How to Recreate Spotify’s “Share to Instagram Stories” Feature Using Clipcat API (Node.js Tutorial)
Contents
Have you ever shared a song from Spotify to Instagram Stories and wondered how they create a story featuring the album art with a video in the background? Something like this…
Spotify allows artists to upload a short, looping visual to their tracks, known as Canvas. This visual appears on the "Now Playing" screen, and when someone shares the track to Instagram Stories, it will play in the background along with the album art.
It’s a small detail, but it makes a big difference. Spotify reported that adding a high-quality Canvas to a track has increased streams by up to 120% and saves by up to 114%, along with noticeable increases in artist profile visits and shares. So if you are building an app, including a similar feature can help drive traffic and increase engagement back to your platform.
In this tutorial, you’ll learn how to build a similar “Share to Instagram Stories” feature for your app using Clipcat’s video rendering API in Node.js. We’ll focus on how to generate a vertical Story video that displays the album art with a background visual, just like how Spotify does it.
What We’re Building
Before we start, let’s take a look at how the feature works:
- The user taps “Share to Instagram Stories” inside your app.
- Your backend sends a request to Clipcat’s API with:
a) The Story template ID
b) Modifications such as the album art image, song title, artist name, and background video URL - Clipcat renders a vertical MP4 video for Instagram Stories.
- Your backend polls Clipcat until the render is completed, then returns the video URL to the app.
The Story you generate will look something like this:
Why Clipcat is the Right Tool for This Job
Clipcat is a cloud video rendering API that lets you create videos programmatically from templates. You only need to design the video template once, then you can use its API to programmatically generate thousands of videos by simply changing the data you send to the API.
Here’s what a template looks like in Clipcat’s template editor:
Using the API, you can dynamically update elements in the template, like:
- Text (e.g., titles, captions, quotes)
- Images (e.g, profile pictures, logos, product photos)
- Videos (e.g., user-uploaded clips or animated backgrounds)
Clipcat will handle all the heavy video processing in the cloud. Your app doesn’t need FFmpeg, GPU support, or any rendering engine.
Pre-requisites
- Node.js installed on your machine
- A Clipcat account (sign up for a free account here, no credit card needed!)
How to Recreate Spotify’s “Share to Instagram Stories” Feature Using Clipcat in Node.js
To keep things simple, we’ll create a Node.js script that demonstrates how to call Clipcat’s API to generate the Story video. Once you understand the flow, you can easily integrate the same logic into your existing backend!
Step 1. Create a Clipcat Template
Sign in to Clipcat and create a new project in your account. Then, duplicate the template below to your project by clicking "Use This Template" :

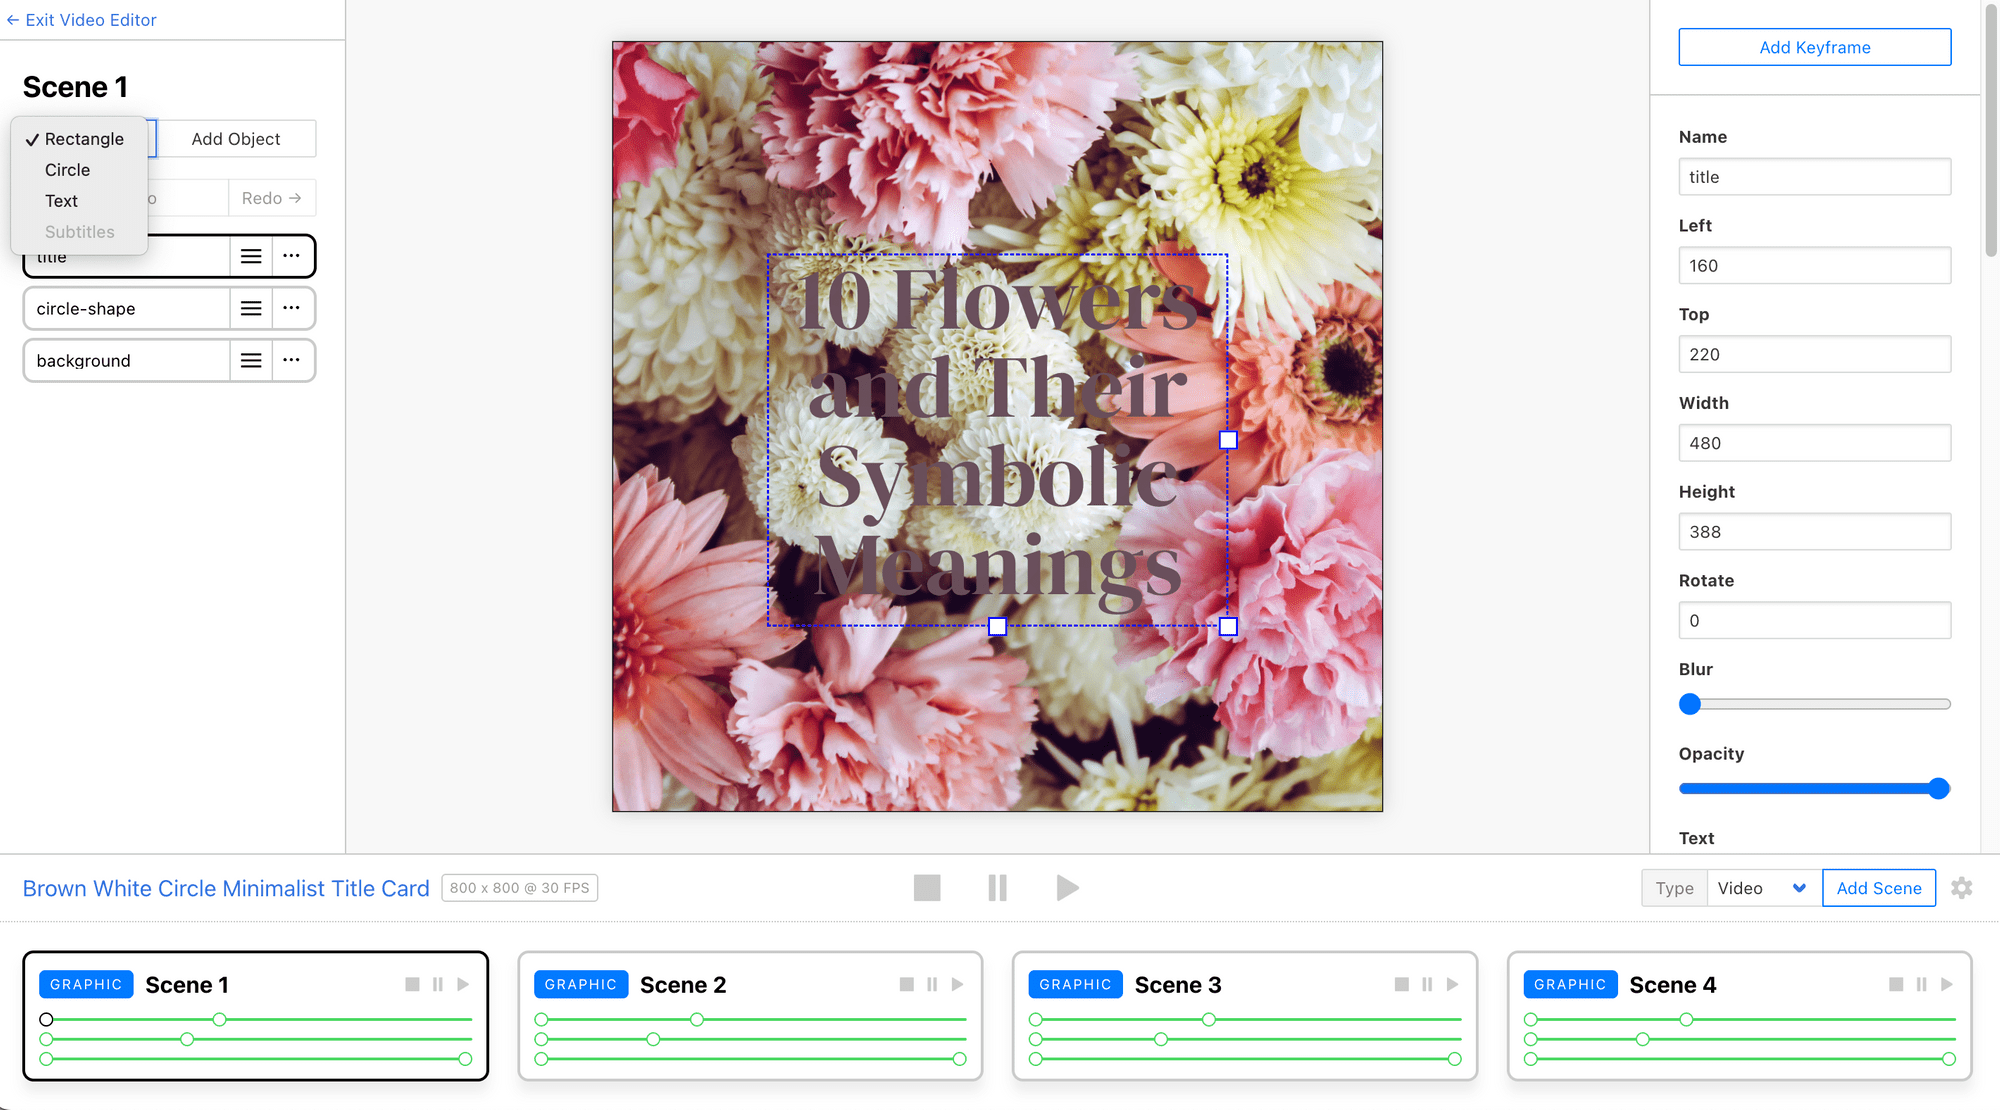
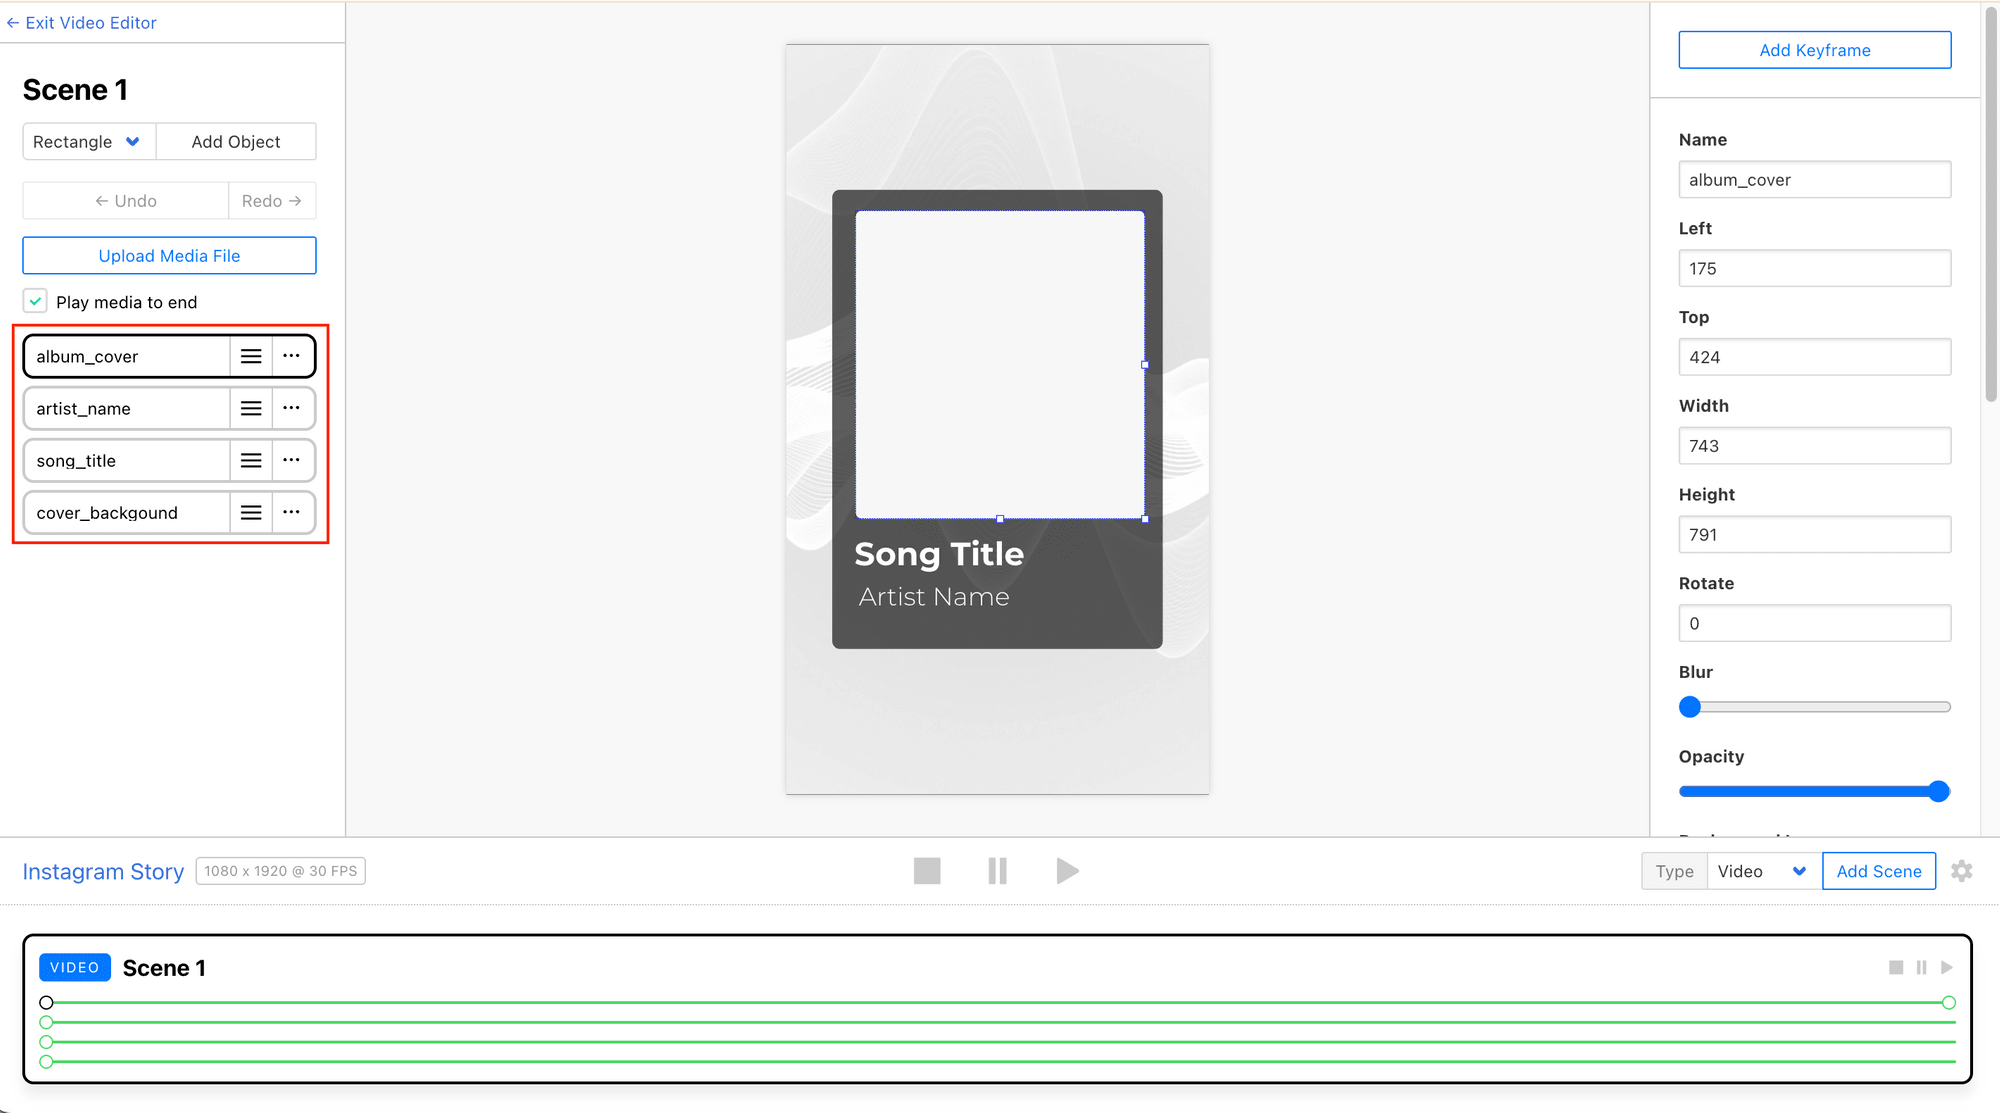
The template we're using in this tutorial has only one video scene, with text objects like song_title and artist_name, as well as a rectangle object like album_cover:
🐱 Meow Memo: Read this guide to learn more about how to customize a video template in Clipcat.
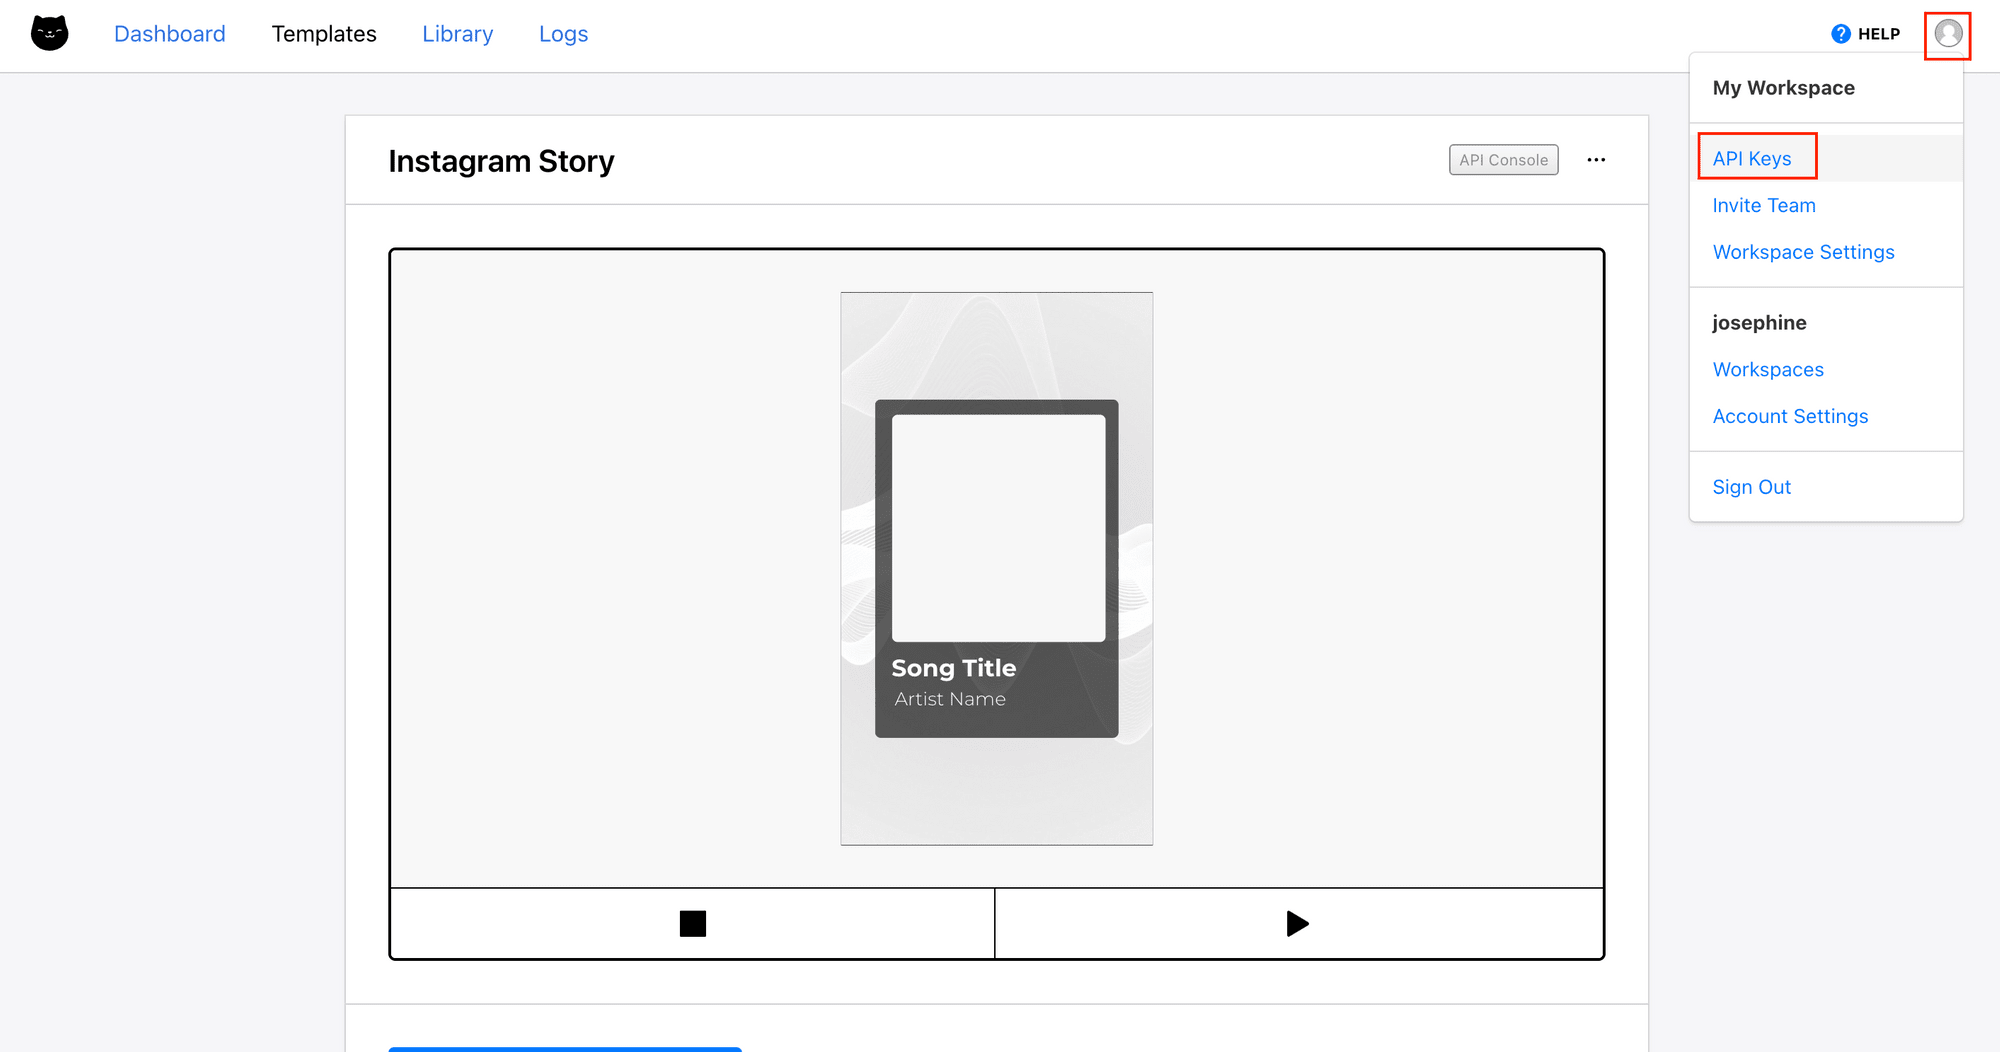
Step 2. Get Your Clipcat API Key and Template ID
Exit the video editor. On the top right corner, click on your profile icon > API Keys. From there, you will find your API key:
To get the template ID, click on the three dots on the top right corner of your template:
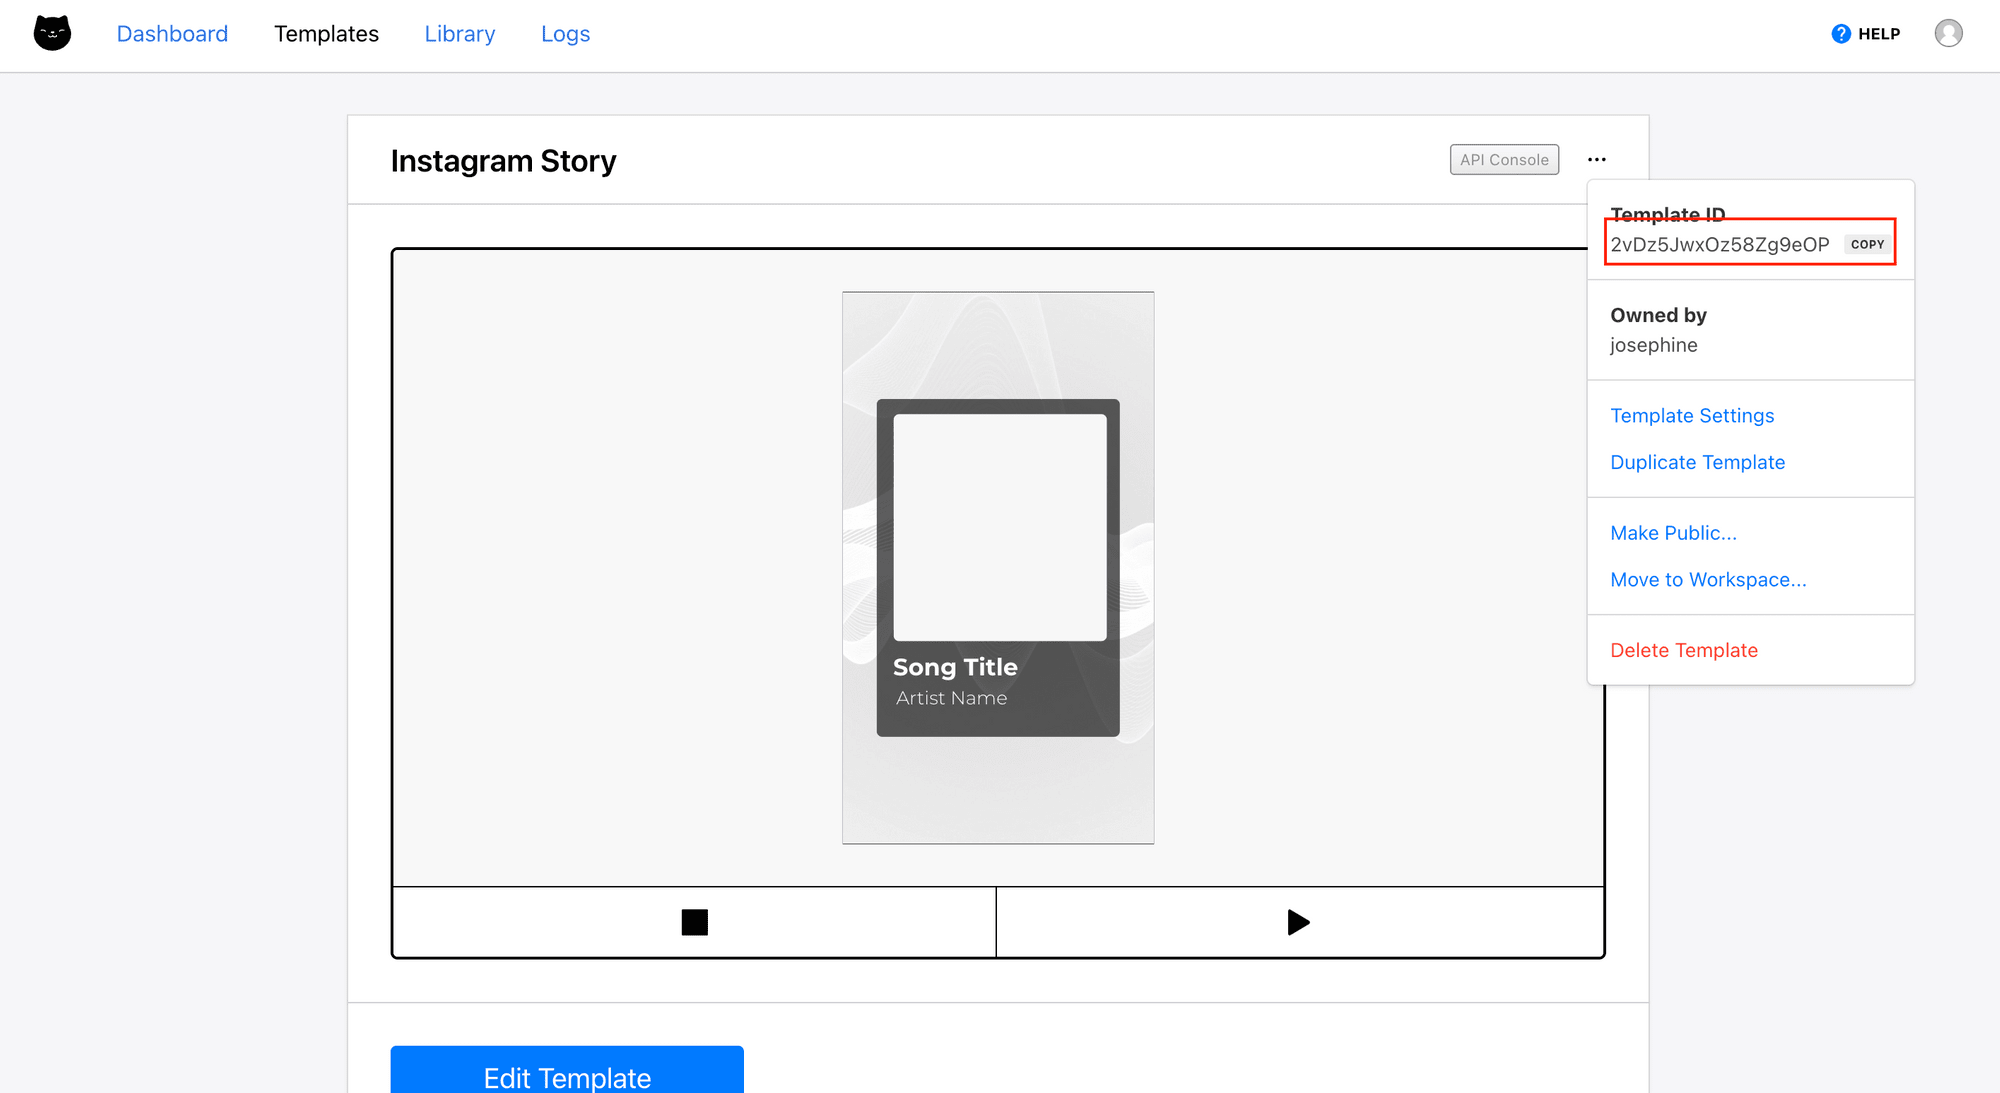
Copy and keep them somewhere safe. We will use them in the Node.js project later.
Step 3. Initialize a Node.js Project
In your terminal/command prompt, run the commands below to create a new project and initialize a new Node.js project in it:
mkdir share-to-ig
cd share-to-ig
npm init
Then, create an .env file and store your Clipcat API key and template ID there:
CLIPCAT_API_KEY=your_clipcat_api_key
CLIPCAT_TEMPLATE_ID=your_clipcat_template_id
Step 4. Writing the Code
Create a file named index.js for writing the script. The script will perform three core tasks, managed by three separate functions:
generateVideo(): Submits aPOSTrequest to Clipcat to start the video rendering job.getVideo(): Submits aGETrequest to Clipcat to check the status of the rendering job.main(): Executes the workflow—initiate the job and then poll until the video is complete.
In the script, add the function below to start the video rendering job and return the render ID:
async function generateVideo() {
  var data = {
    template: process.env.CLIPCAT_TEMPLATE_ID,
    modifications: [
      {
        scene: 'Scene 1',
        media_url: 'your_background_video_url',
      },
      {
        scene: 'Scene 1',
        object: 'album_cover',
        'background-image': 'your_album_cover_url',
      },
      {
        scene: 'Scene 1',
        object: 'song_title',
        text: 'your_song_title',
      },
      {
        scene: 'Scene 1',
        object: 'artist_name',
        text: 'your_artist_name',
      },
    ],
  };
  const res = await fetch('https://api.clipcat.com/v1/renders', {
    method: 'POST',
    body: JSON.stringify(data),
    headers: {
      'Content-Type': 'application/json',
      Authorization: `Bearer ${process.env.CLIPCAT_API_KEY}`,
    },
  });

  const resData = await res.json();
  const renderUid = resData.uid;

  return renderUid;
}
The modifications property is a list of changes that you want to apply to the objects in your template.
🐱 Meow Memo: To learn more about what you can add to the
modificationsproperty, check out Clipcat’s API Reference.
Next, add the function below to check if the job is done and return the video URL:
async function getVideo(renderUid) {
  const res = await fetch(`https://api.clipcat.com/v1/renders/${renderUid}`, {
    method: 'GET',
    headers: {
      Authorization: `Bearer ${process.env.CLIPCAT_API_KEY}`,
    },
  });

  const data = await res.json();
  const videoUrl = data.url; // 'url' will only have a value when the render is complete.

  console.log(videoUrl);
  return videoUrl;
}
Finally, call the two functions in the main function to trigger the video rendering and retrieval processes:
async function main() {
  const renderUid = await generateVideo();

  let videoUrl;

  while (!videoUrl) {
    console.log(`Polling the result for render ID: ${renderUid}...`);
    videoUrl = await getVideo(renderUid);
    await new Promise((resolve) => setTimeout(resolve, 5000)); // wait 5 seconds before checking again
  }
}

main();
The getVideo() function is called continuously at an interval of 5 seconds (to avoid overwhelming the API) until the job finishes rendering and the video is ready.
Step 5. Run the Script
Let’s run the script to test it. In your terminal/command prompt, run the command below:
node index.js
You should see logs like:
Polling the result for videoID: 67B9jxV8g2GD8G5Ery...
null
Polling the result for videoID: 67B9jxV8g2GD8G5Ery...
null
Polling the result for videoID: 67B9jxV8g2GD8G5Ery...
https://media.clipcat.com/renders/67B9jxV8g2GD8G5Ery/final/6e8472e9001cdda20f40c967cccd0c2bc354f0b9.mp4
Paste the final URL into a browser, and you should be able to view the video. Here’s an example of the result video:
That’s how easy it is to recreate an Instagram Story just like Spotify’s! Now, you can modify the code to fit this feature into your own project. Remember to also include a clickable link so viewers can tap through and get redirected to your app.
What’s Next
Spotify’s “Share to Instagram Stories” feature is one of many examples of what you can build using a template-based video rendering API like Clipcat. There are other things you can do with the template design that are not covered in this tutorial, such as adding multiple scenes, keyframes, transitions, and effects. All these can make the videos even more interesting and engaging.
If you’d like to learn more, check out these articles: