How to Automate Video Generation with Clipcat and Google APIs (Node.js Tutorial)
Contents
If you're building something that requires generating videos with a consistent format, such as user testimonials, product highlights, weekly updates, or short explainer videos, this tutorial is for you. In this guide, you'll learn how to automate video generation using Clipcat (a video generation tool) and Google APIs in Node.js.
Automating video generation not only saves you time on repetitive editing tasks but also helps you maintain brand consistency across large batches of videos by generating them from a reusable template. With a simple setup that connects Clipcat to your media assets and data stored in Google Sheets via Google APIs, you can streamline the whole editing process and generate videos automatically.
To show you how the whole thing works, we’ll build a simple Node.js script that:
- Reads user testimonials and photos from a Google Sheets (responses from a Google Form submission)
- Inserts them into a Clipcat video template
- Automates the video rendering and output
…so in the end, you’ll be able to generate videos like these using the script:
It’s a straightforward workflow, and by the end of it, you’ll have a working Node.js script that you can integrate into form submissions, scheduled scripts, backend services, or anything else you need!
Prerequisites
Before we begin, make sure you have the following:
- Node.js and npm installed
- Access to Google Sheets and Google Drive
- A Google Cloud account
- A Clipcat account
- An Imgur account (for hosting the images)
Preparing the Data
Google Forms automatically saves all responses in a linked Google Sheet, and any uploaded photos will be stored in a folder in your Google Drive. You can access them using the Google APIs.
🐱 Meow Memo: However, the images in Google Drive can’t be used directly in Clipcat. So, we’ll need to upload those images to Imgur first and use the Imgur URLs instead (we’ll show you how to work around this).
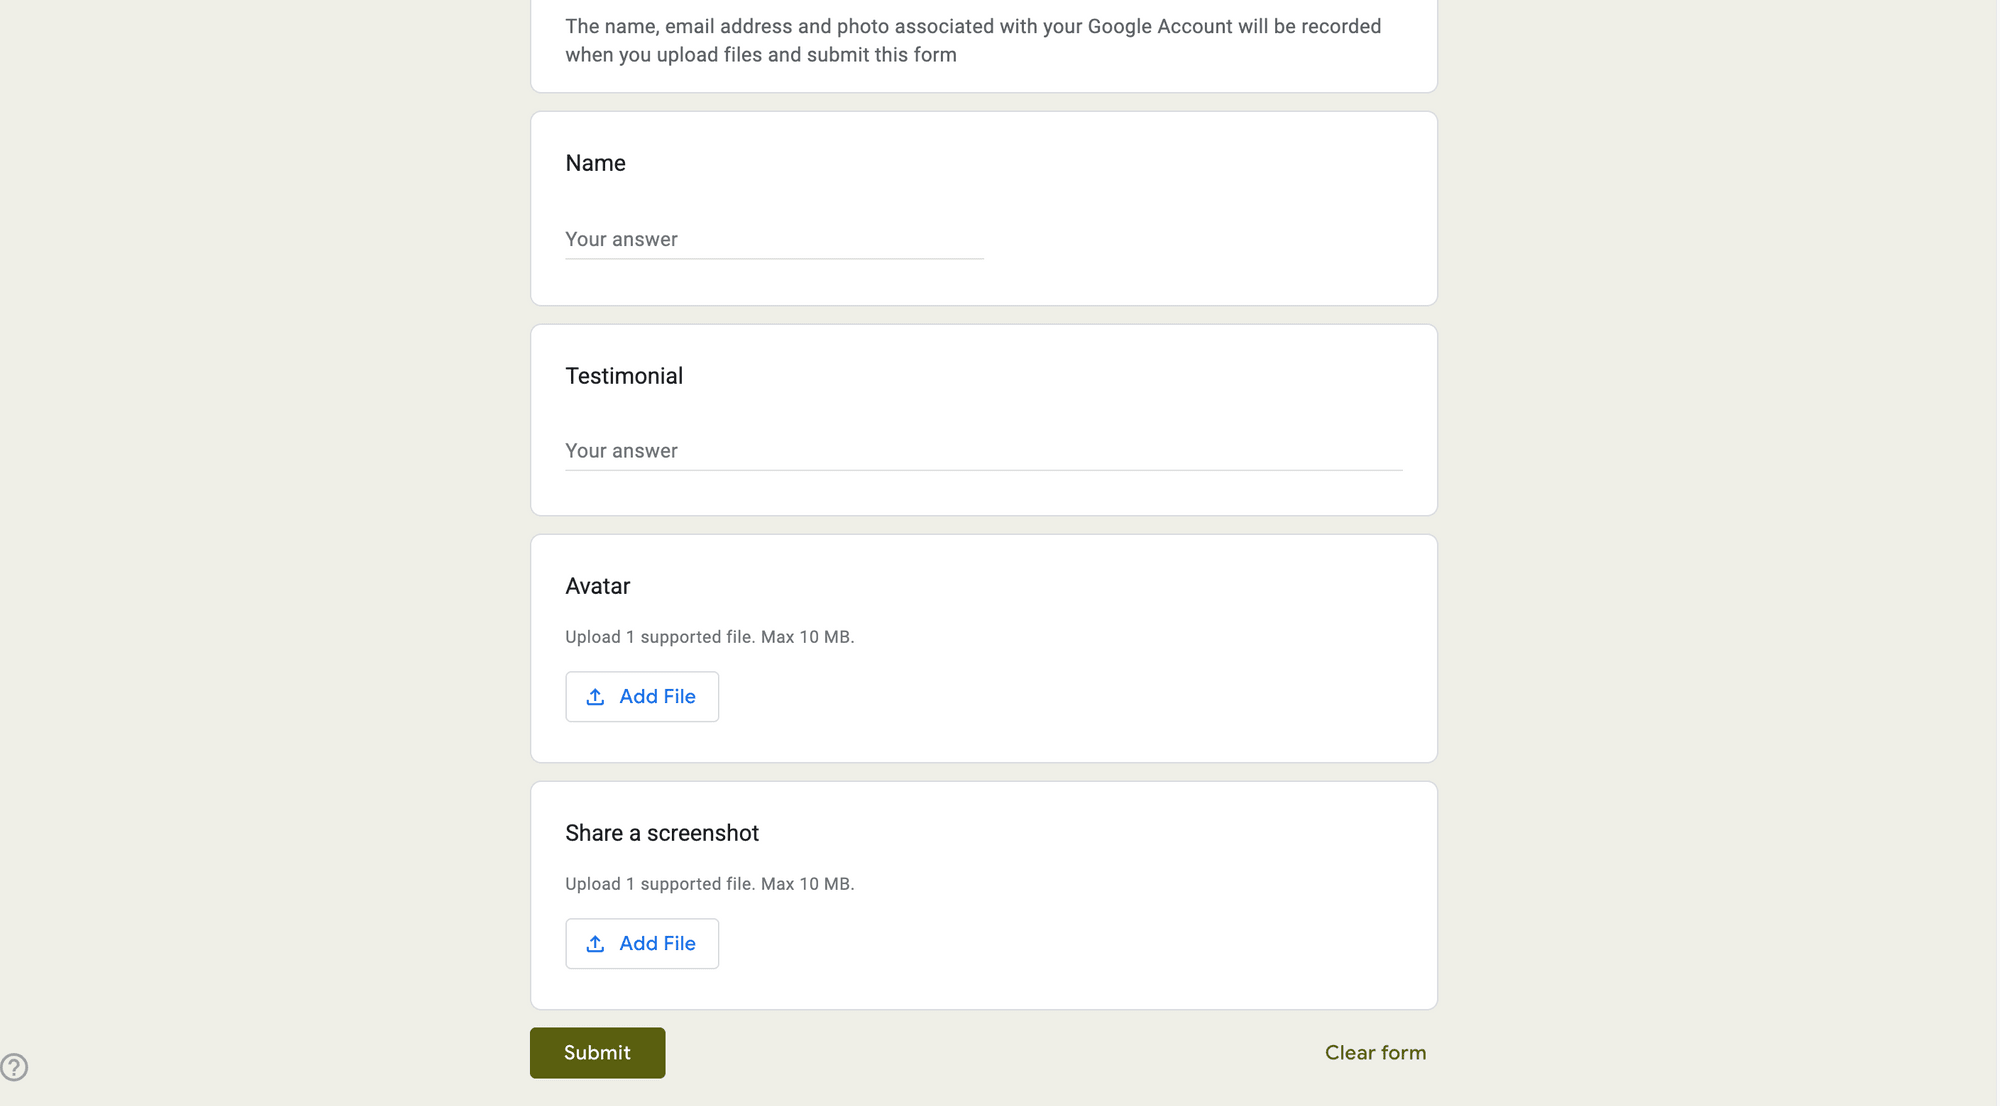
The Google Form collects the user’s name and testimonial, and lets them upload an avatar or profile photo along with an image related to their testimonial:
You can view all the responses in the linked Google Sheet, which you can access from the “Responses” tab in your Google Form edit page:
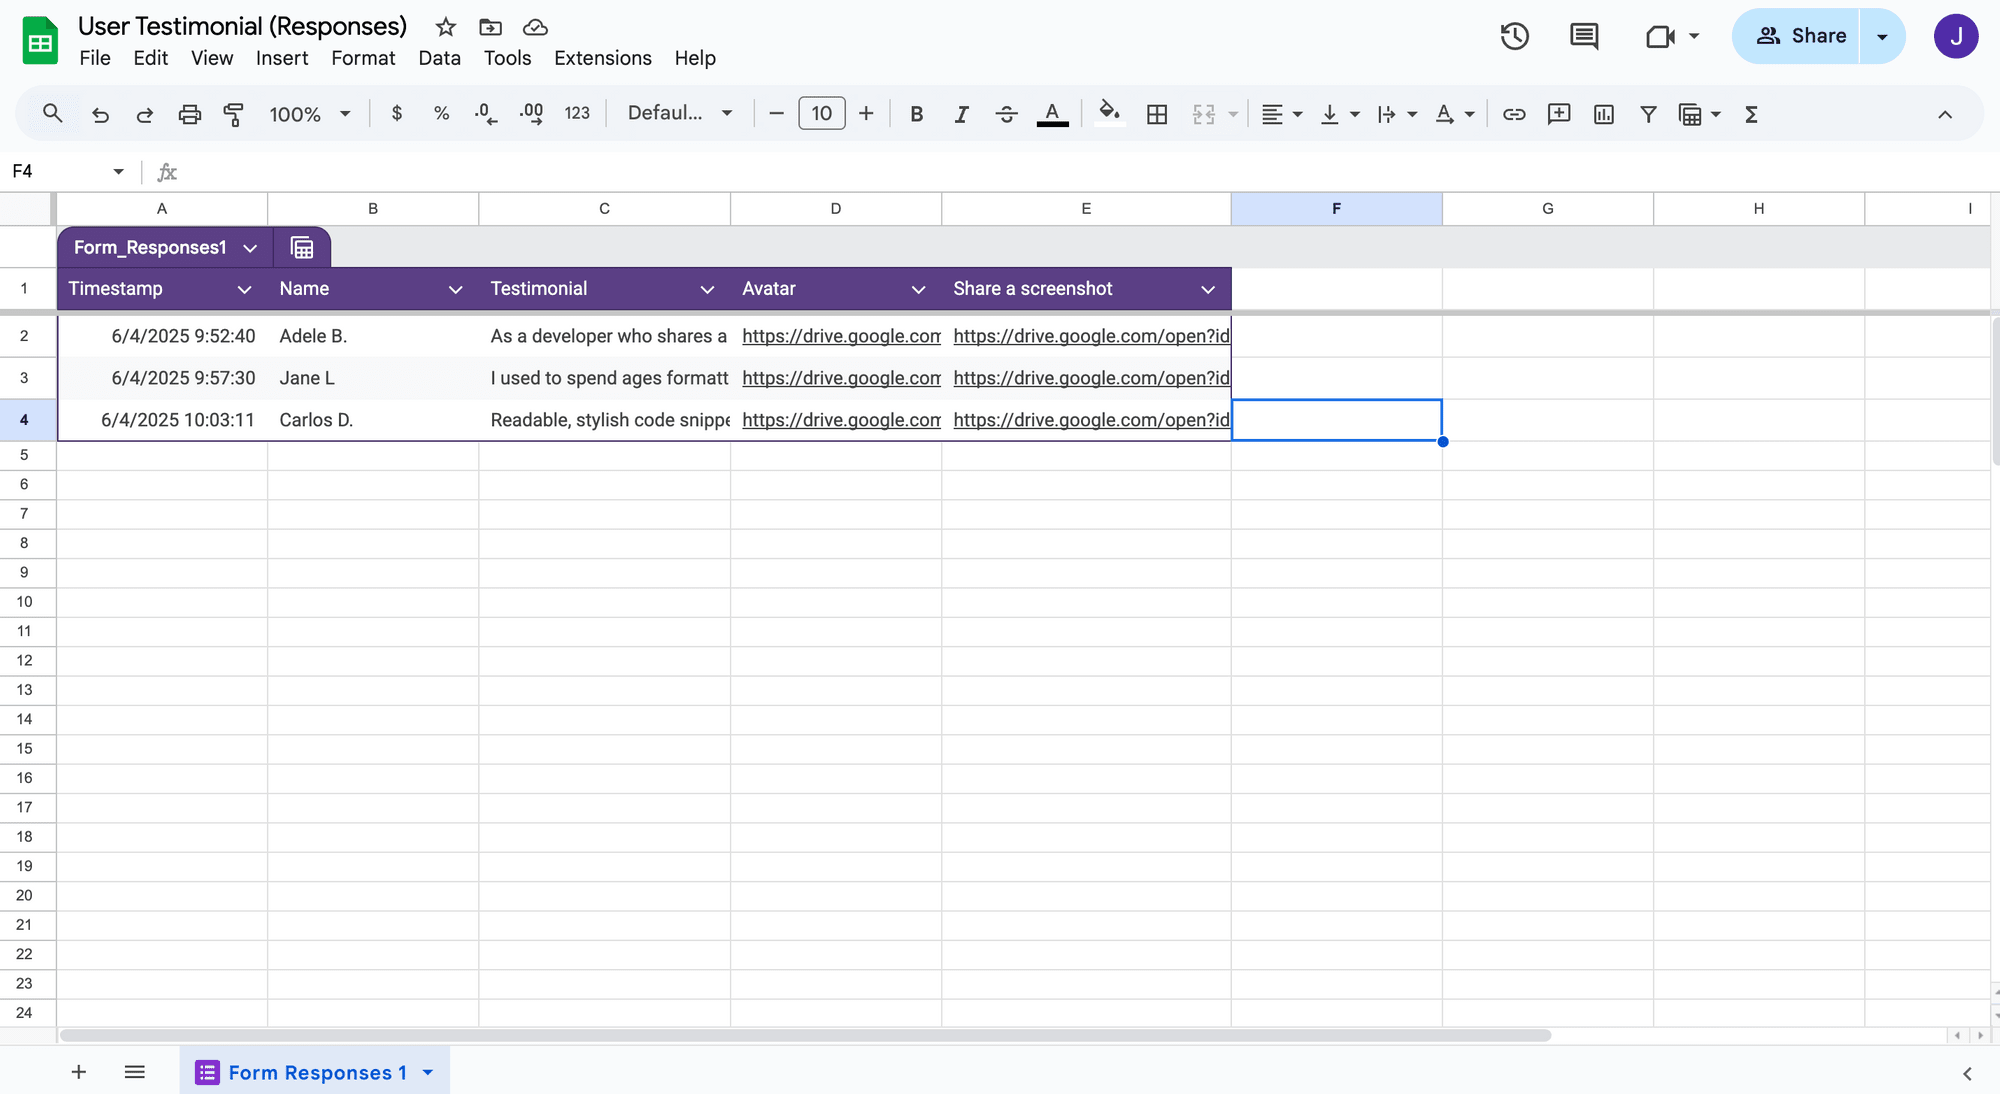
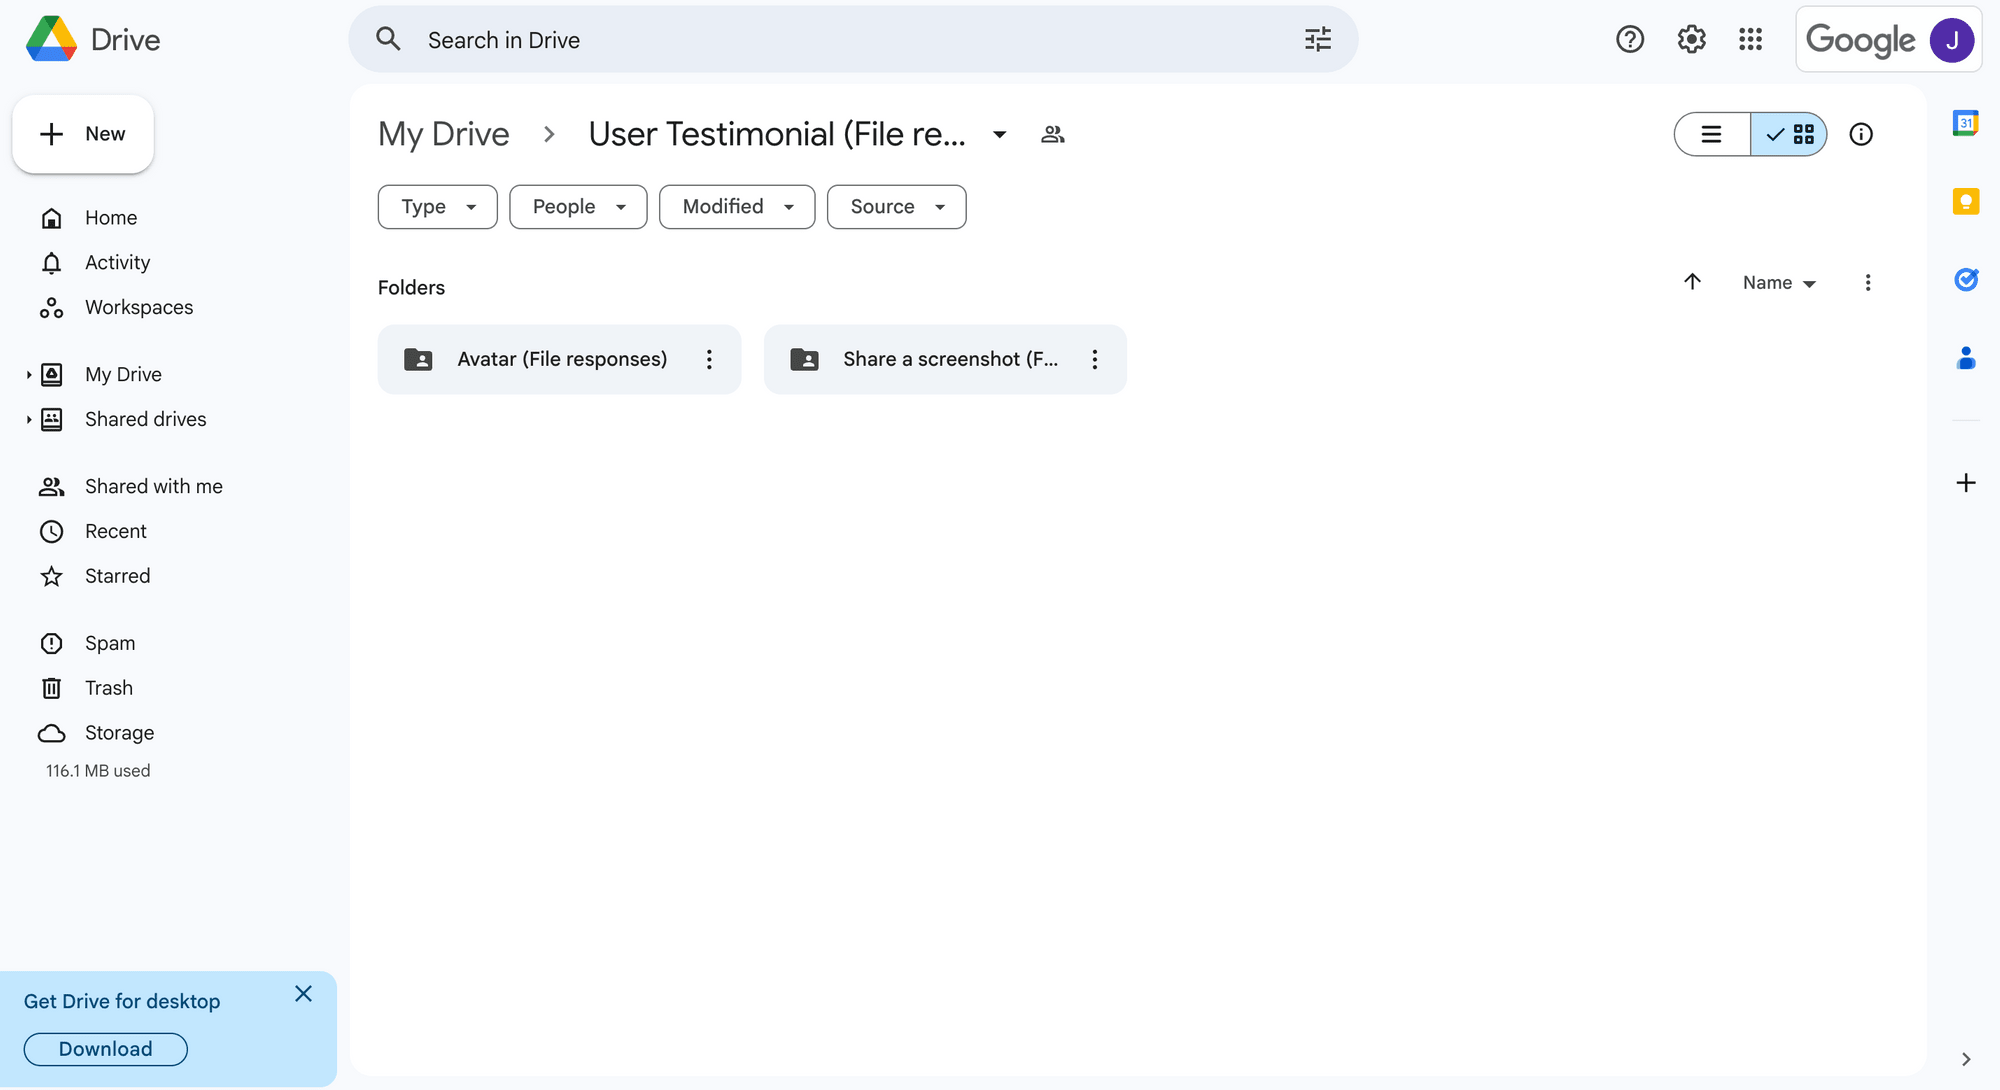
The image URLs are displayed in the Google Sheet, and the actual image files are stored in a folder in your Google Drive:
This gives you everything you need to personalize each video with the user’s name, testimonial, and photo.
Preparing the Clipcat Design Template
First, sign up for a Clipcat account and create a new project in your account. Then, duplicate the template below to your project by clicking "Use This Template" :
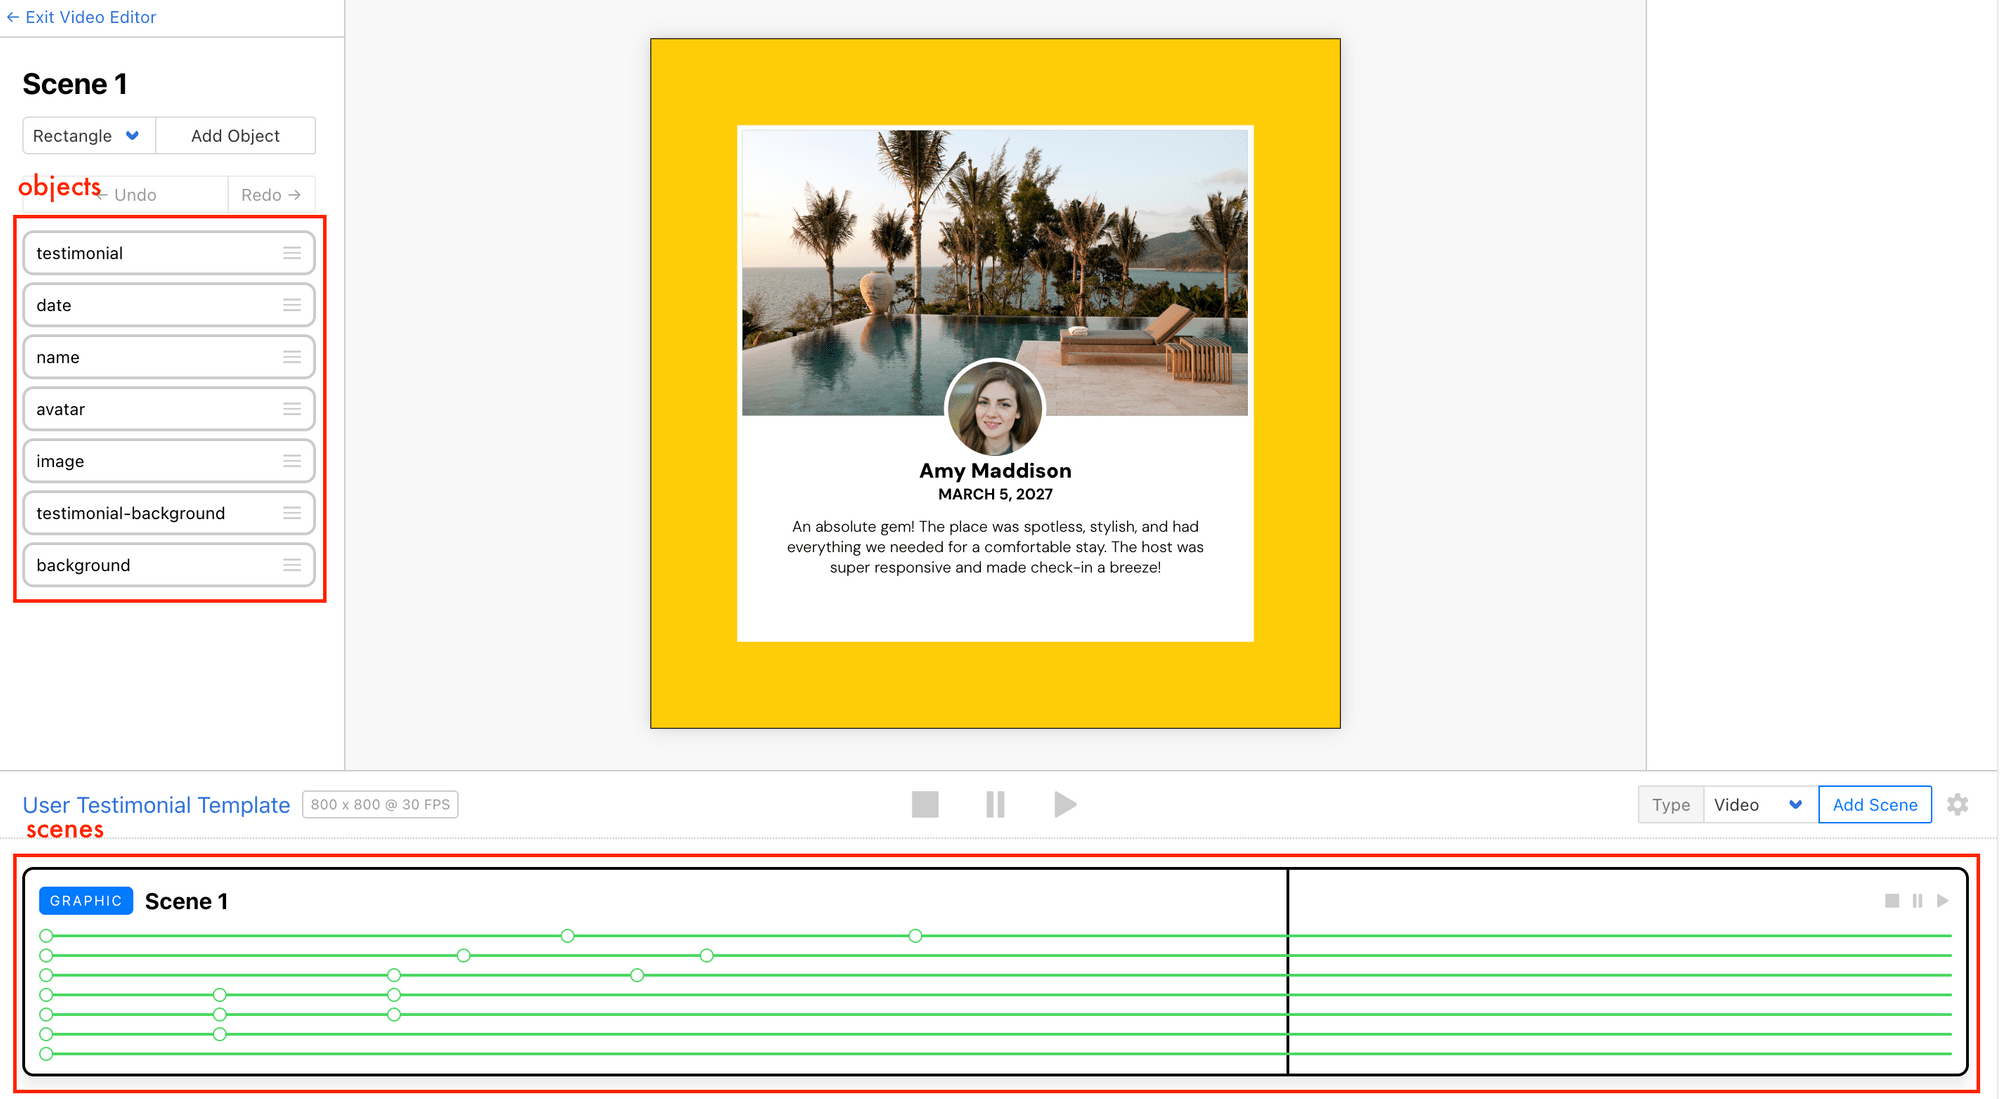
A Clipcat video template can include multiple graphic or video scenes, each one made up of different objects like text or shapes (rectangles or circles). You can update these scenes and objects directly through Clipcat’s API, and this lets you generate different videos dynamically without touching the editor.
The template we're using in this tutorial has one video scene, with text objects like name, date, and testimonial, as well as shape objects like avatar, image, and background:
🐱 Meow Memo: Read this guide to learn more about how to customize a video template in Clipcat.
Setting Up API Access and Credentials
Before you can start fetching data or generating videos, you'll need to set up API access and authentication for Google Sheets, Google Drive, Clipcat, and Imgur.
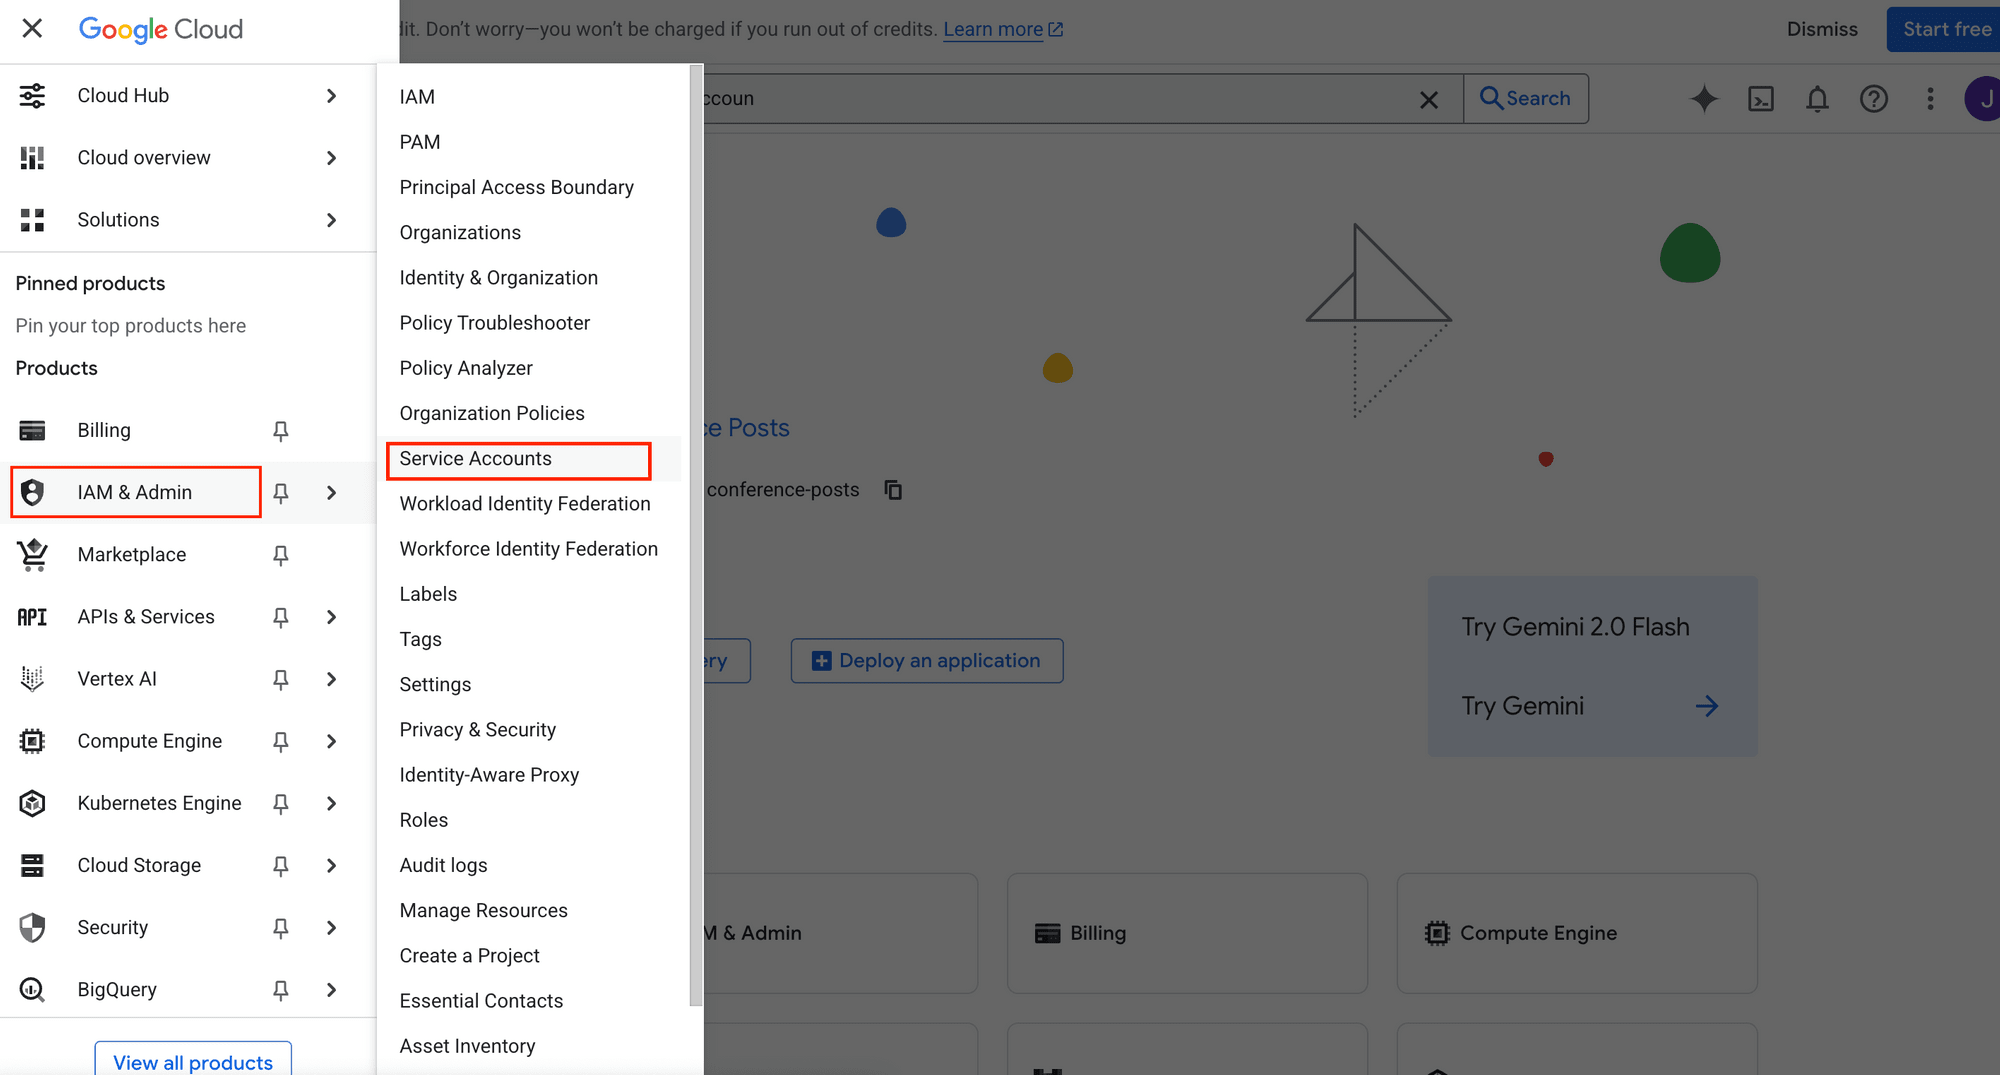
1. Google Sheets API (via Google Service Account) and ID
Go to the Google Cloud Console and create a new project (or use an existing one). Then, navigate to IAM & Admin → Service Accounts:
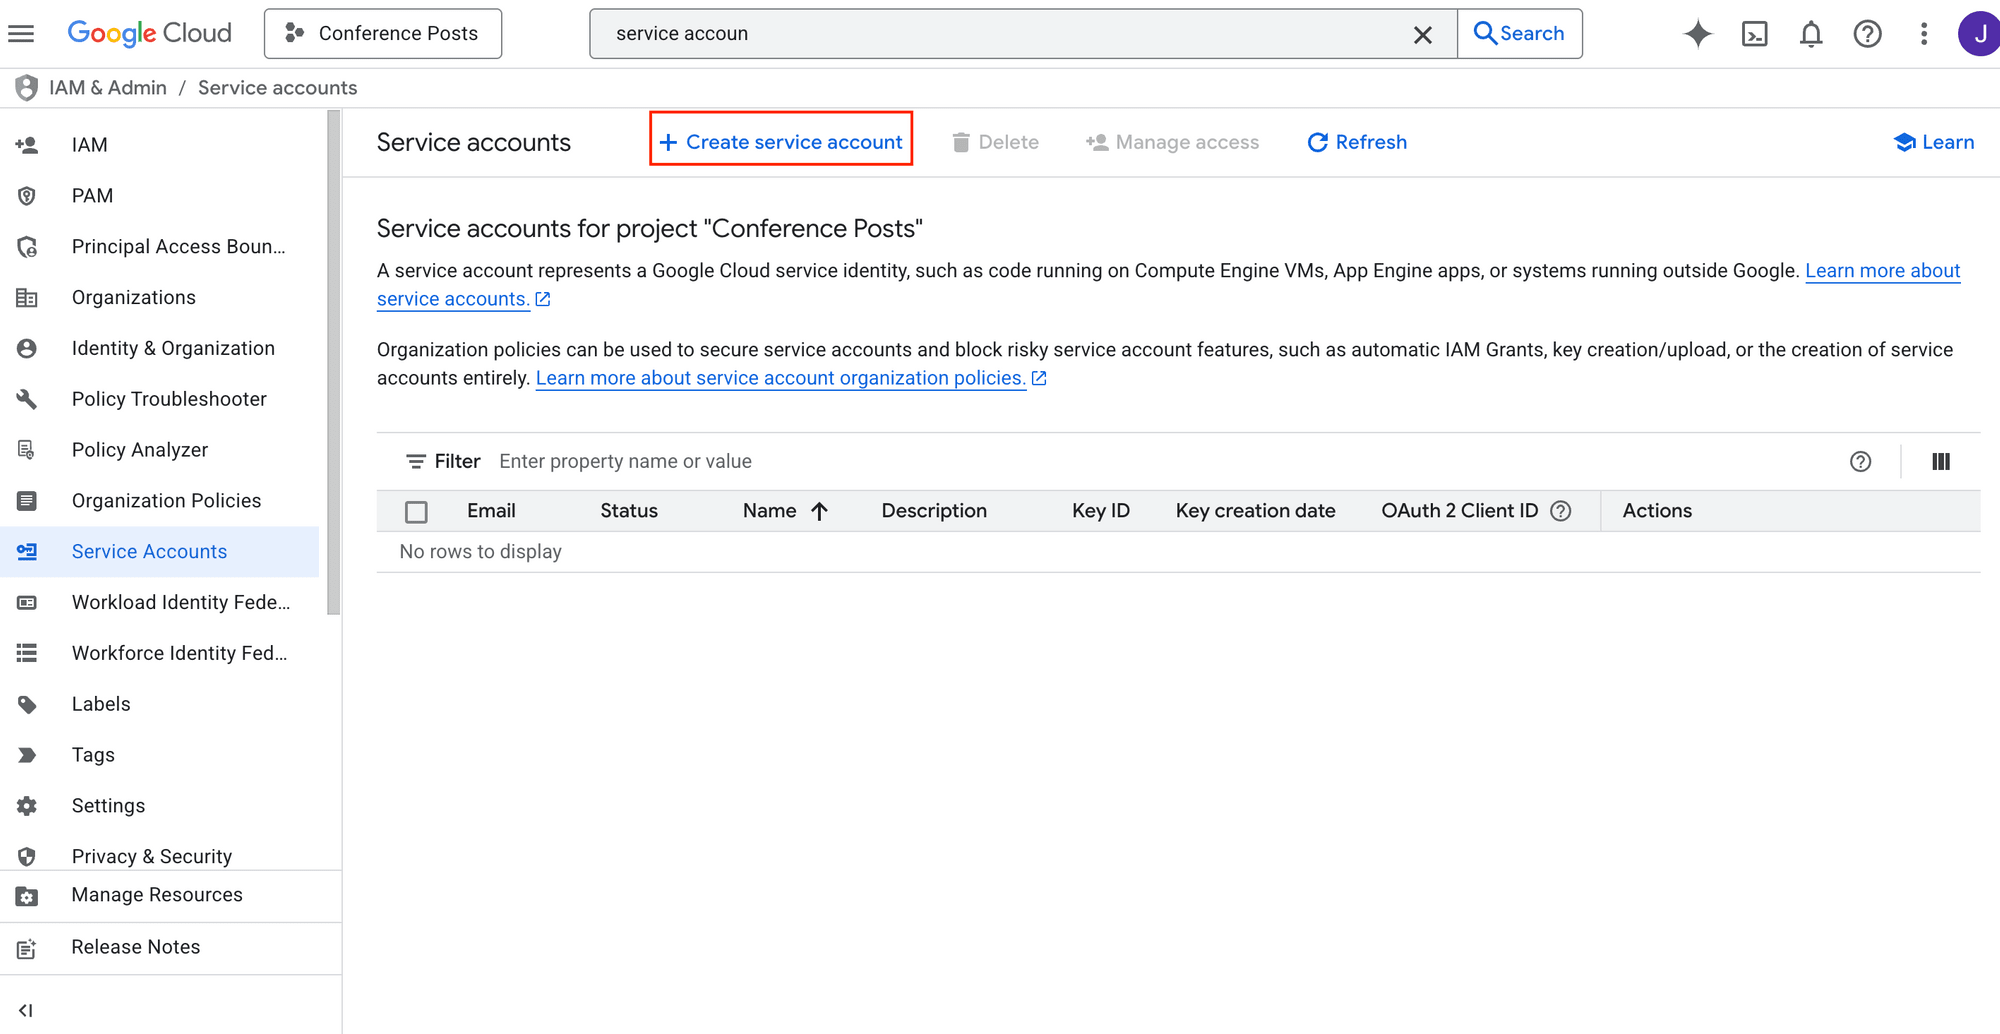
Click “Create service account” :
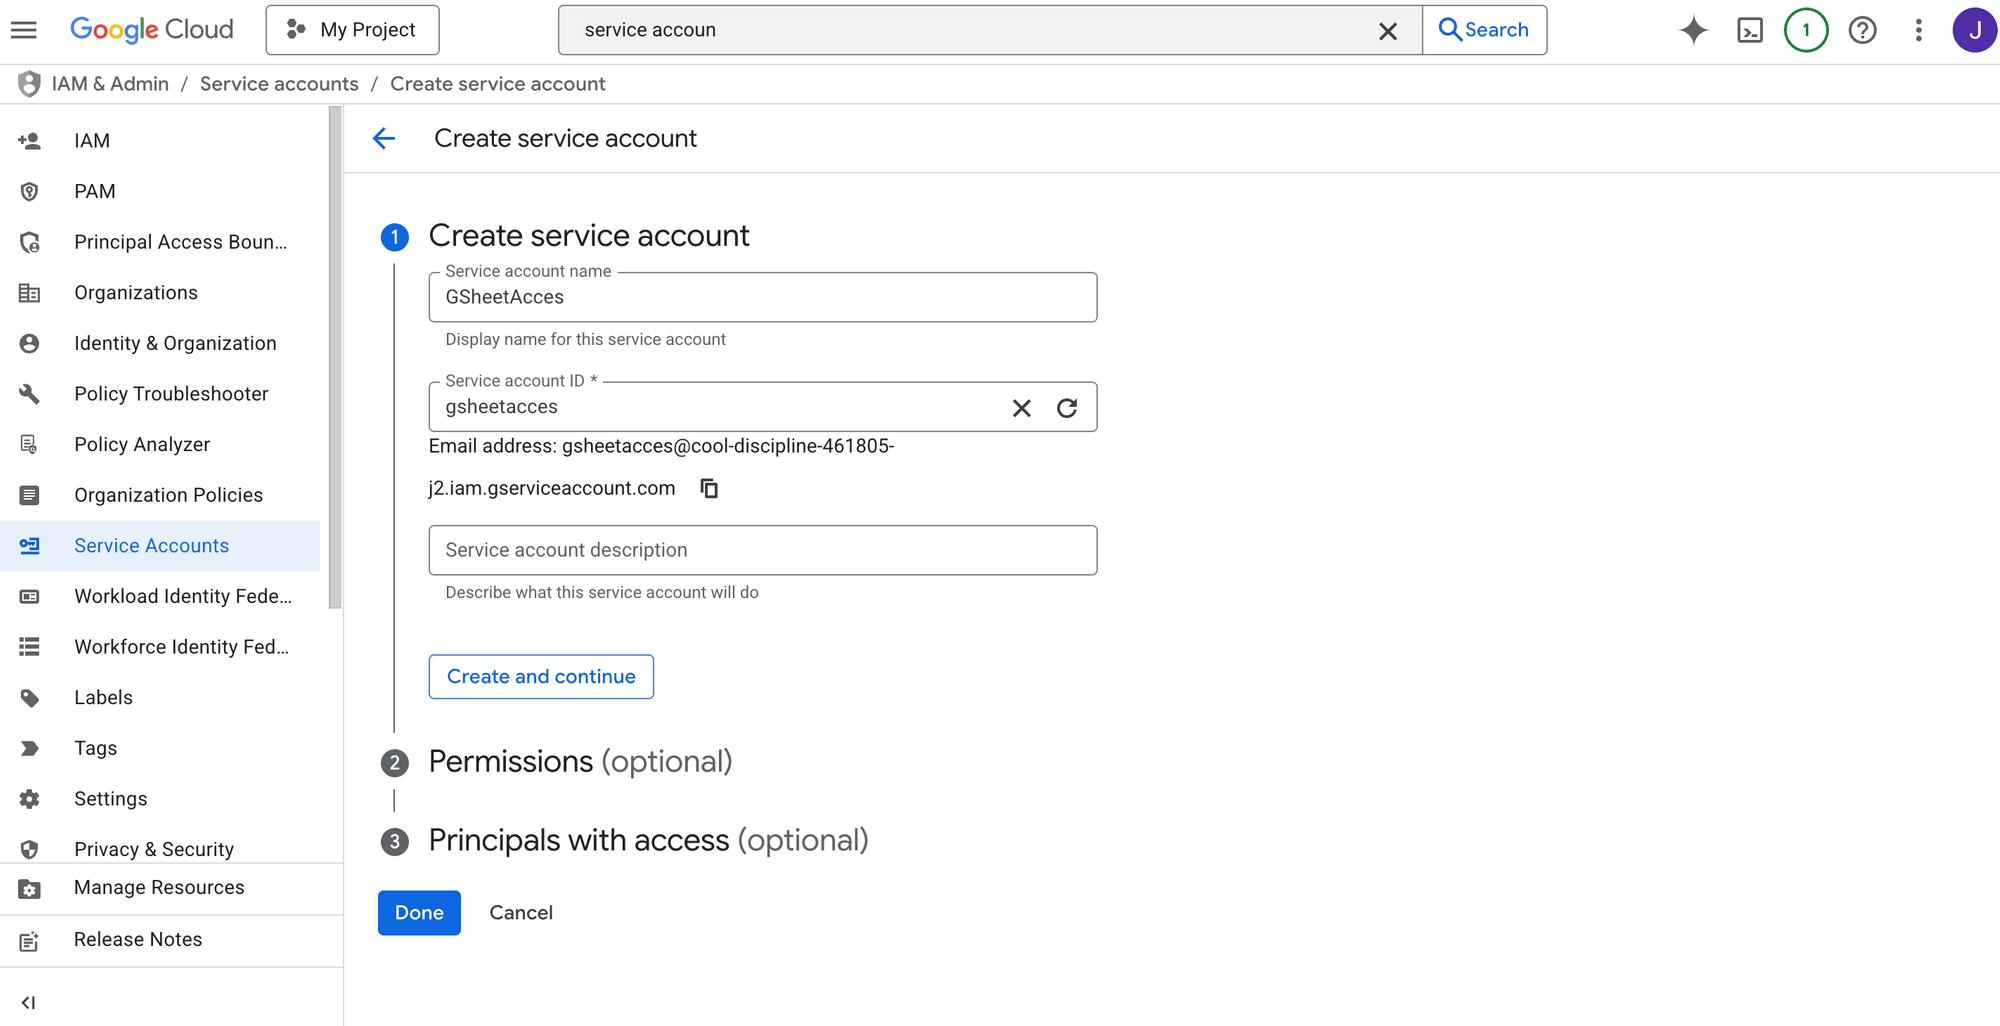
Fill in the information needed and click “Done” to continue:
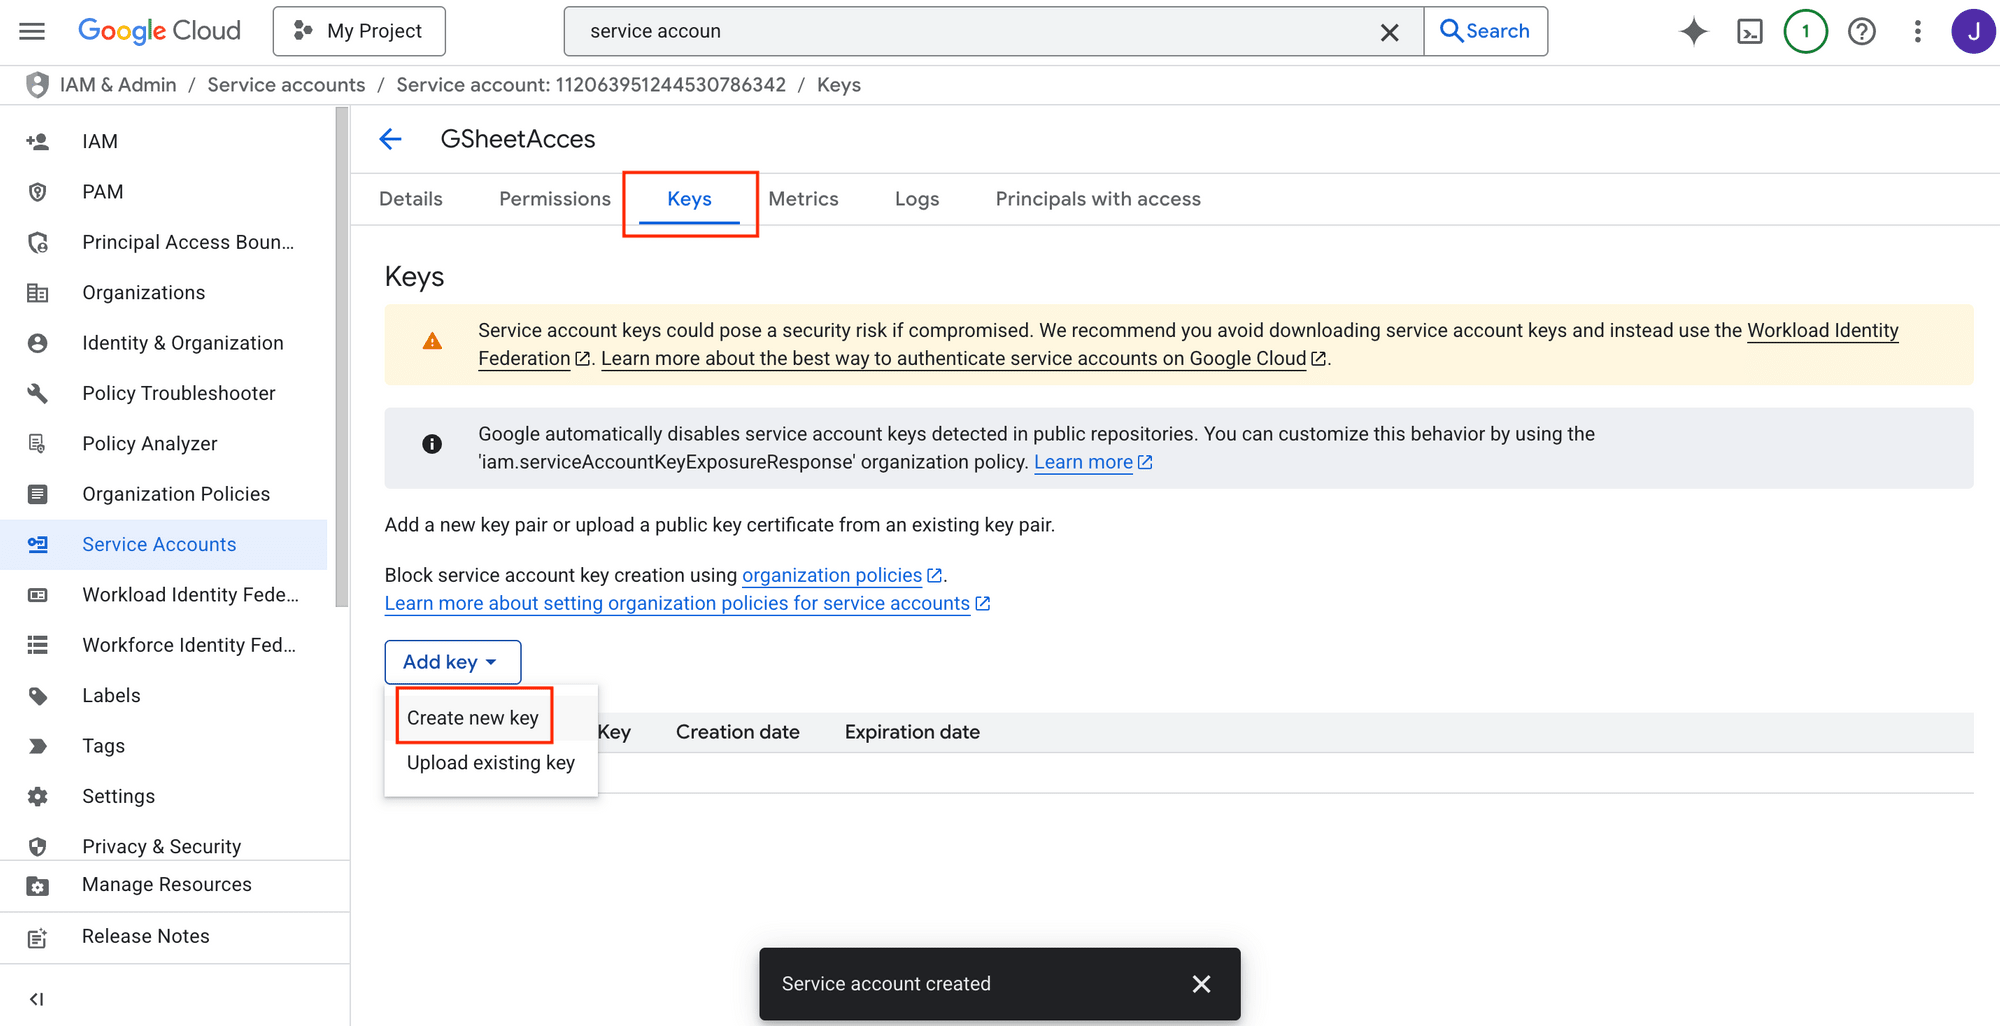
Then, go to the Keys tab and click “Add key” → “Create new key” :
Select JSON as the key type and click “Create” to complete:
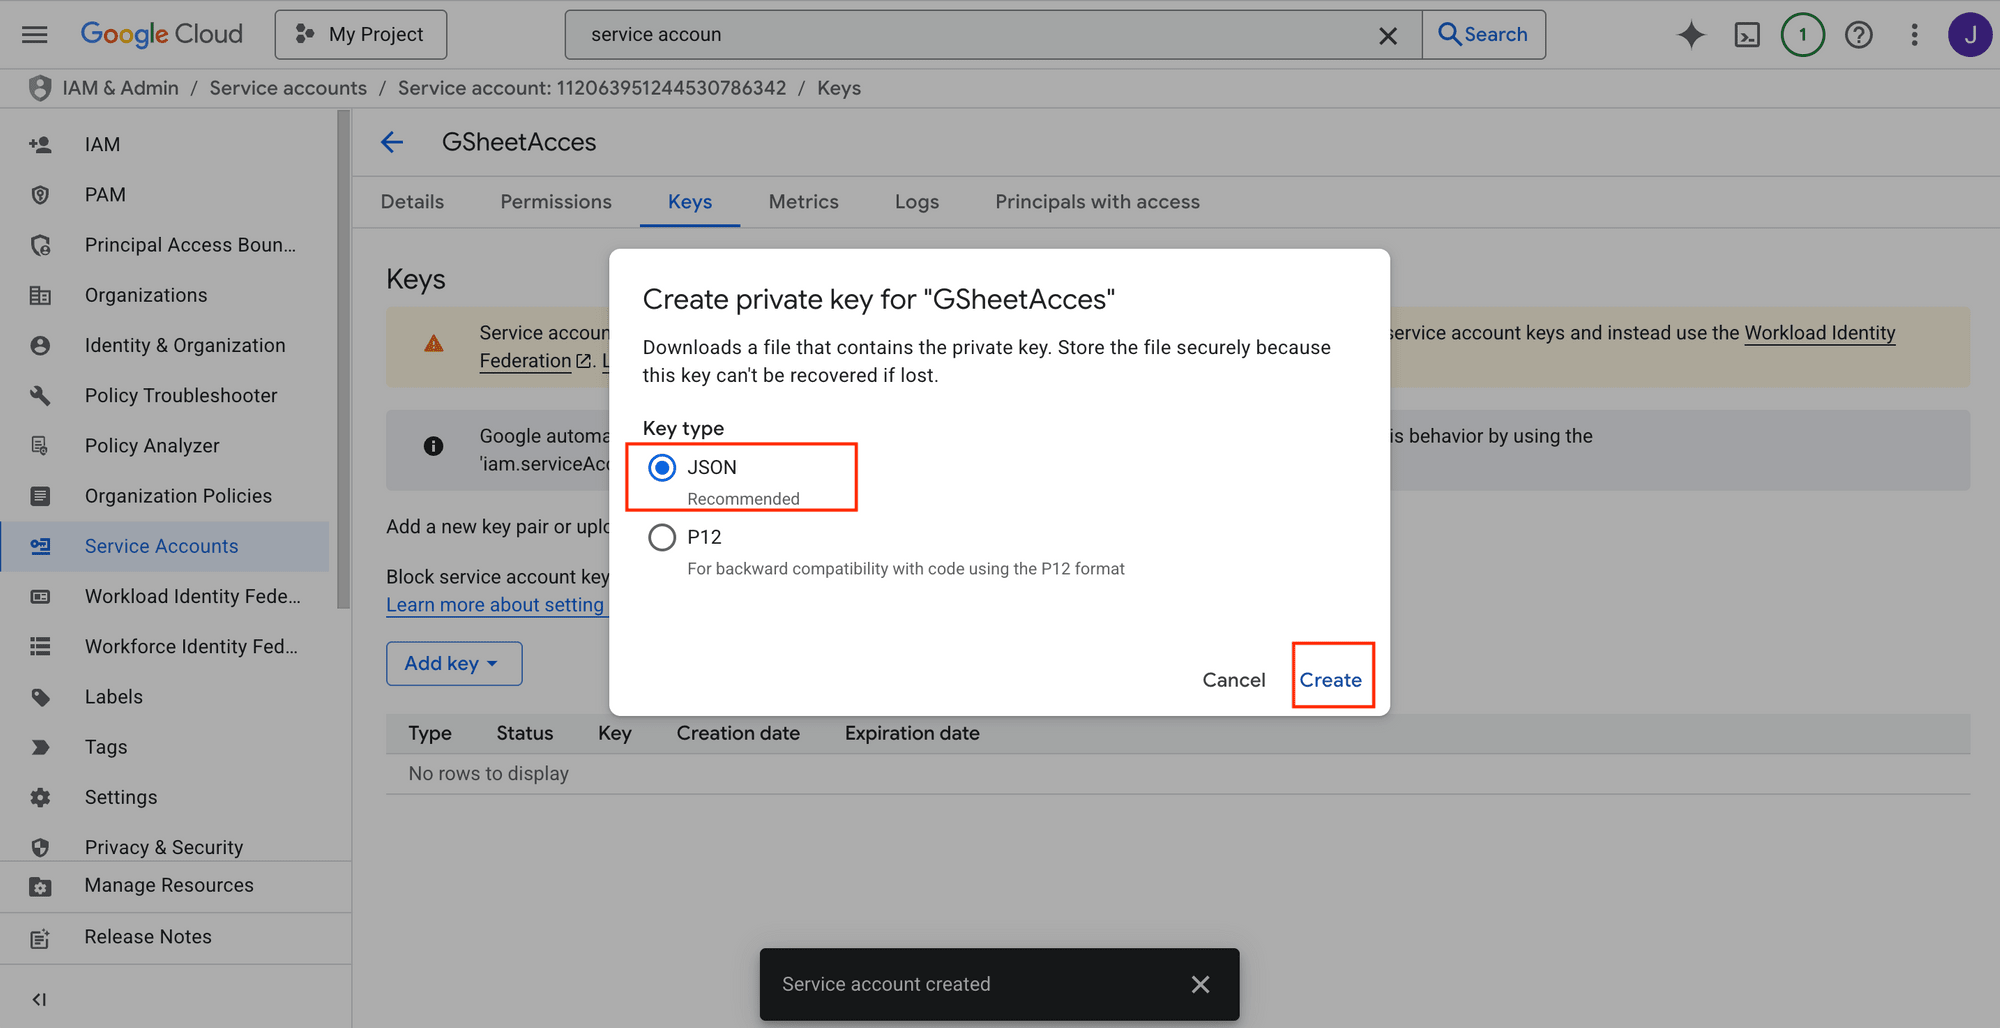
A JSON file will be downloaded automatically, and we will need it in our script later to access the Google API.
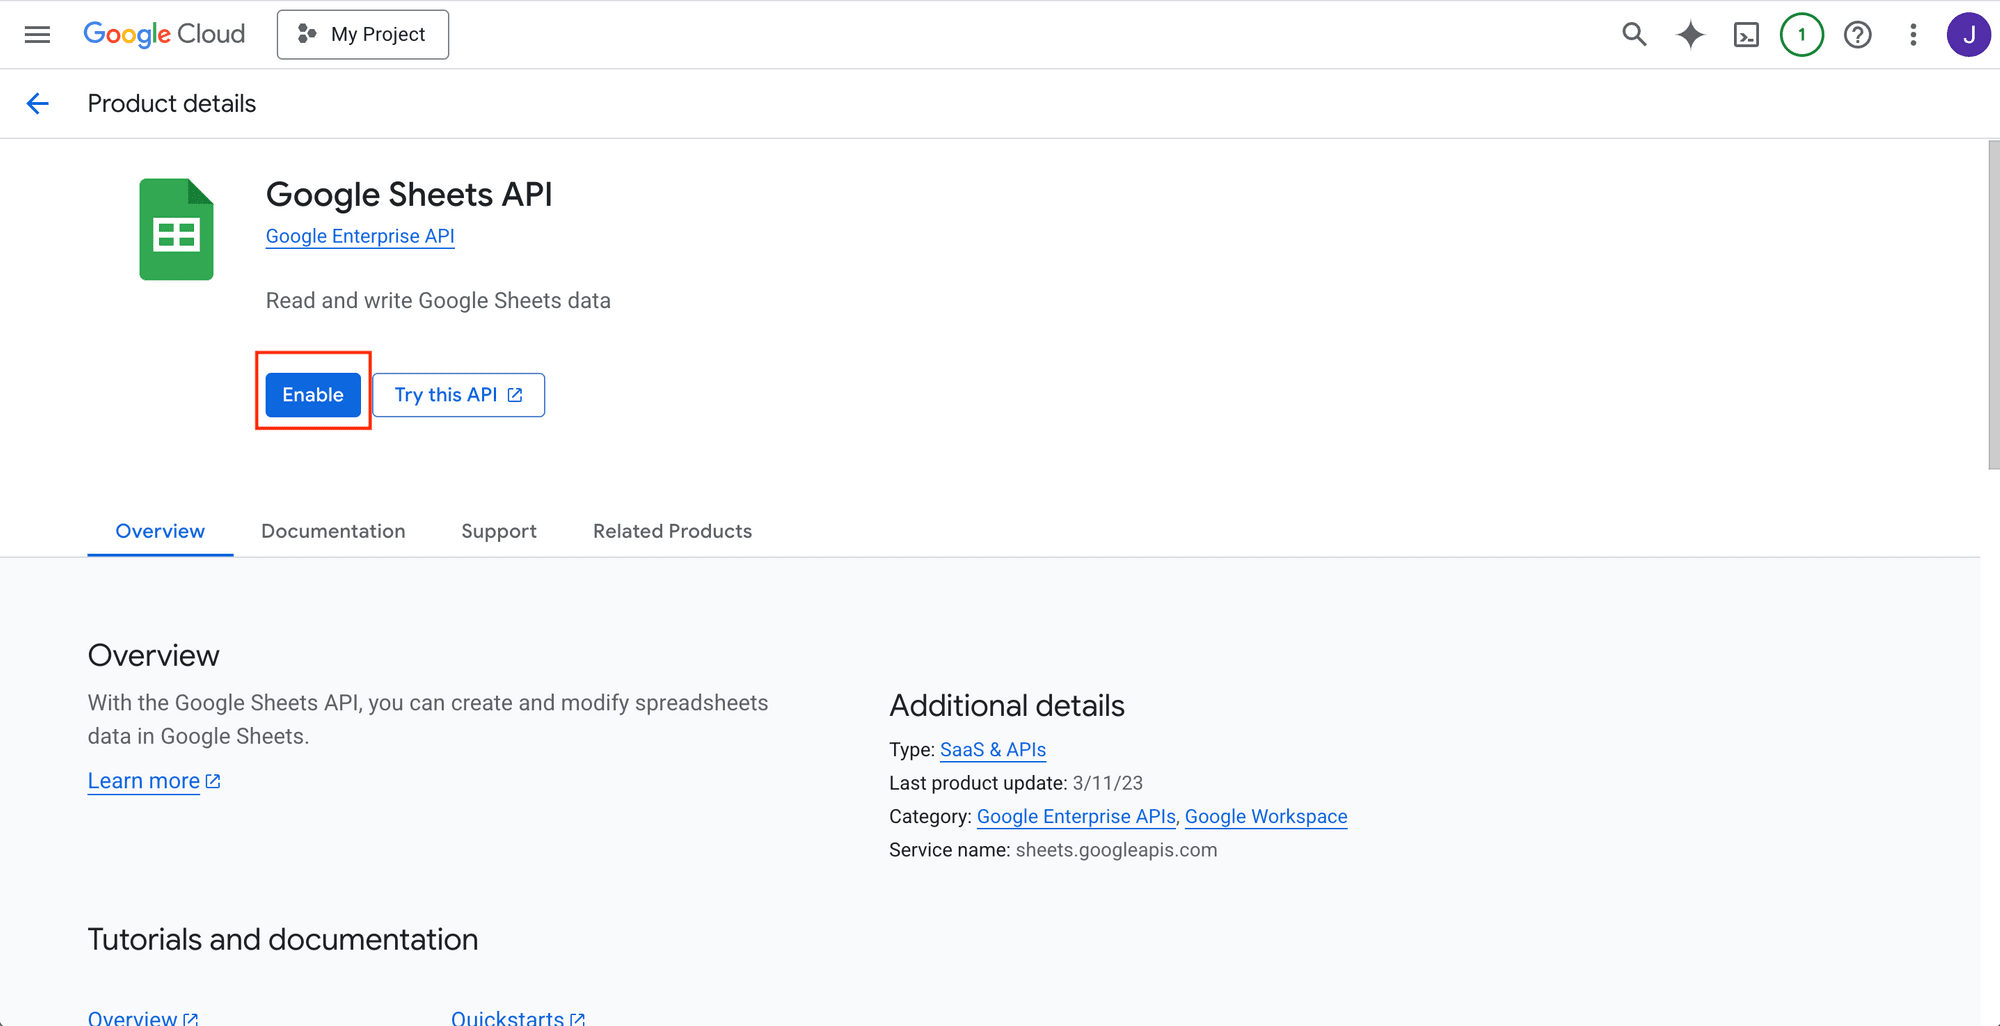
Next, enable the Google Sheets API in the API Library:
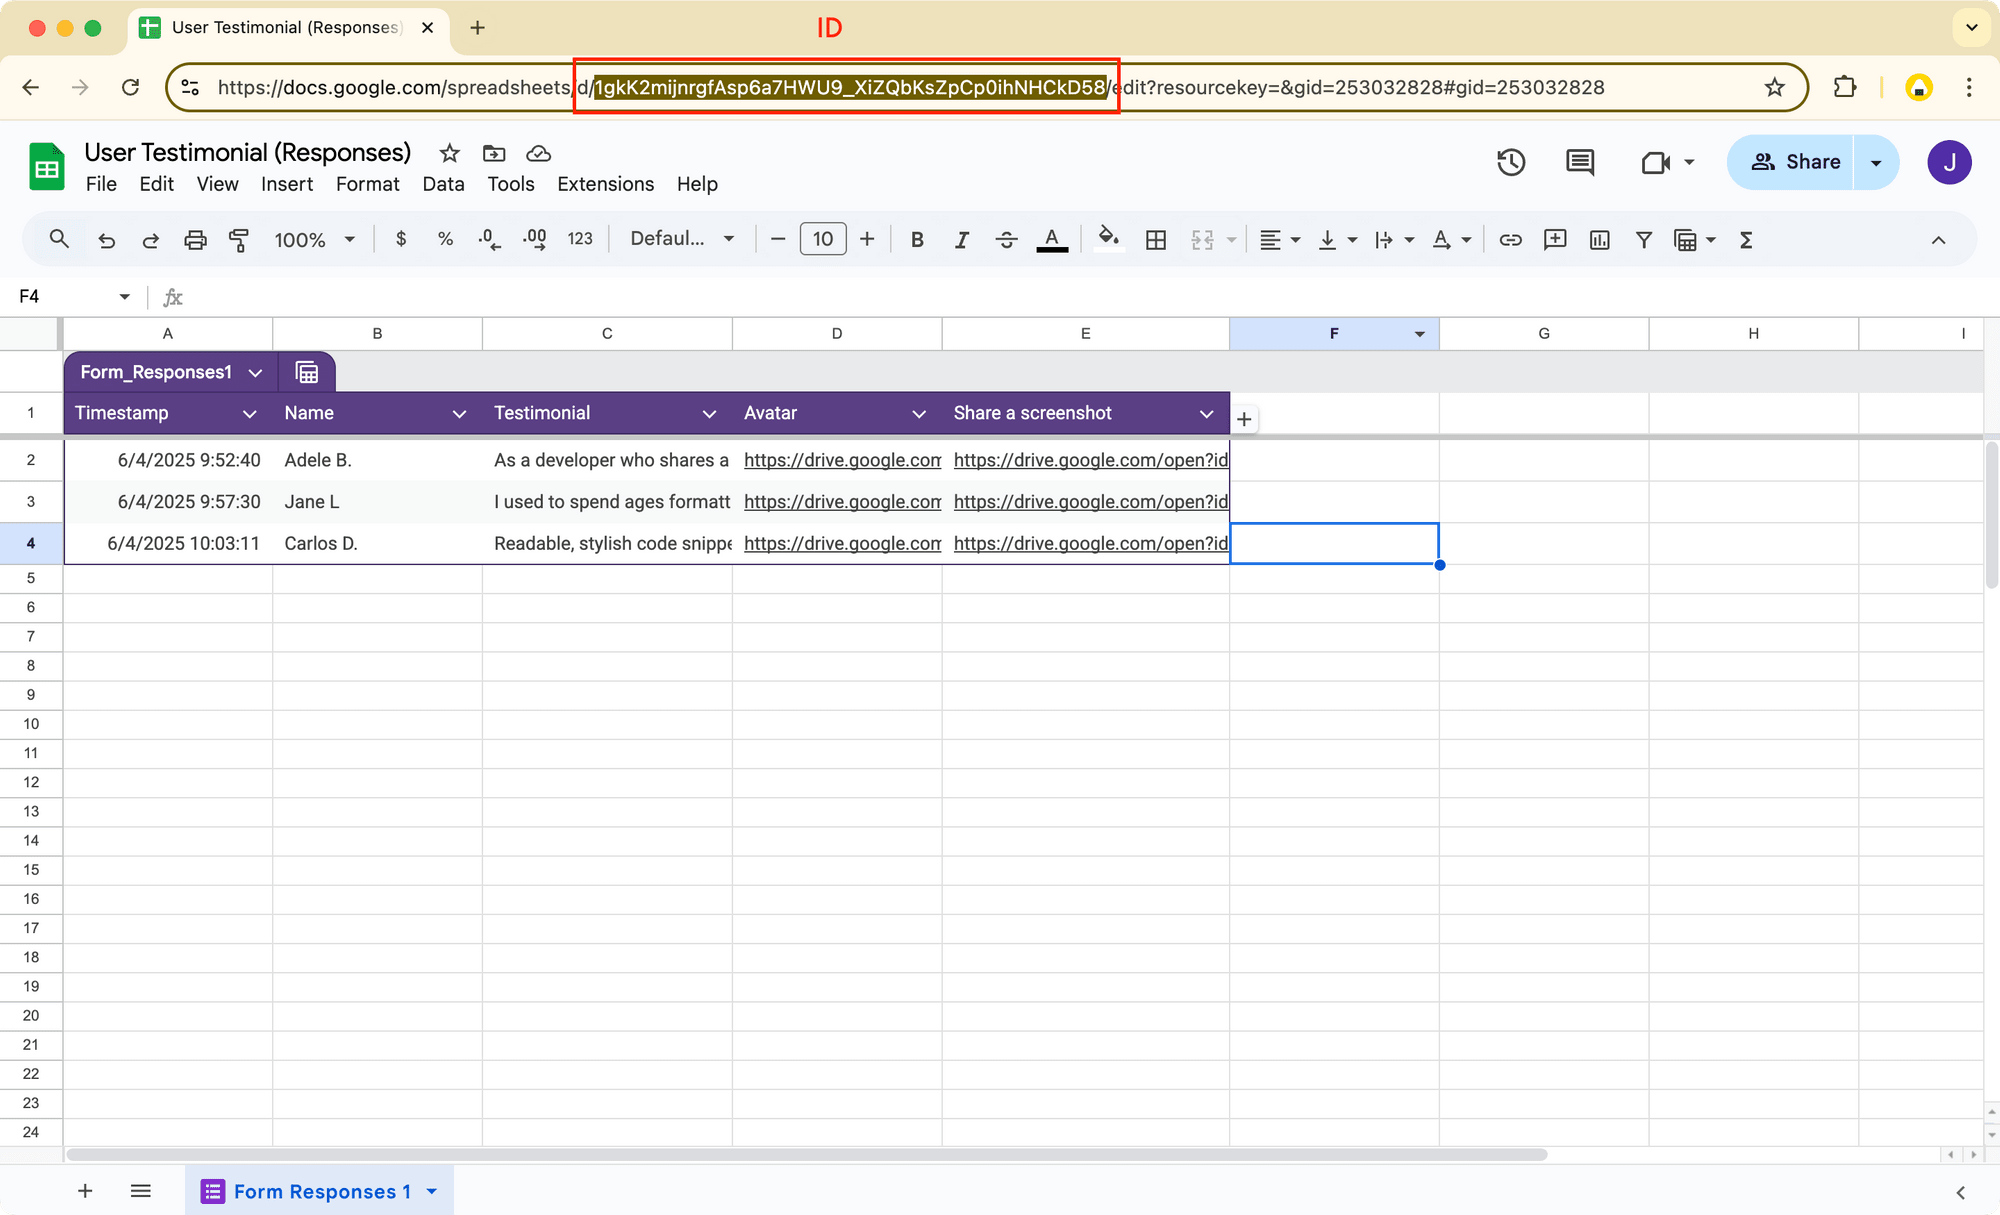
You’ll also need your Google Sheets ID, which you can find in the URL between d/ and /edit:
Make sure to also:
- Share your Google Sheet: Click “Share” , add your service account email, and grant Editor access
- Set your Google Drive image folder’s sharing settings to “Anyone with the link” so the images can be accessed by the script.
2. Clipcat API Key and Template ID
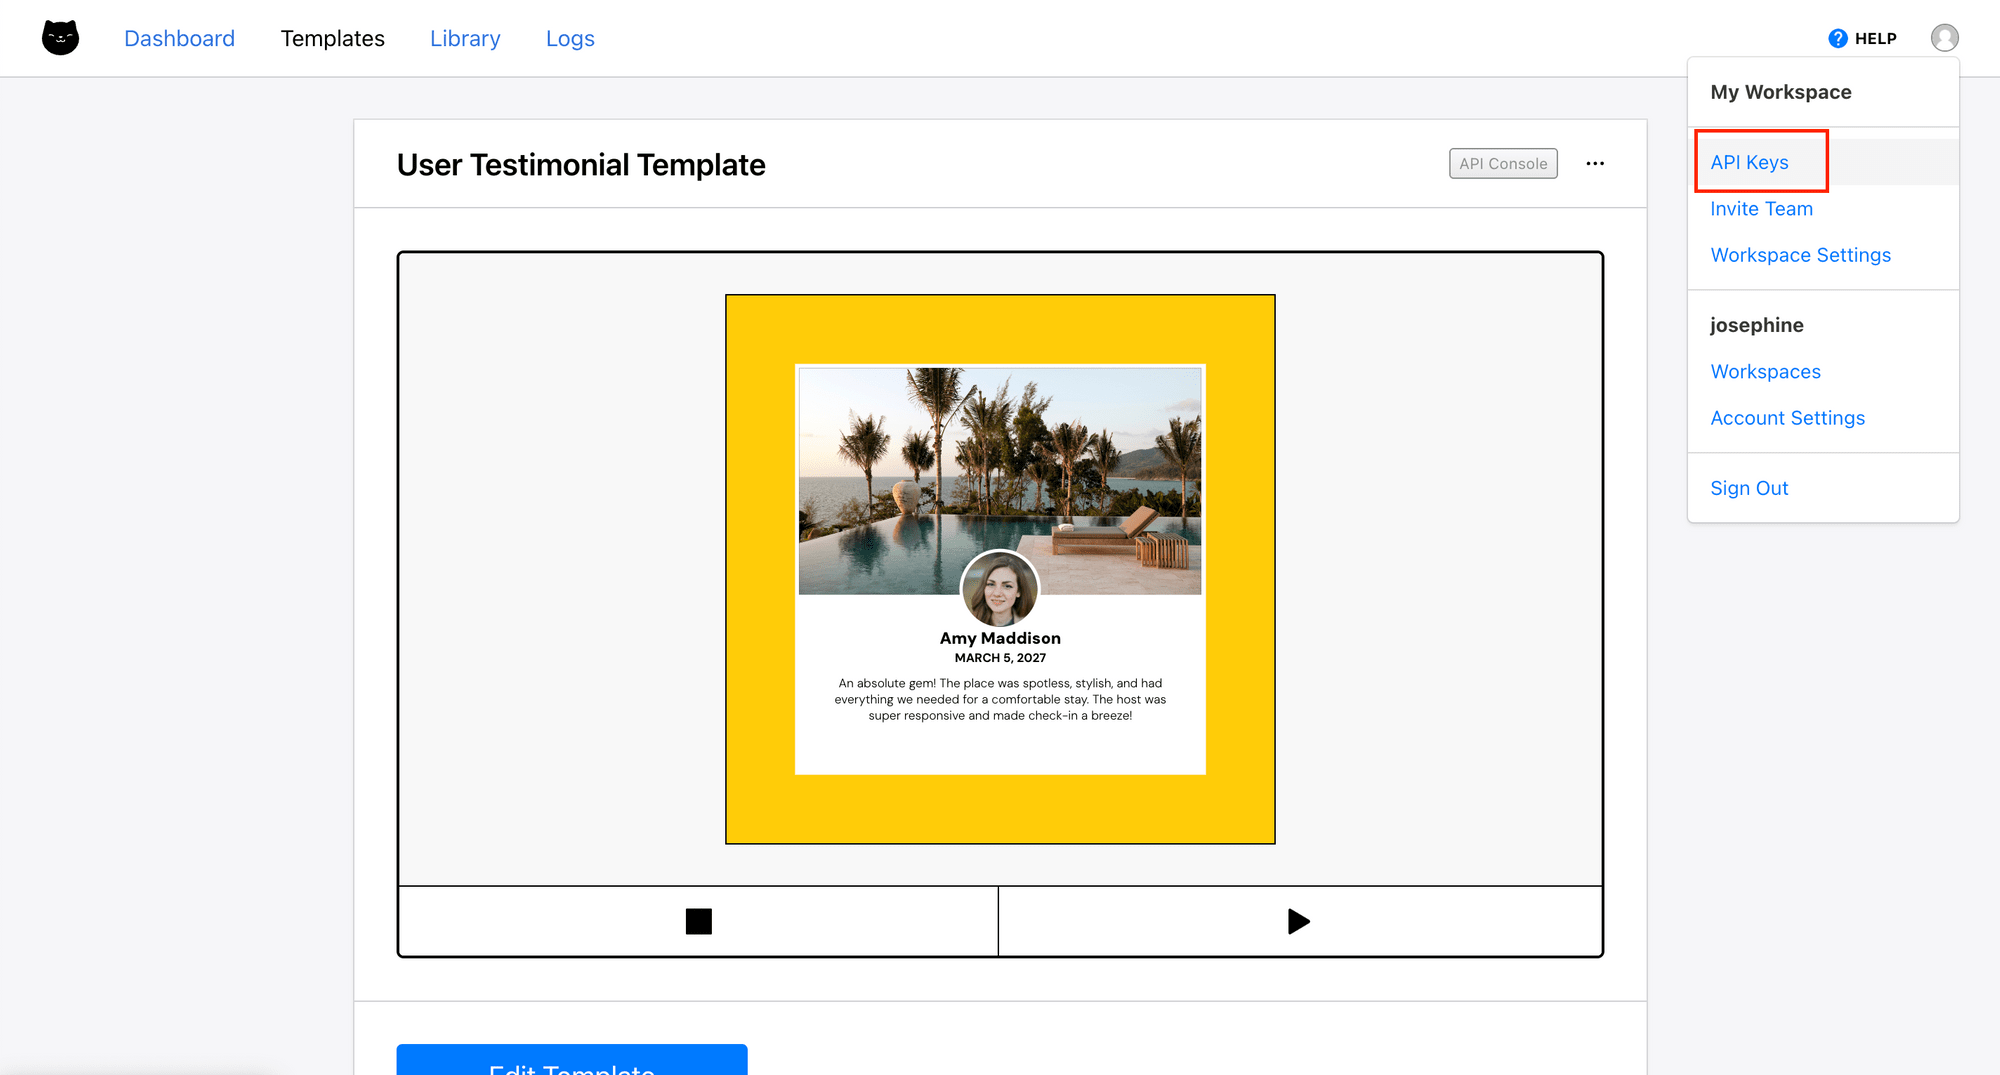
To use the Clipcat API, you need the Clipcat API key and the template ID. For the API key, click on your profile icon on the top right corner, and click “API Keys” :
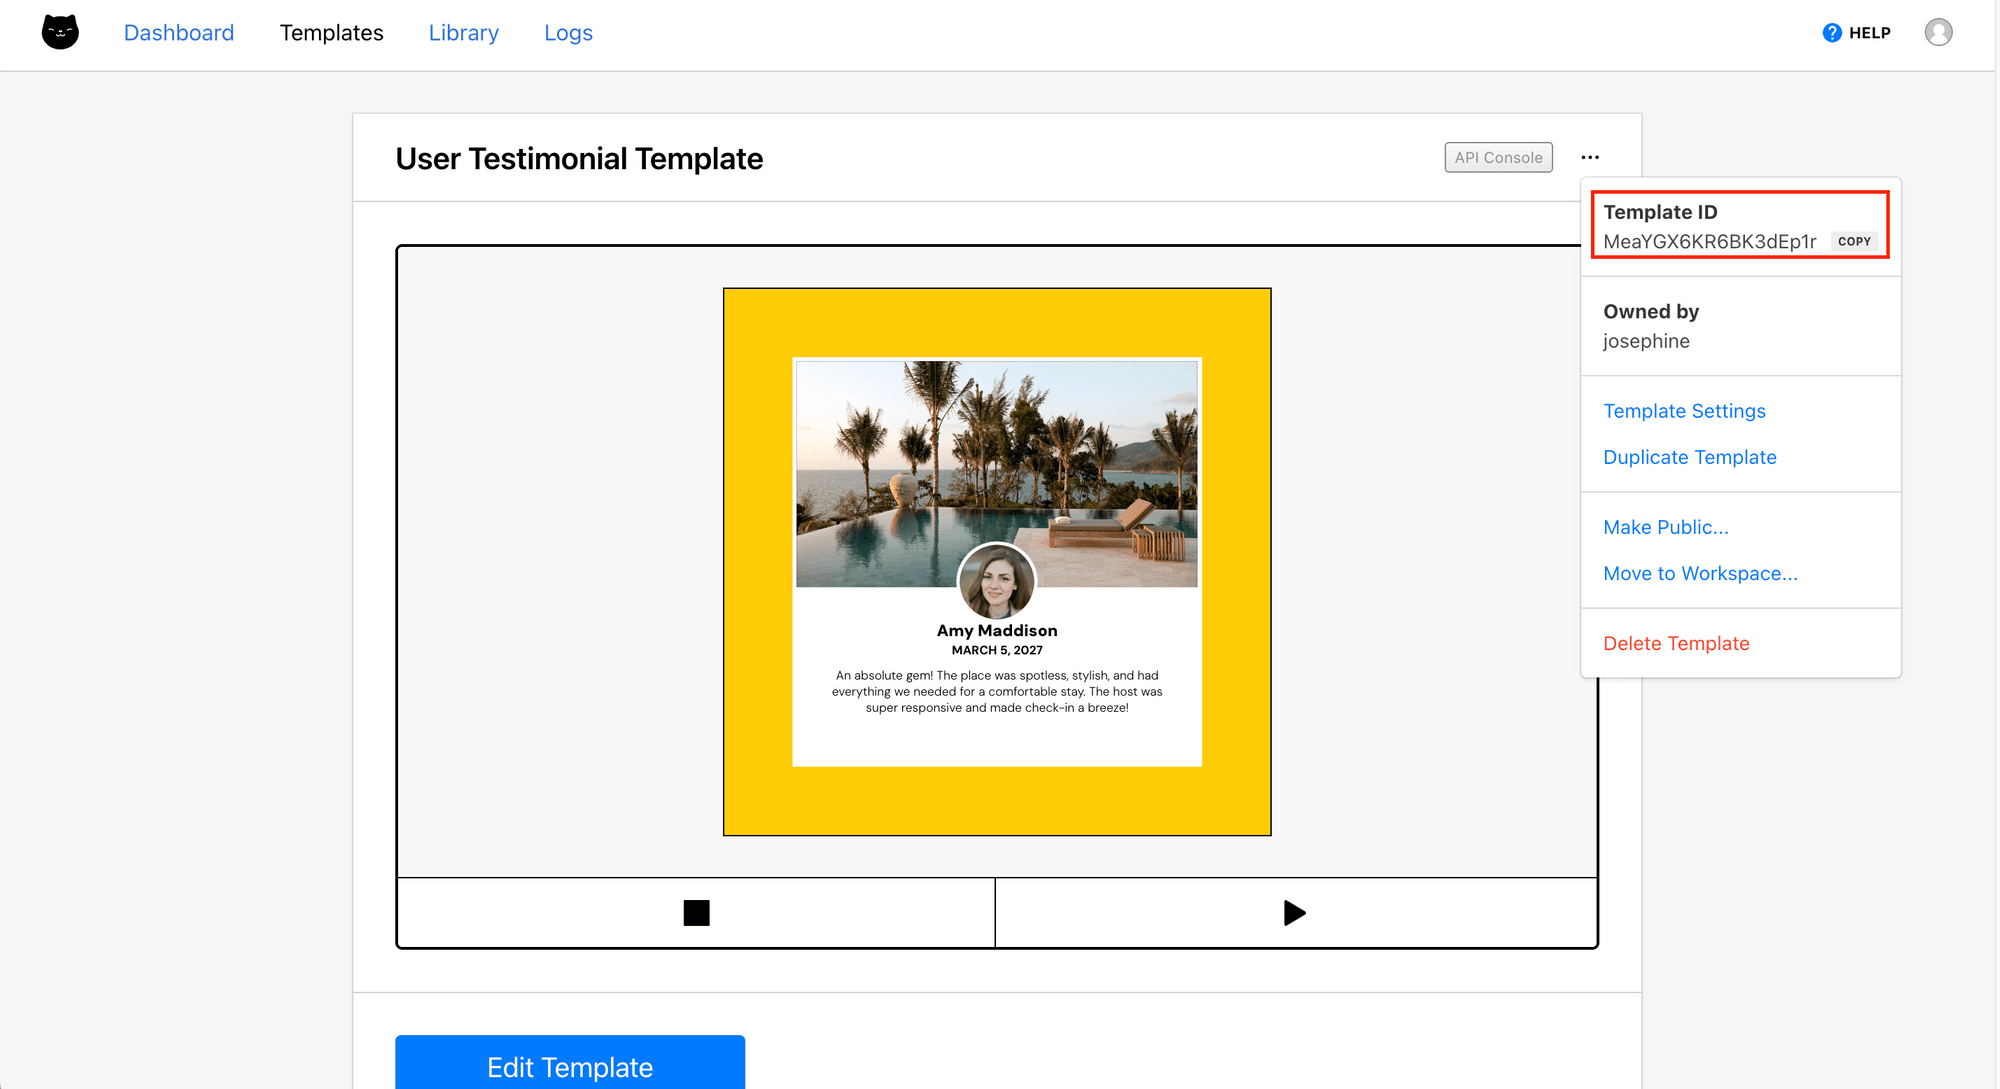
To get the template ID, click the three dots at the top right corner of your template:
3. Imgur API (for Hosting Uploaded Images)
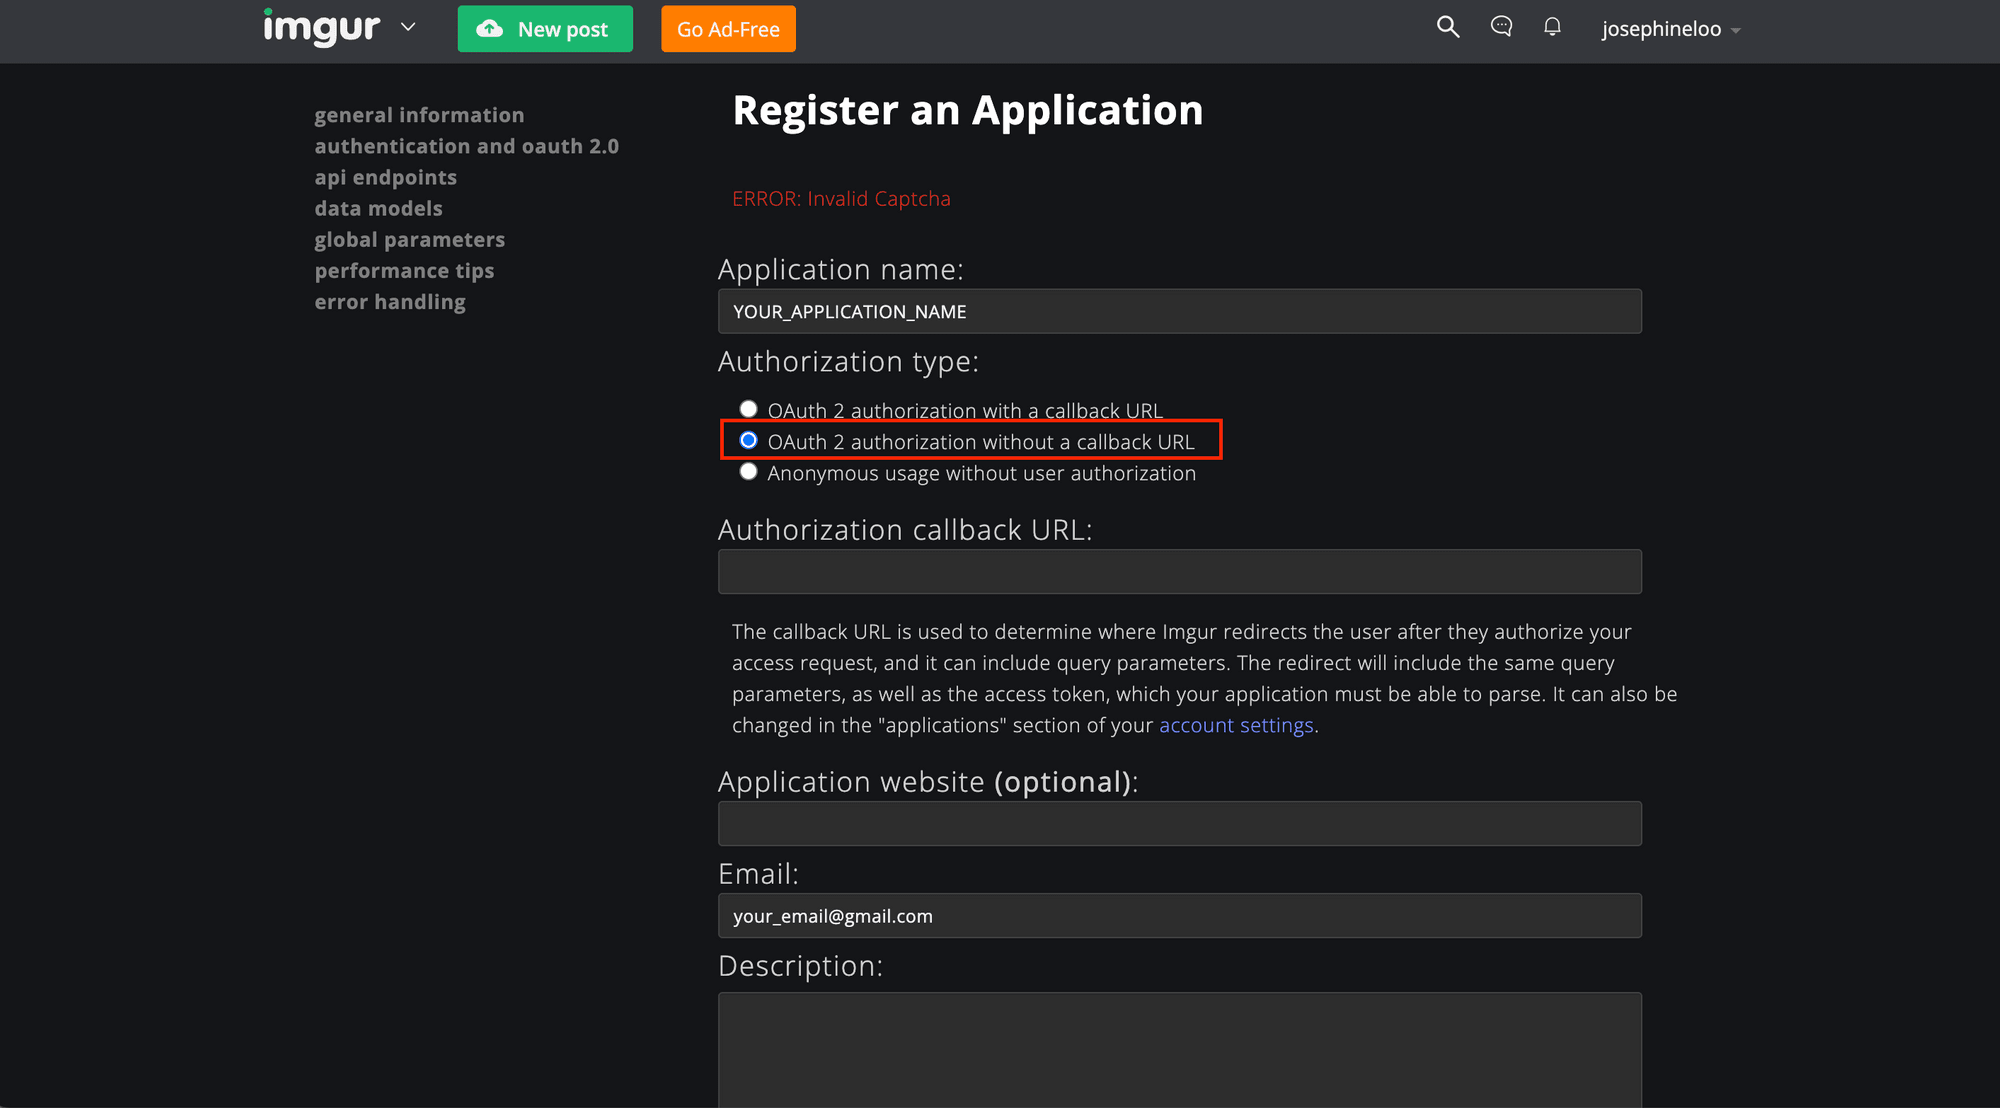
Log in to your Imgur account and register a new application. Fill in the application name, email, select “OAuth 2 authorization without a callback URL” for the authorization type, and click “Submit” to proceed.
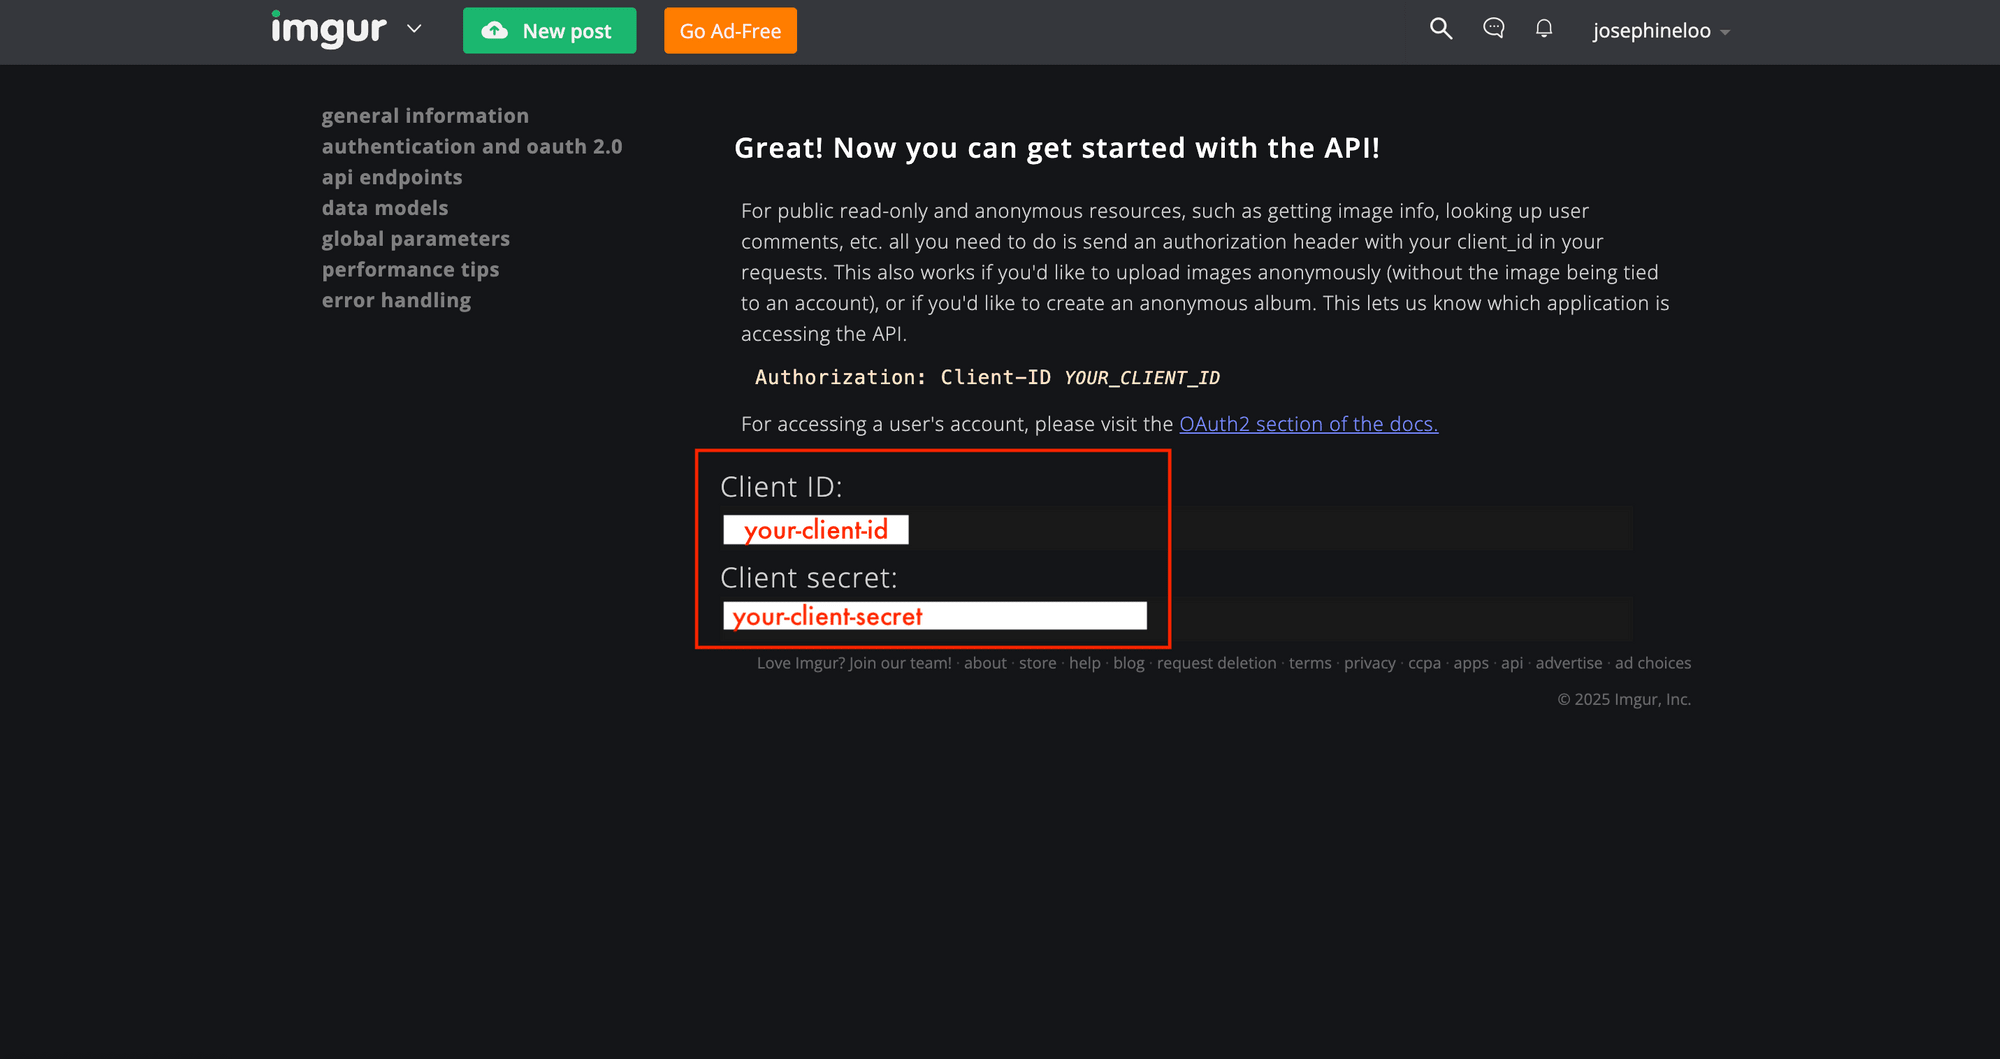
You’ll get your Client ID and Client Secret, which you’ll use to authorize your API calls:
Writing the Node.js Script
Now that everything’s in place, let’s write the automation script in Node.js.
Step 1. Set Up Your Environment
Open your terminal/command prompt and run the following commands to create a new folder and Node.js project:
mkdir clipcat-video-generator
cd clipcat-video-generator
npm init
Next, run the command below to install the required packages:
npm install googleapis google-auth-library axios form-data dotenv
Then, create a .js file (e.g., script.js) and import the packages like this:
require('dotenv').config();
const { google } = require('googleapis');
const fs = require('fs');
const axios = require('axios');
const path = require('path');
const FormData = require('form-data');
Let’s set up the API keys and config. Create a .env file in your project folder and add your keys and IDs:
GOOGLE_PRIVATE_KEY=your-json-file-name
GOOGLE_SHEET_ID=your-google-sheets-id
GOOGLE_SHEET_NAME=your-google-sheets-name
CLIPCAT_API_KEY=your-clipcat-api-key
CLIPCAT_TEMPLATE_ID=your-clipcat-template_id
IMGUR_CLIENT_ID=your-imgur-client-id
In your script.js file, set up authentication for Google Sheets using your private key file, and declare the Clipcat and Imgur API keys as constants:
const sheets = google.sheets('v4');
const auth = new google.auth.GoogleAuth({
  keyFile: process.env.GOOGLE_PRIVATE_KEY,
  scopes: ['https://www.googleapis.com/auth/spreadsheets.readonly'],
});

const IMGUR_CLIENT_ID = process.env.IMGUR_CLIENT_ID;
const CLIPCAT_API_KEY = process.env.CLIPCAT_API_KEY;
🐱 Meow Memo: Don’t forget to put your Google Cloud service account JSON file in the root folder of your project too.
Step 2. Writing Helper Functions
Before we jump into the main logic, let’s set up a few helper functions that’ll make our code cleaner and easier to manage later.
Since each testimonial comes with two images (an avatar and a screenshot), we’ll need a consistent way to name and save the image files locally. Add this function to your script.js to generate the local .jpg file path based on the image’s file ID:
function getLocalImagePath(fileId) {
  return path.join(__dirname, `${fileId}.jpg`);
}
We’ll be updating the Clipcat video template with responses from the Google Form. For the video’s background colour, instead of using a fixed colour, we can randomly generate one each time to keep things fresh:
function getRandomHexColor() {
  const hex = Math.floor(Math.random() * 0xffffff).toString(16);
  return '#' + hex.padStart(6, '0');
}
Step 3. Read Form Responses from Google Sheets
To read data from your Google Sheet, add the function below. This will fetch all the rows and return the results but excluding the first row, since that one contains the field names:
async function readSheet() {
  const client = await auth.getClient();
  const spreadsheetId = process.env.GOOGLE_SHEET_ID;
  const range = process.env.GOOGLE_SHEET_NAME;

  const res = await sheets.spreadsheets.values.get({
    auth: client,
    spreadsheetId,
    range,
  });

  return res.data.values.slice(1); // skip first row
}
🐱 Meow Memo: Make sure the sheet is shared with the service account.
Step 4. Download Image from Google Drive
The image links in our sheet are stored in Google Drive, but to use them with the Clipcat API, we first need to download them and then upload them elsewhere. This function takes a Google Drive file ID, downloads it using a public link pattern, and saves it locally:
async function downloadImage(fileId, localImagePath) {
  const driveUrl = `https://drive.google.com/uc?id=${fileId}`;
  console.log(`Downloading image from Google Drive ID: ${fileId}`);
  try {
    const res = await axios.get(driveUrl, {
      responseType: 'stream',
      headers: { 'User-Agent': 'Mozilla/5.0' },
    });

    const writer = fs.createWriteStream(localImagePath);
    res.data.pipe(writer);

    return new Promise((resolve, reject) => {
      writer.on('finish', () => {
        console.log('Image downloaded');
        resolve();
      });
      writer.on('error', reject);
    });
  } catch (err) {
    console.error('Failed to download image:', err.message);
    throw err;
  }
}
Step 5. Upload Image to Imgur
Google Drive image links aren’t directly usable for embedding, so we upload each image to Imgur, which gives us a public image URL. This function uses Imgur’s API to upload a file and returns the image URL:
async function uploadToImgur(localImagePath) {
  console.log('Uploading to Imgur...');
  const form = new FormData();
  form.append('image', fs.createReadStream(localImagePath));

  try {
    const res = await axios.post('https://api.imgur.com/3/image', form, {
      headers: {
        ...form.getHeaders(),
        Authorization: `Client-ID ${IMGUR_CLIENT_ID}`,
      },
    });

    const imgUrl = res.data.data.link;
    console.log('Uploaded to Imgur:', imgUrl);
    return imgUrl;
  } catch (err) {
    console.error('Failed to upload to Imgur:', err.response?.data || err.message);
    throw err;
  }
}
Step 6. Generate Video with Clipcat
With the testimonial text and image URLs ready, we can call the Clipcat API to generate the video. This function takes the testimonial data and sends it to Clipcat’s rendering API, using the template you’ve set up beforehand:
async function generateVideo(entry, avatarUrl, screenshotUrl) {
  const data = {
    template: process.env.CLIPCAT_TEMPLATE_ID,
    modifications: [
      {
        scene: 'Scene 1',
        text: entry[0].split(' ')[0],
        object: 'date',
      },
      {
        scene: 'Scene 1',
        text: entry[1],
        object: 'name',
      },
      {
        scene: 'Scene 1',
        object: 'testimonial',
        text: entry[2],
      },
      {
        scene: 'Scene 1',
        'background-image': avatarUrl,
        object: 'avatar',
      },
      {
        scene: 'Scene 1',
        'background-image': screenshotUrl,
        object: 'image',
      },
      {
        scene: 'Scene 1',
        object: 'background',
        'background-color': getRandomHexColor(),
      },
    ],
  };

  try {
    const res = await axios.post('https://api.clipcat.com/v1/renders', data, {
      headers: {
        'Content-Type': 'application/json',
        Authorization: `Bearer ${CLIPCAT_API_KEY}`,
      },
    });

    console.log('Video render started. Render ID:', res.data.id);
  } catch (err) {
    console.error('Failed to generate video:', err.response?.data || err.message);
  }
}
Step 7. Putting It All Together
Here’s where everything comes together. We’ll read all rows from the sheet and for each row, extract the data, public image URLs (so Clipcat can access them), call the Clipcat API to generate the video, and finally, clean up the downloaded image files from our local folder once everything’s done:
(async () => {
  try {
    const entries = await readSheet();

    for (const entry of entries) {
      const avatarFileId = entry[3].split('?id=')[1];
      const screenshotFileId = entry[4].split('?id=')[1];
      const localAvatarPath = getLocalImagePath(avatarFileId);
      const localScreenshotPath = getLocalImagePath(screenshotFileId);
      await downloadImage(avatarFileId, localAvatarPath);
      await downloadImage(screenshotFileId, localScreenshotPath);

      const avatarUrl = await uploadToImgur(localAvatarPath);
      const screenshotUrl = await uploadToImgur(localScreenshotPath);
      await generateVideo(entry, avatarUrl, screenshotUrl);

      fs.unlinkSync(getLocalImagePath(screenshotFileId));
      fs.unlinkSync(getLocalImagePath(avatarFileId));
    }

    console.log('All videos processed');
  } catch (err) {
    console.error('Process failed:', err.message);
  }
})();
Run the command below in your terminal/command prompt to execute the script:
node index.js
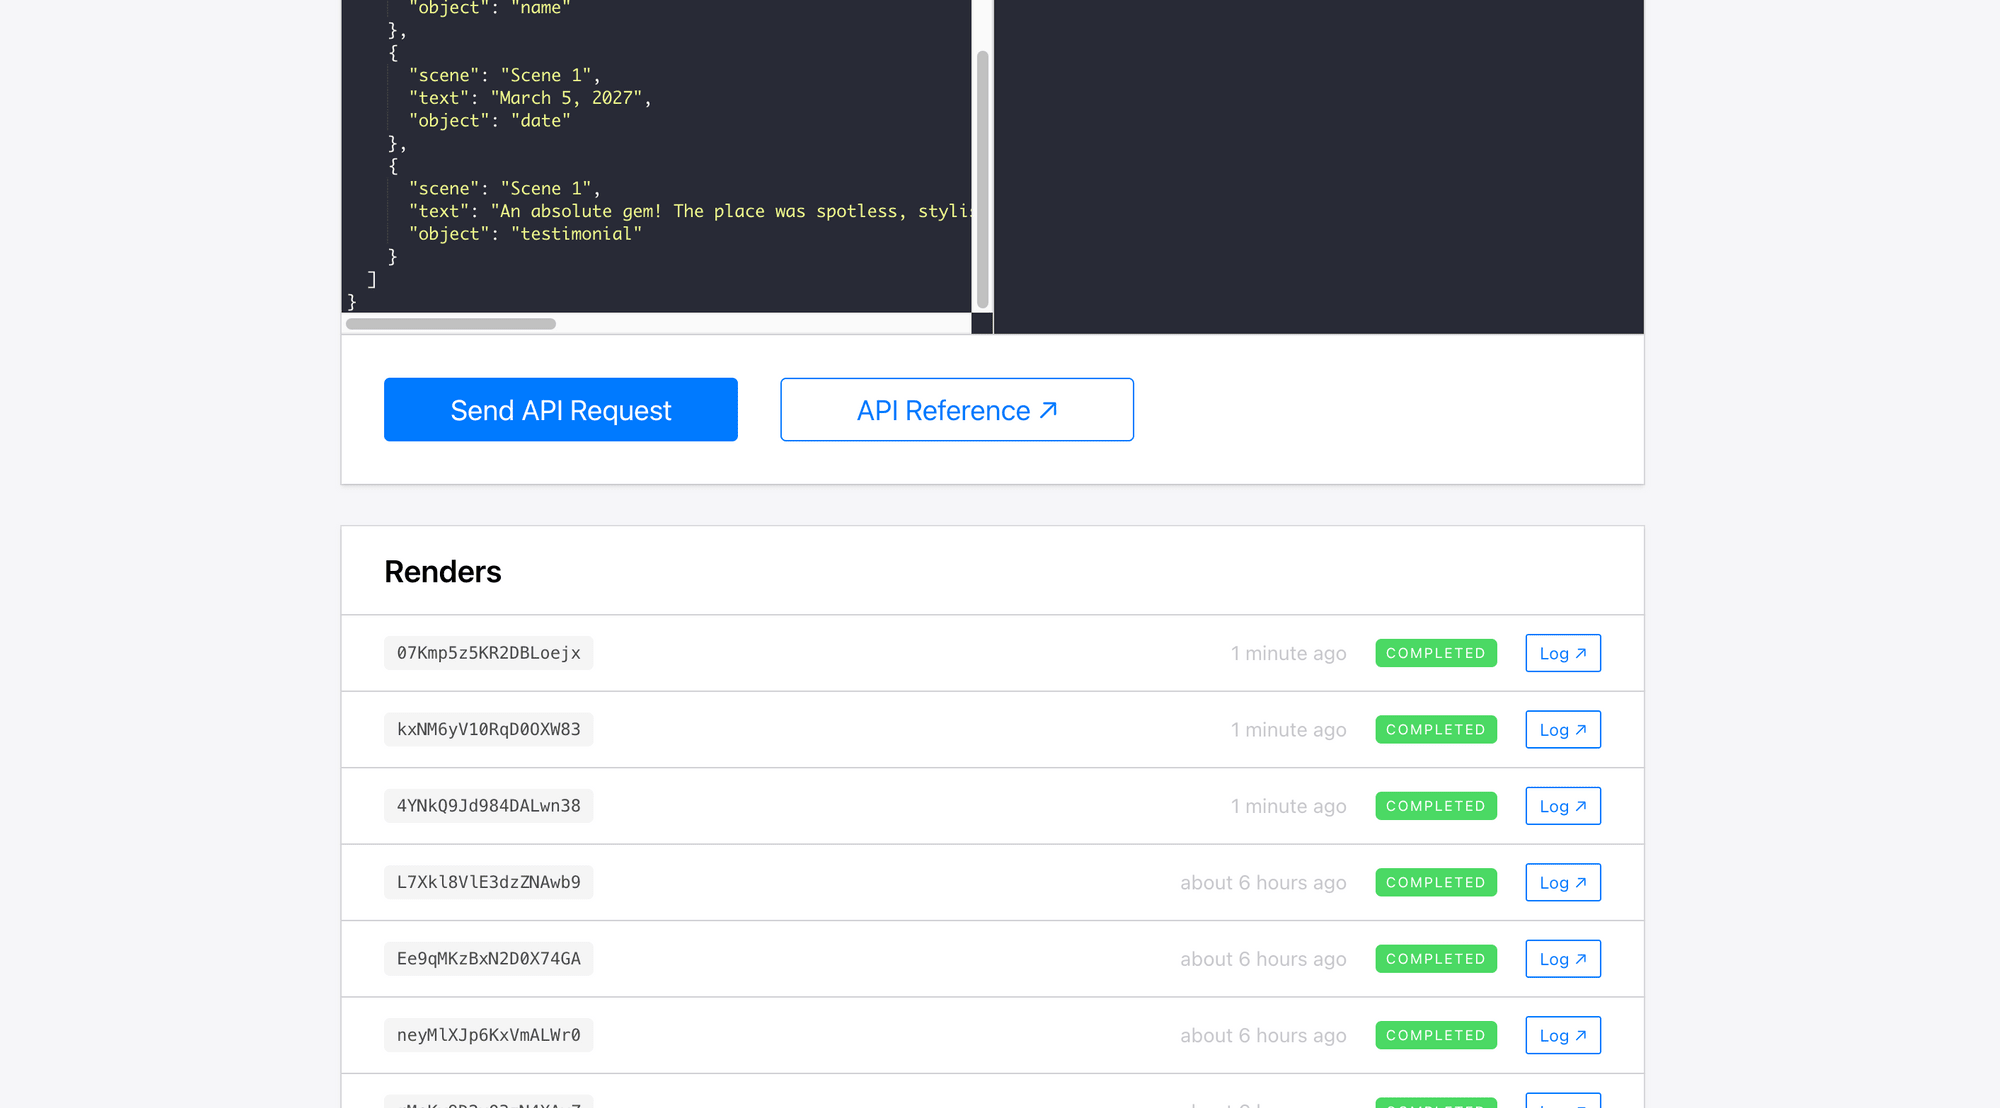
Each row in your spreadsheet will trigger a video render using the Clipcat template. You can check progress on your Clipcat dashboard:
Here’s the result:
🐱 Meow Memo: View the full code on GitHub.
Conclusion
With this setup and script, you can dynamically create personalized videos using data and media collected through a Google Form or any data stored in Google Sheets. The entire process, from data collection to video rendering, is handled automatically. It is flexible, scalable, and works for many other use cases, such as:
- Marketing campaigns: Auto-generate promo videos based on campaign briefs or social media captions stored in Google Sheets.
- Educational content: Turn key points into short animated summary videos.
- Onboarding videos: Create personalised welcome videos for new hires using their submitted details.
- Product updates: Use data from your Sheets to build short product highlight videos with pricing and features.
- Newsletters & reports: Quickly turn weekly updates or performance summaries into bite-sized video digests.
No matter what your goal is, automating video generation can save you hours of manual editing and make sure every video looks on brand. If you haven’t tried it yet, give it a go!
🐱 Meow Memo: Sign up for a Clipcat account here. You’ll get 100 free API credits to kickstart your first project!