How to Automate Personalized Videos in Kit (formerly ConvertKit) Newsletters with Clipcat API (Node.js Guide)
Contents
Email marketing is far from dead, but generic newsletters are. In a world flooded with content, personalization is what makes your emails stand out. Emails with personalized content have a 26% higher open rate, and when you combine that with video, click-through rates (CTR) can improve by up to 300%!
That’s why combining personalized videos with your email marketing campaigns can be such a powerful strategy. In this tutorial, you’ll learn how to set up an automation workflow that helps you generate personalized videos and include them in your Kit (formerly ConvertKit) emails.
You can use it to welcome new users, thank your top customers, or even hype up a product launch. This guide will walk you through everything in a way that’s developer-friendly and easy to follow. Let’s get started!
What You’ll Be Building
You'll build a complete workflow that automatically generates personalized videos for your subscribers and includes them in a Kit newsletter.
Here’s how the flow looks like:
-
A subscriber gets tagged in Kit (e.g., using a tag like
generate_video). -
Kit triggers a webhook to your server (we'll expose it using ngrok for local testing).
-
Your server receives the webhook and calls the Clipcat API to render a video personalized with the subscriber’s name.
-
Once the video is ready, your server calls Kit's API to update the subscriber’s custom fields (
video_urlandthumbnail_url). -
You can then use these custom fields in your Kit email using Liquid to display a thumbnail image and link to the personalized video.

This setup gives you full control over when videos are generated, and you can easily scale your email personalization without having to manually edit anything.
Prerequisites
Part 1. Set Up Your Clipcat Video Template
Sign in to Clipcat (or sign up if you haven’t) and create a new project in your account. Then, duplicate the template below to your project by clicking "Use This Template" :
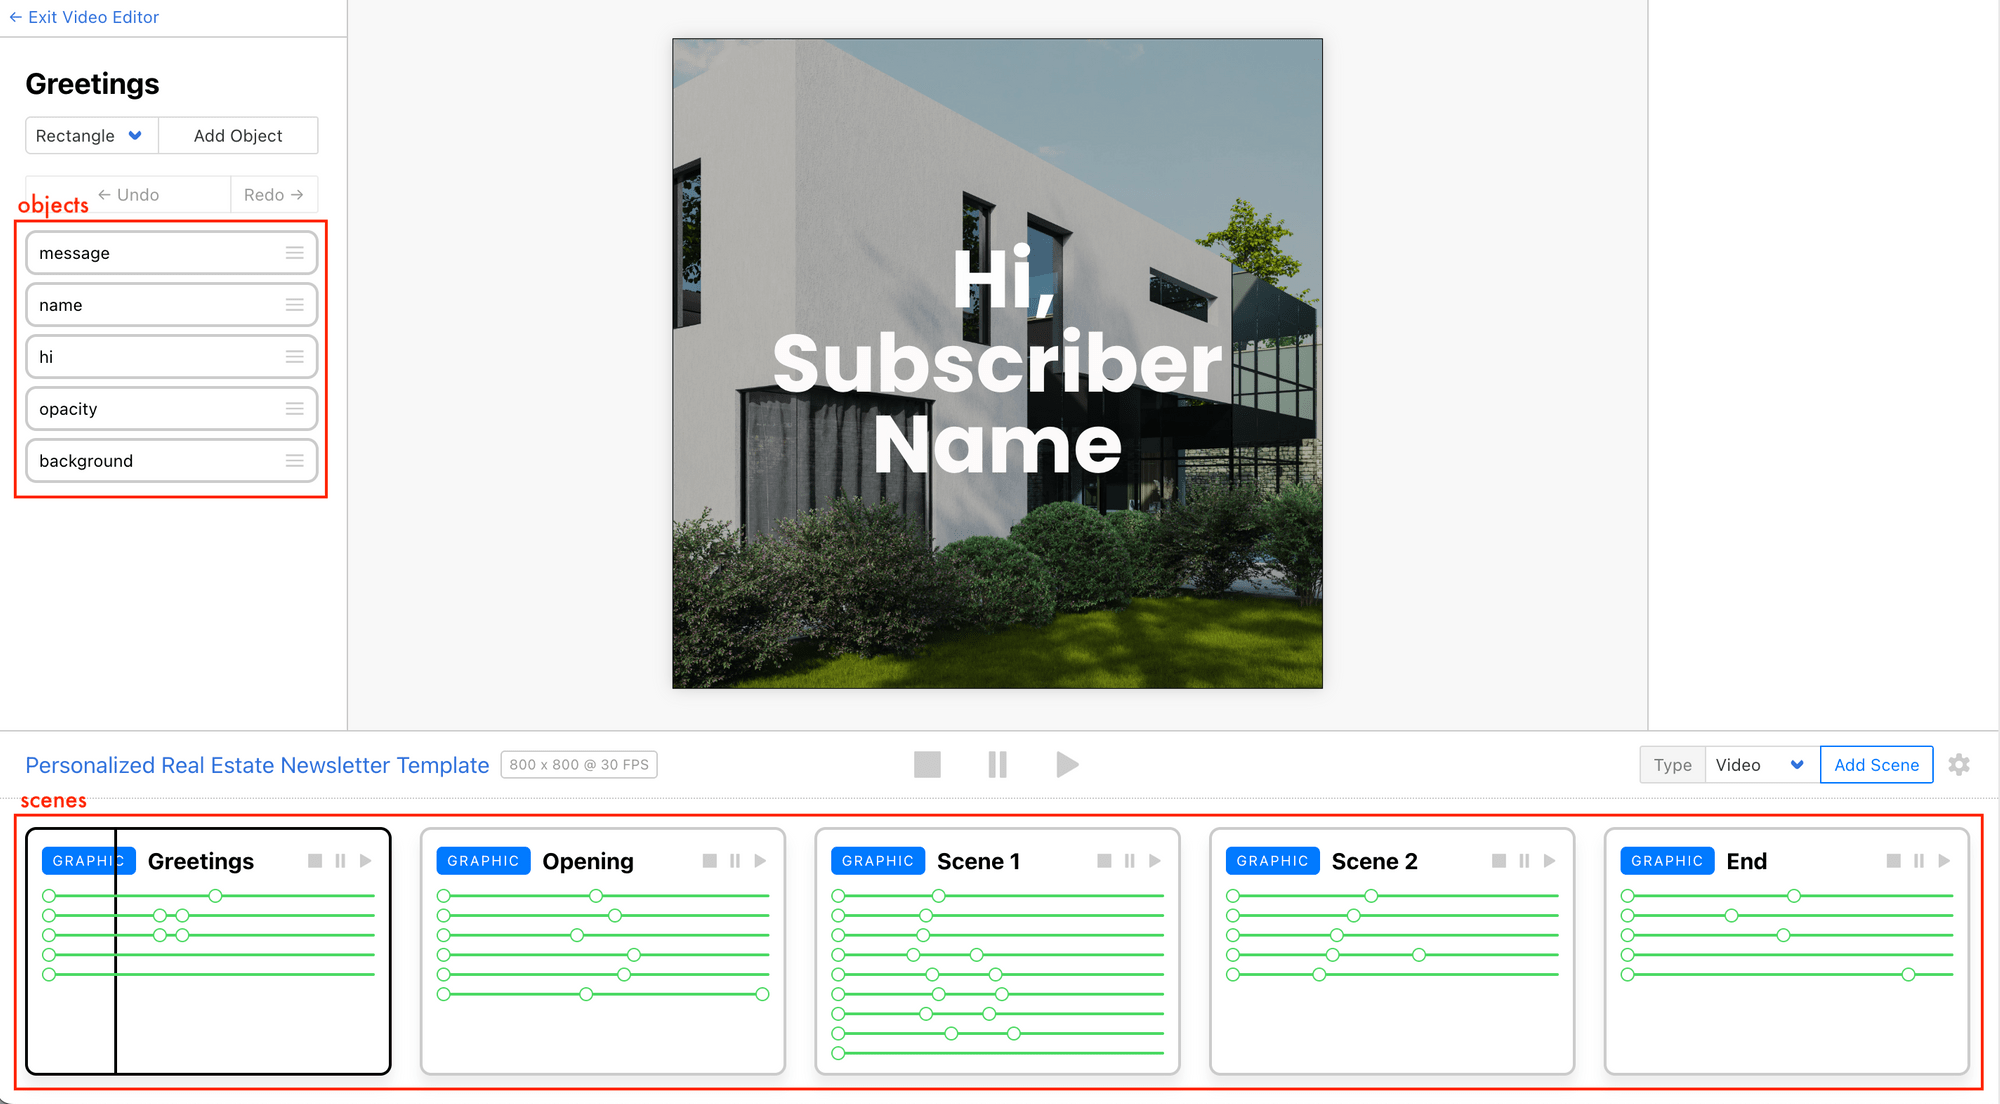
A Clipcat video template can include multiple graphic or video scenes, each one made up of different objects like text or shapes (rectangles or circles). You can update these scenes and objects directly through Clipcat’s API, and this lets you generate different videos dynamically without touching the editor.
The template we're using in this tutorial has five scenes, with text objects like message and name, as well as shape objects like background and opacity:
🐱 Meow Memo: Read this guide to learn more about how to customize a video template in Clipcat.
Part 2. Configure Kit
Next, we’ll set up Kit to trigger a webhook to your server when a specific event happens. For this tutorial, we’ll use the tag_add event as our trigger. So whenever a certain tag is added to a subscriber, it will trigger the personalized video automation in Clipcat.
Using tags as a trigger is super flexible because:
- You can manually add the tag from your Kit dashboard
- Tags can be automatically applied through automation rules (e.g., after a form submission or email click)
- You can bulk-tag existing subscribers to generate videos for many people at once
This gives you full control over when and for whom videos get created, without relying solely on subscriber actions.
🐱 Meow Memo: While we’ll use
tag_addas our example in this tutorial, Kit’s webhook system also supports other trigger events such assubscriber_activate,subscriber_unsubscribe,subscriber_bounce, and more.
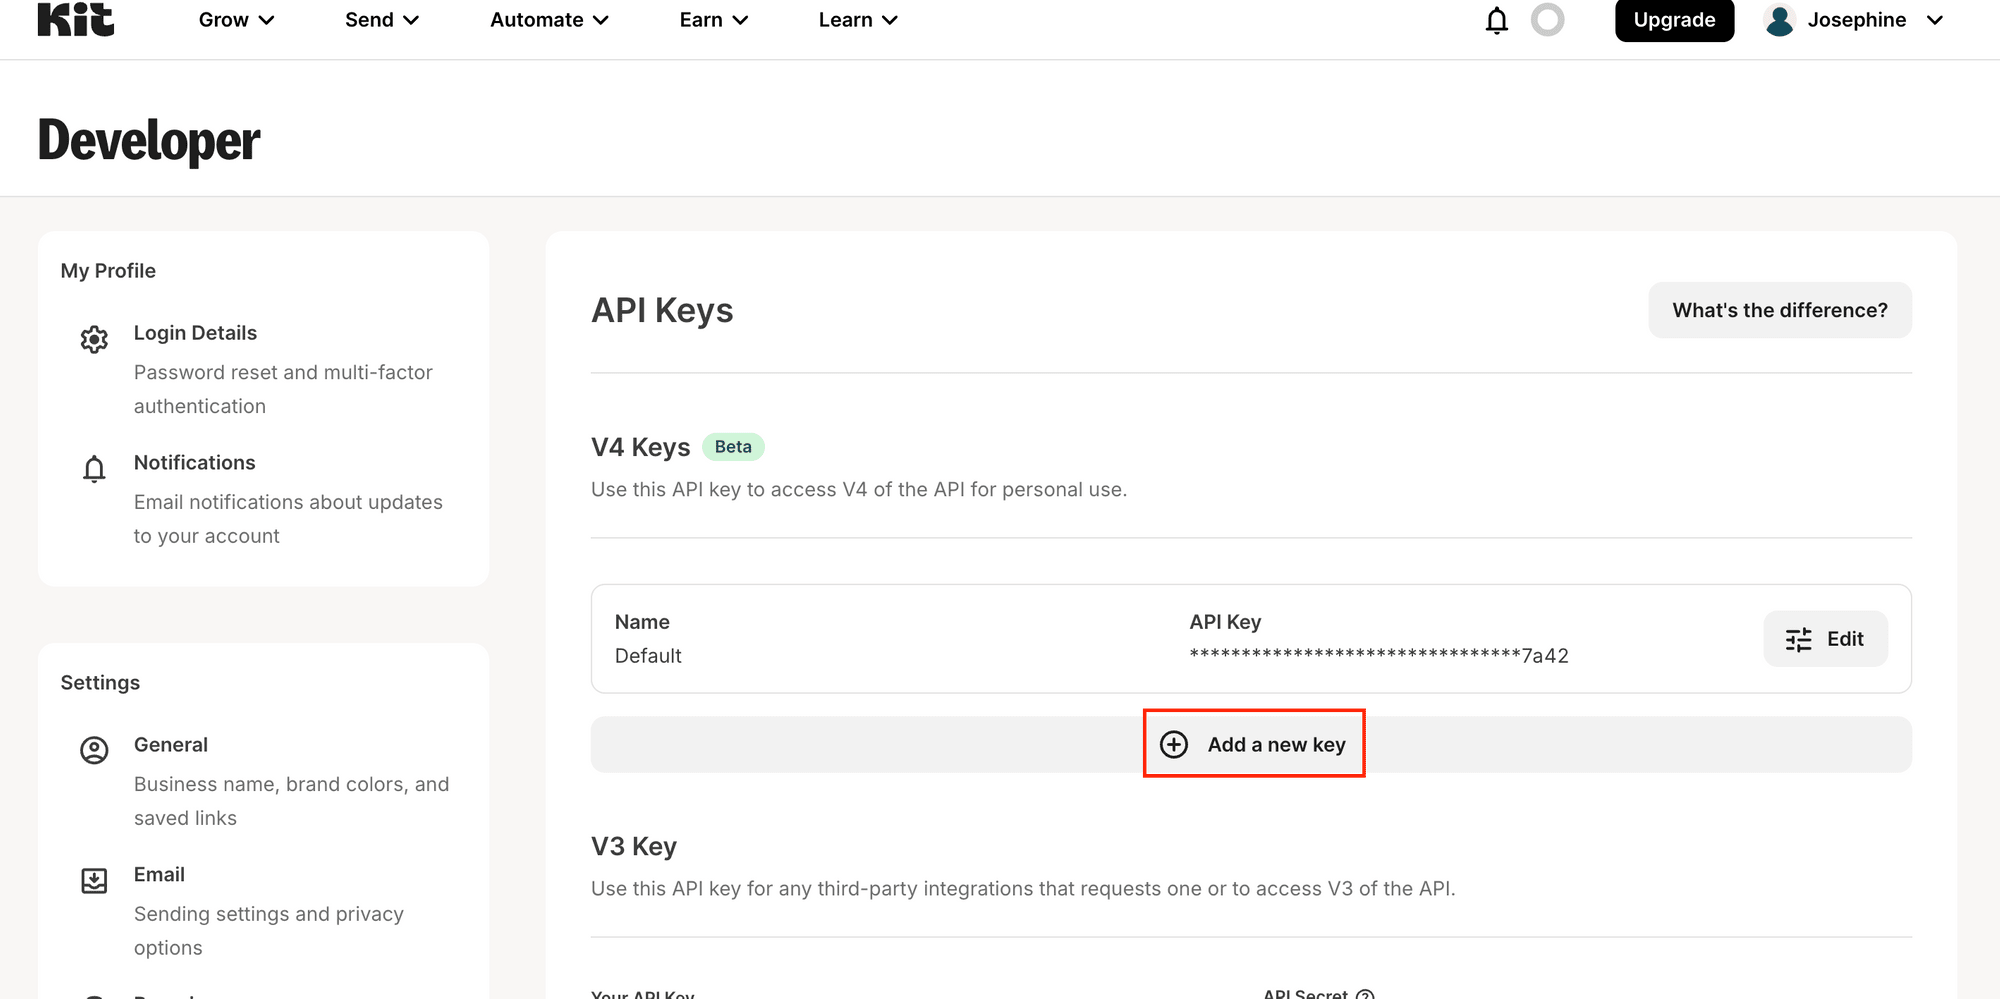
Step 1. Get the API Key
Head to your Kit account settings and navigate to the Developer section (click your profile icon > Settings > Developer ). Then, click “Add a new key” to generate a new API key:
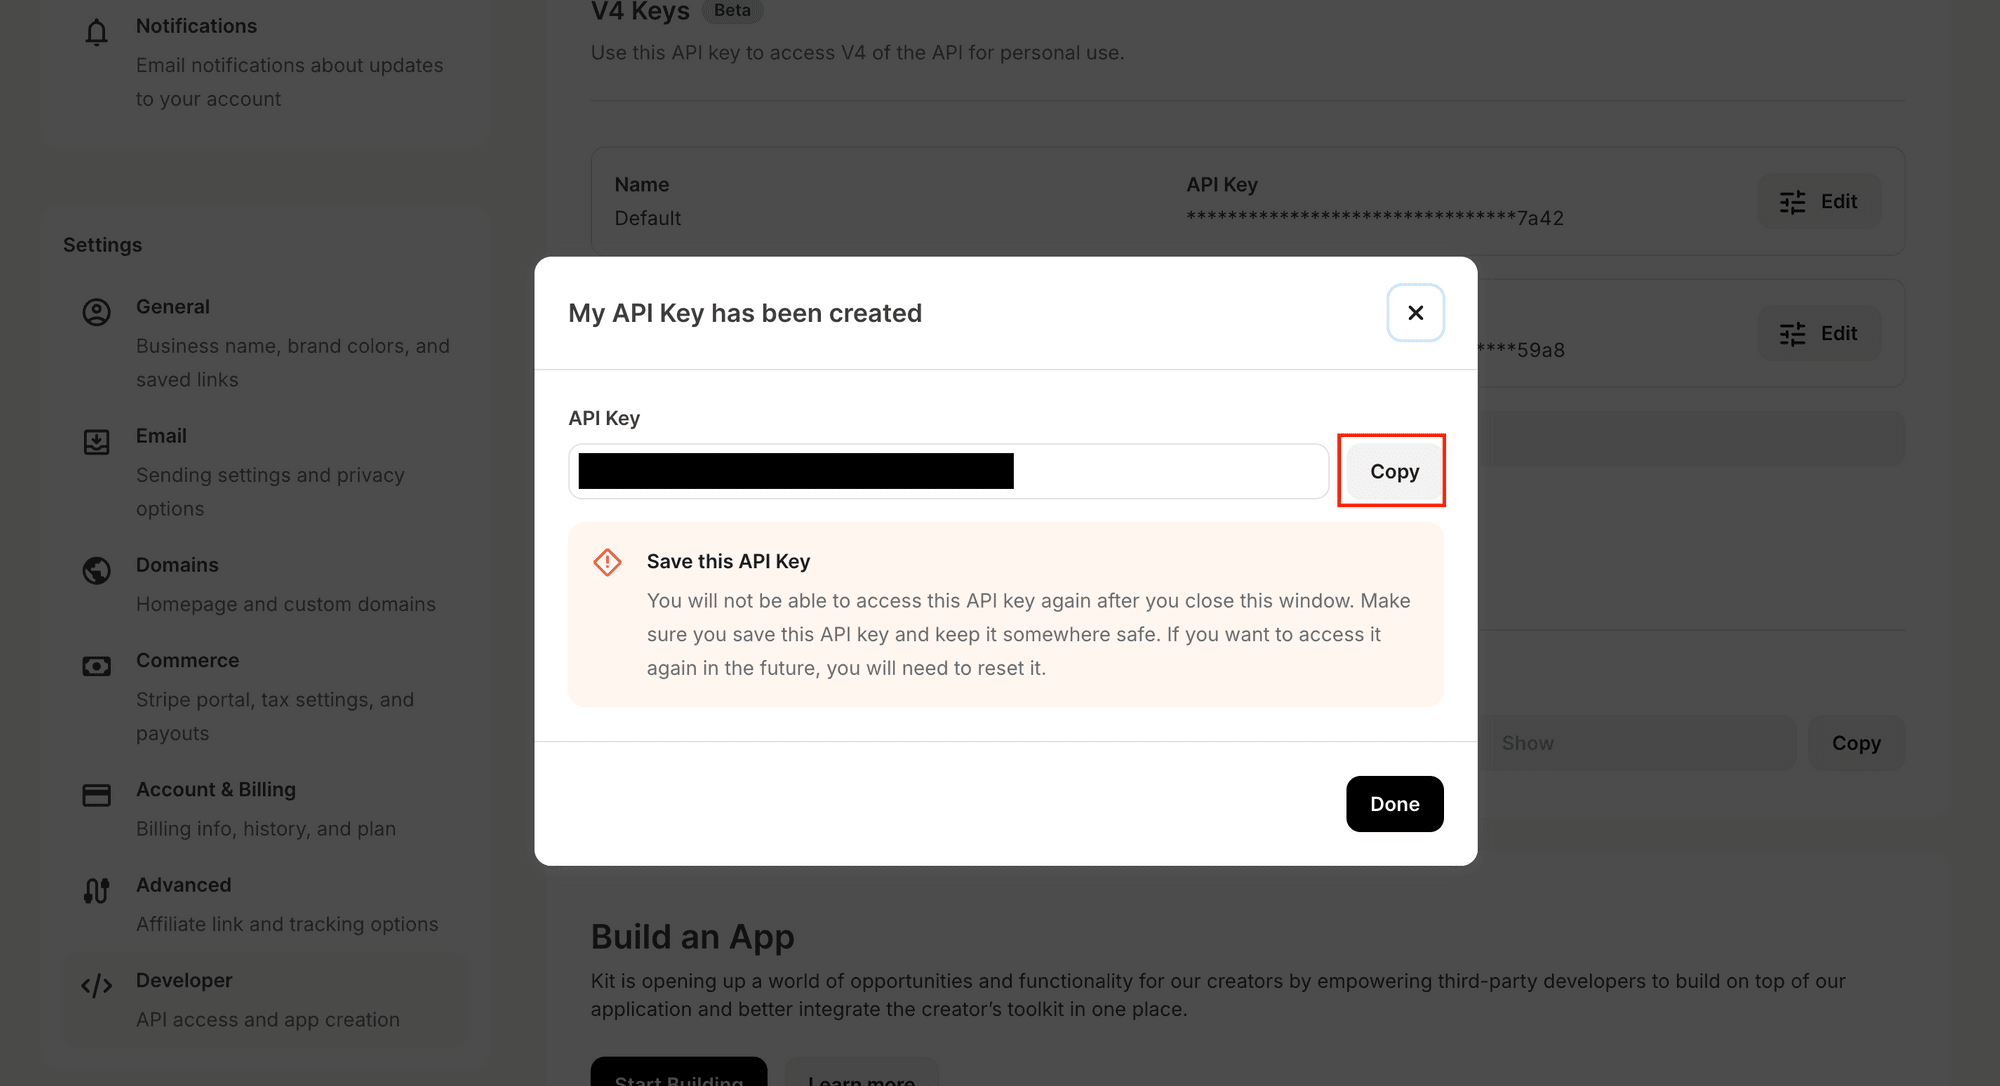
Copy the API key and save it somewhere safe. You’ll need it later to interact with the API.
Step 2. Create a New Tag
Let’s create a new tag so that every time it’s added to a subscriber, it will trigger the webhook to generate a personalized video. Go to Grow > Subscribers , then click on “Create a Tag” :

Enter a name for your tag (e.g., generate_video):

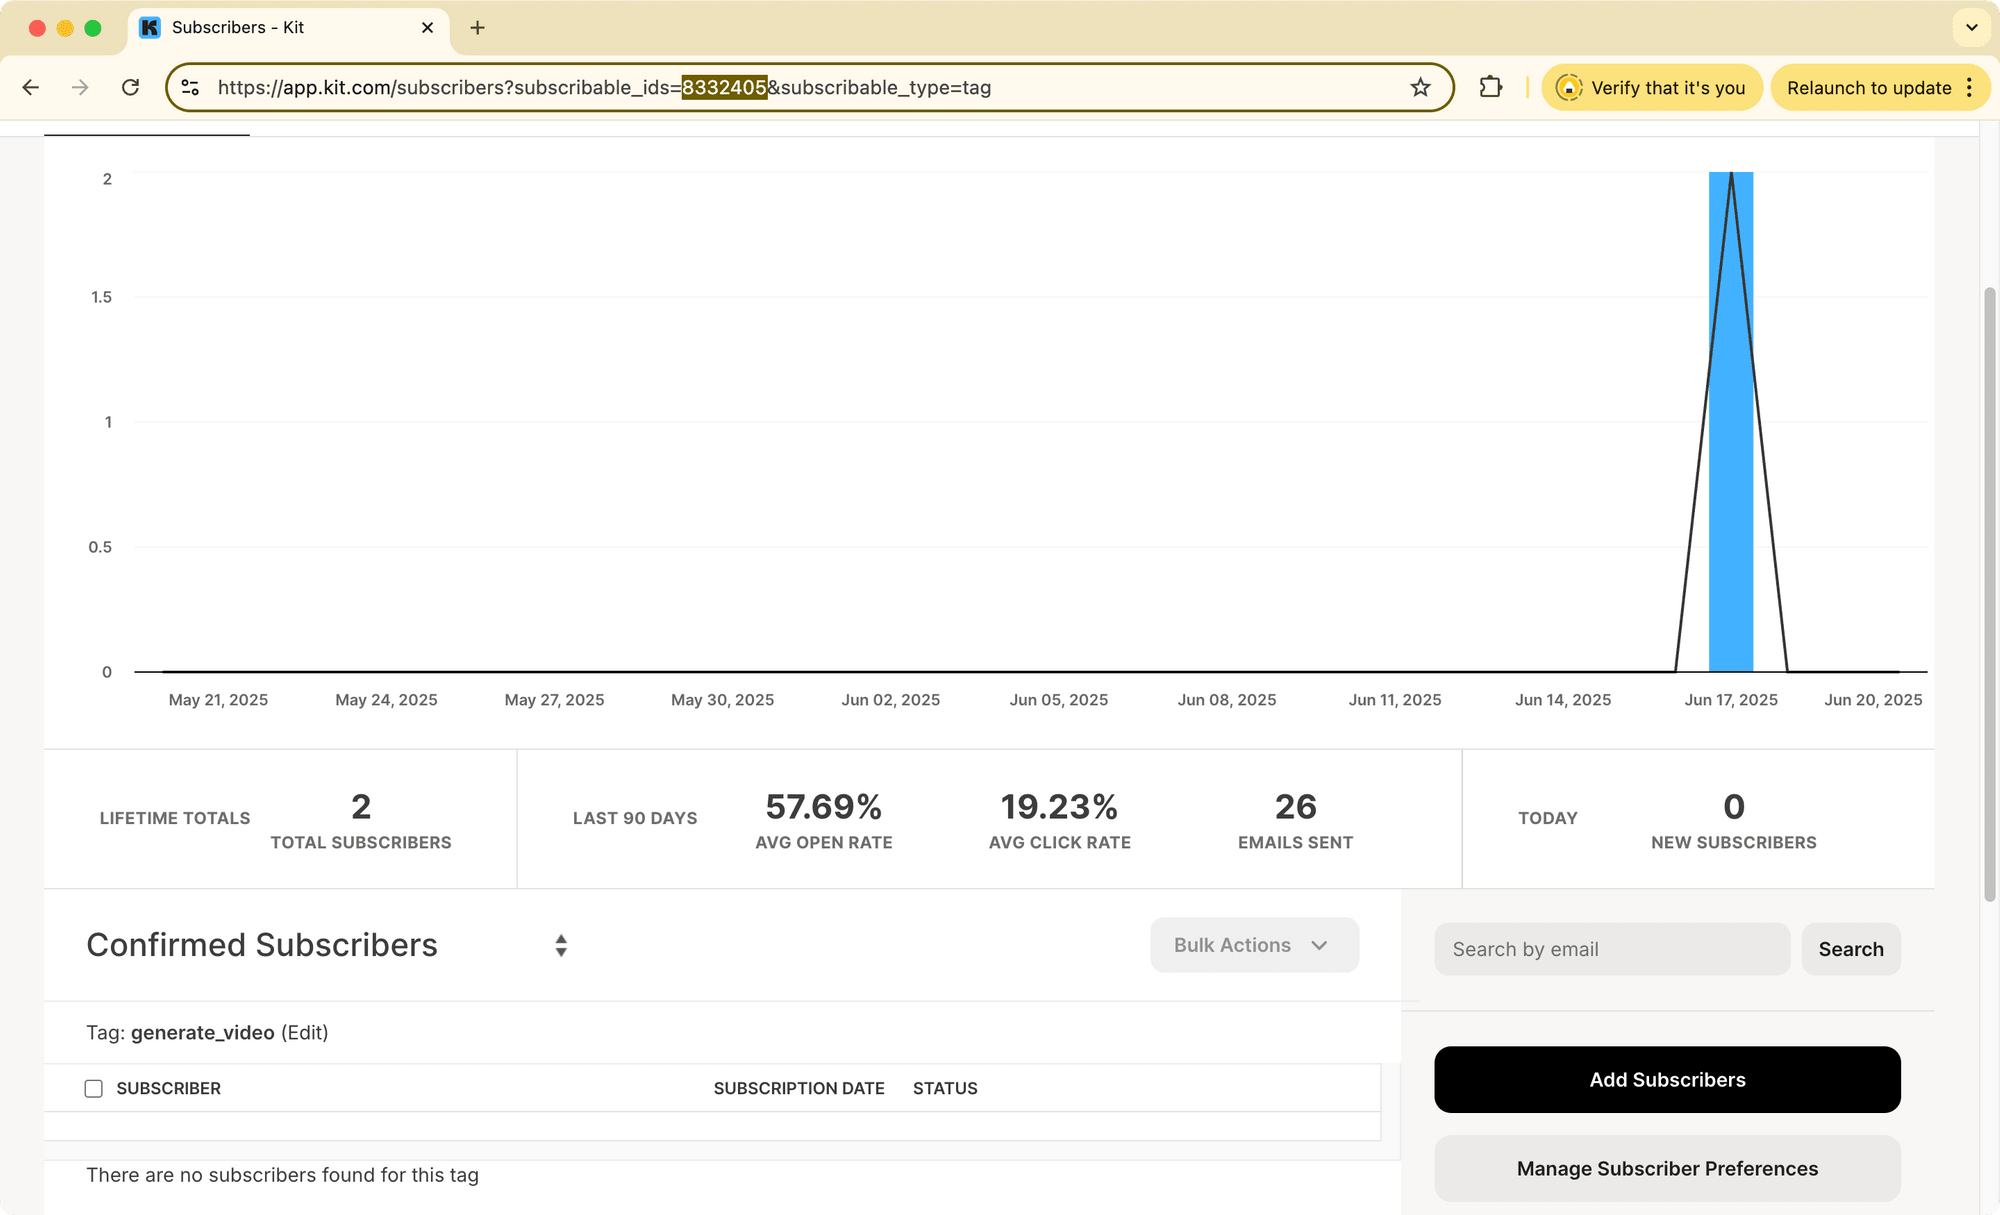
Once the tag is created, click on it to open the tag page. You’ll find the tag ID in the URL, after _id=:
Step 3. Create a Webhook
We can create a webhook directly using Kit’s API Playground. Just head over to the Webhooks section in their API reference and click on “Try it” to open the playground:
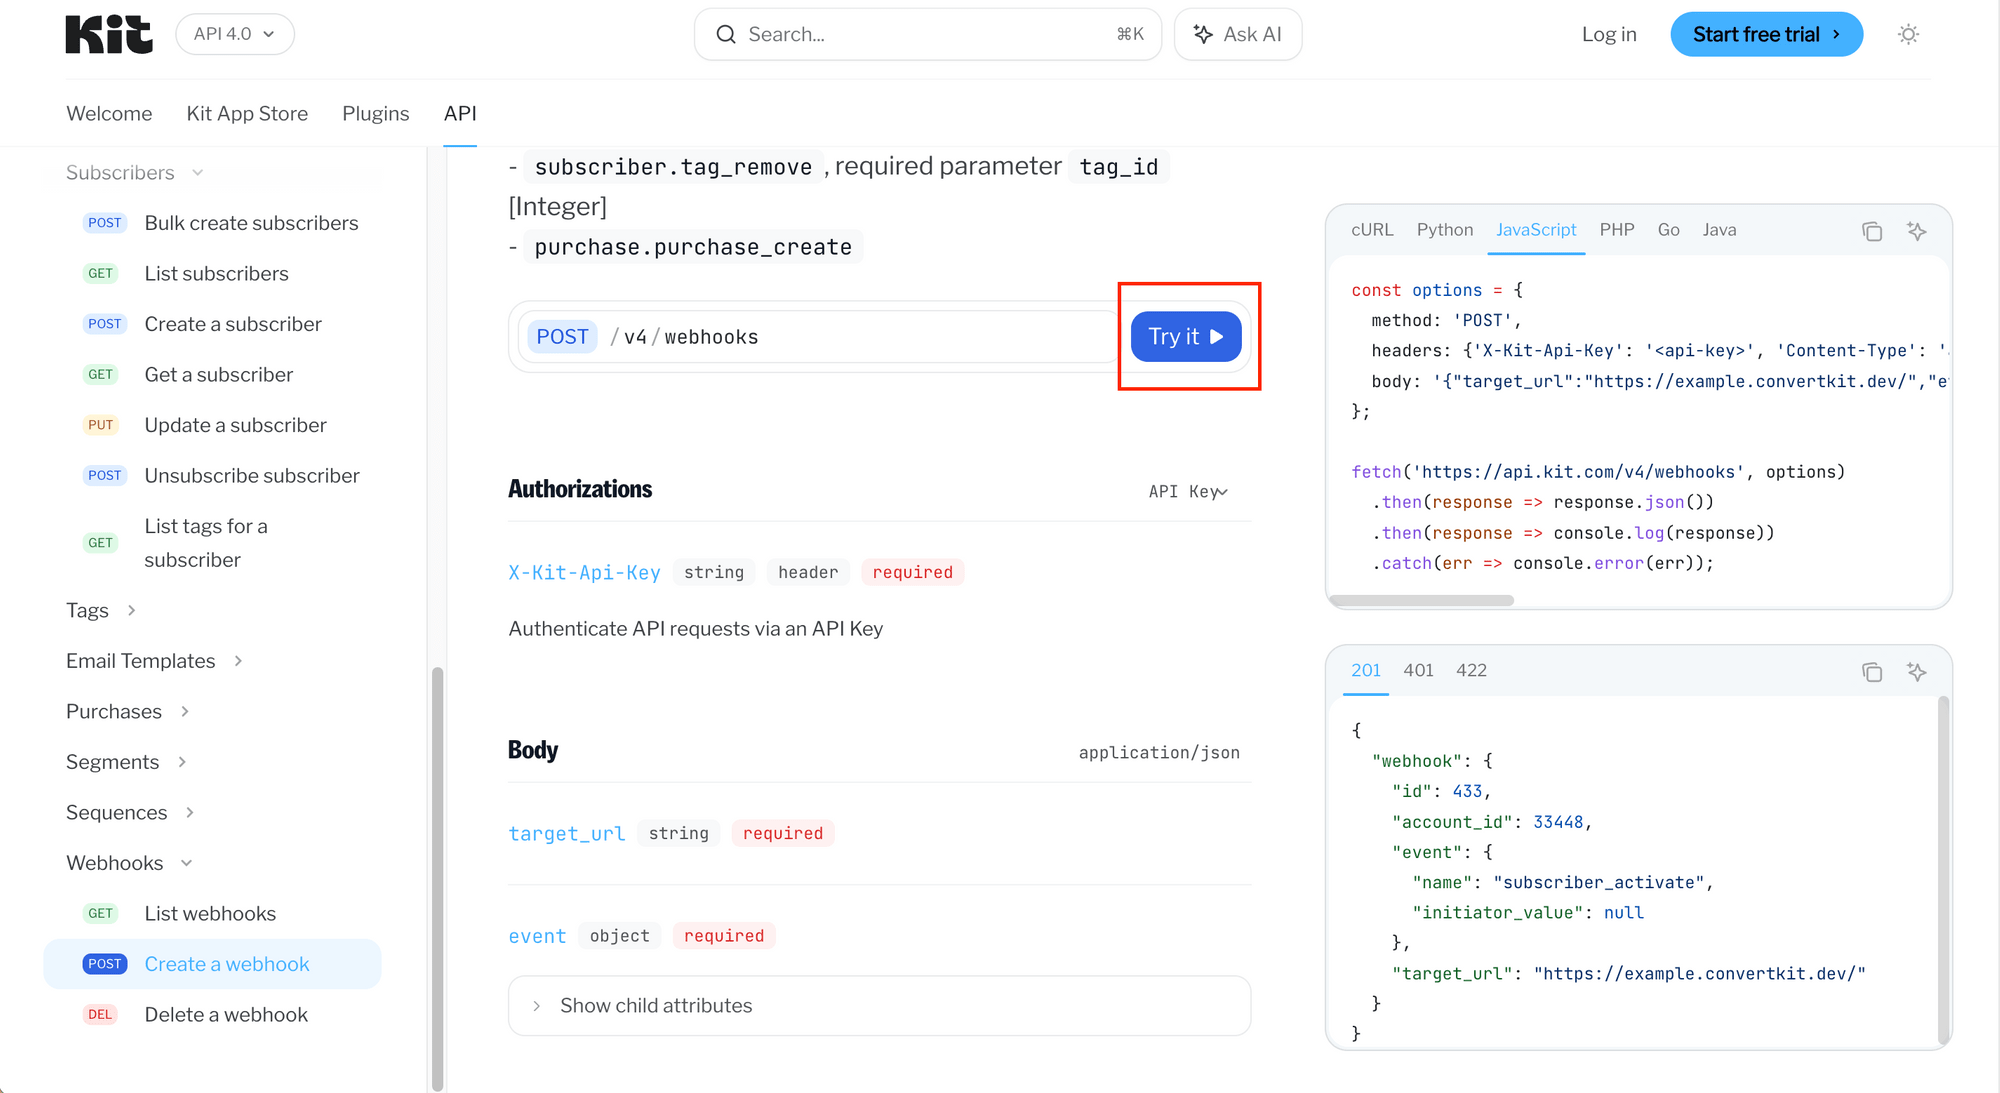
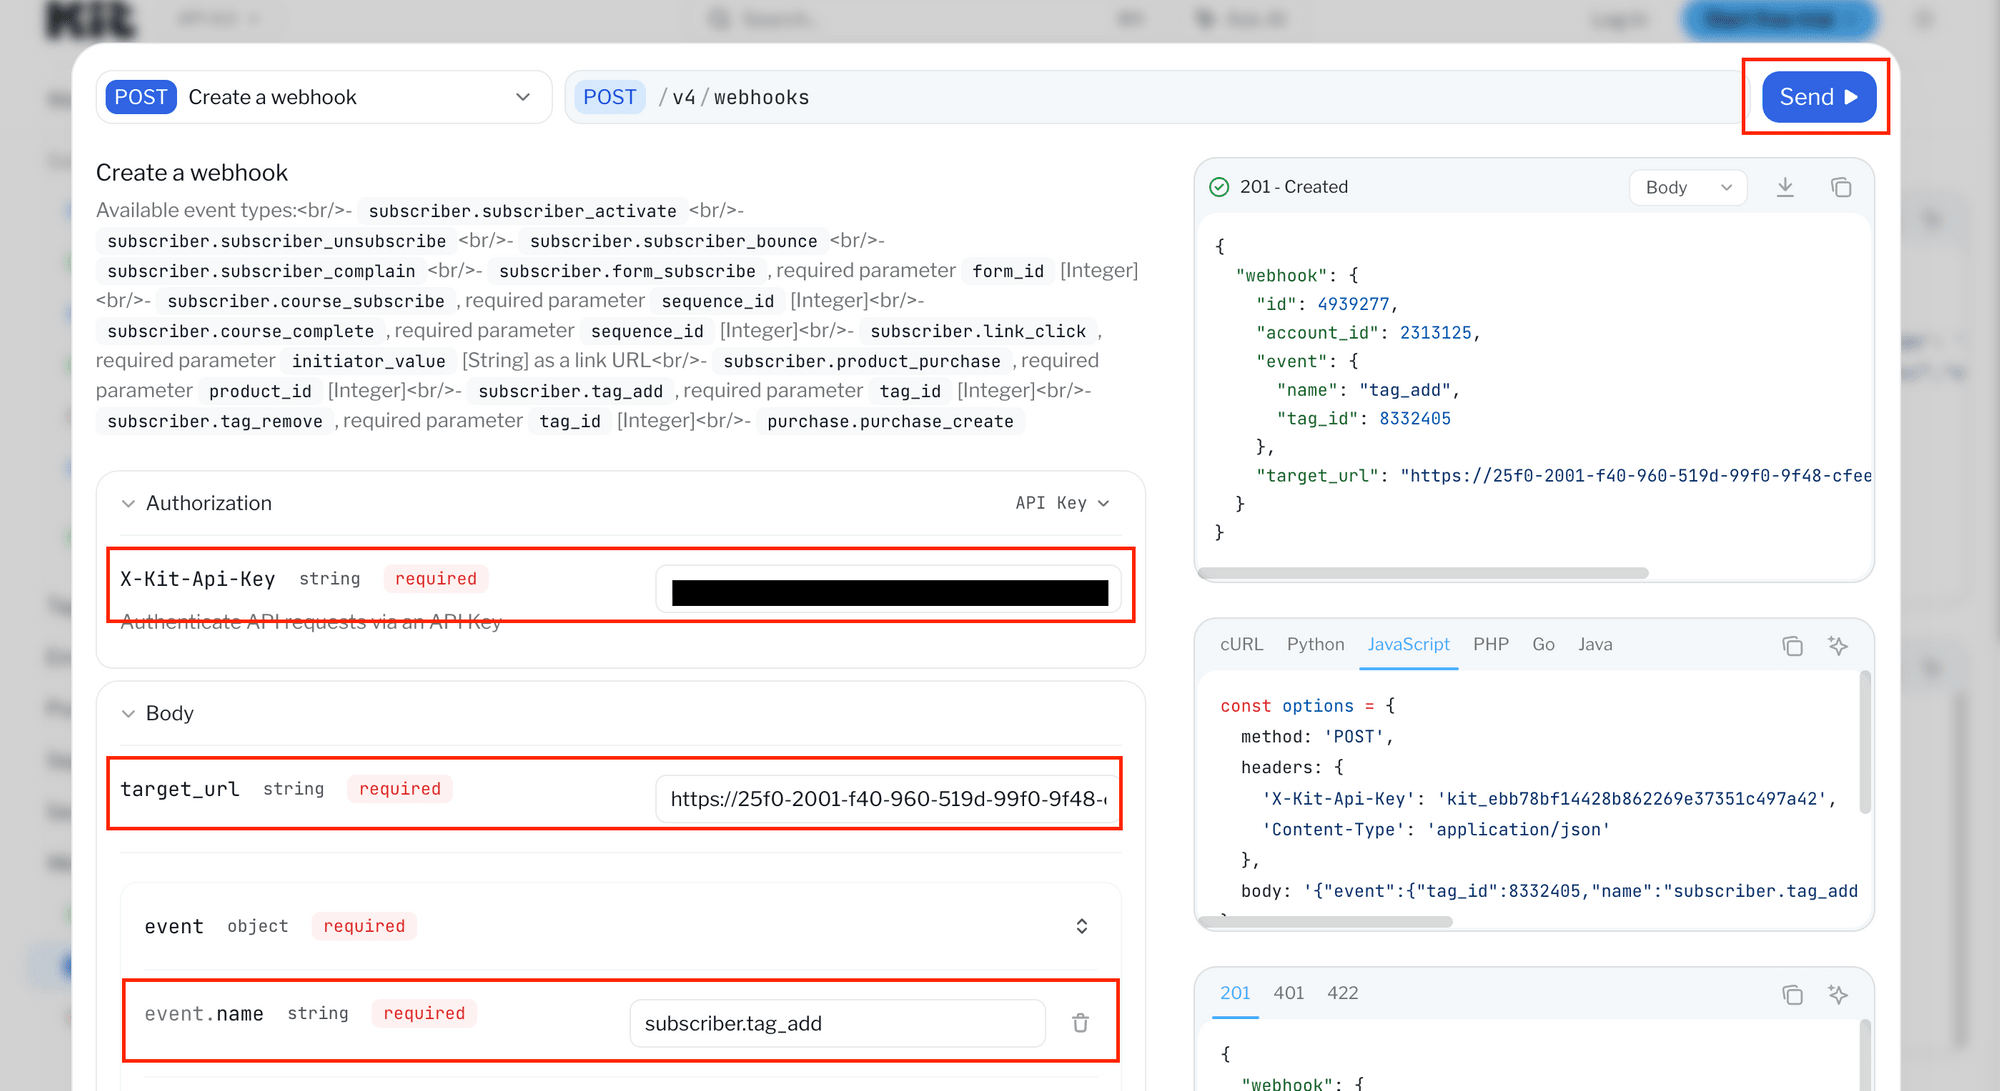
In the API Playground, fill in the fields as below:
X-Kit-Api-Key: Your Kit API keytarget_url: The URL that will receive the webhookevent.name: Typesubscriber.tag_addevent.tag_id: The tag ID you created earlier
To expose your localhost to receive the webhook, just run this command in your terminal/command prompt:
ngrok http 3000
🐱 Meow Memo: If your localhost isn't running on port 3000, just update it to match the port you're using.
You’ll get a public URL like:
https://abc123.ngrok-free.app
So, if your endpoint for receiving the webhook is /webhook/generate-video, your target_url would be:
https://abc123.ngrok-free.app/webhook/generate-video
Step 4. Create Custom Fields
To store the video and thumbnail URLs for each subscriber, you’ll need to create two custom fields. From your Kit dashboard, go to Grow > Subscribers , click on any subscriber, and add two fields named thumbnail_url and video_url. This way, we can update these fields to store the URLs later using the API.

Part 3. Create an Express Server to Handle the Webhook
Now, let’s build an Express server that will receive webhook data from Kit, call the Clipcat API to generate a personalized video, and update the subscriber’s custom fields with the video and thumbnail URLs.
The logic is separated into three files to keep things modular and maintainable:
index.js: The main server and webhook handlerclipcat.js: Handles video generation via the Clipcat APIkit.js: Handles subscriber updates and tag removal in Kit
Step 1. Create the Project Directory
In your terminal/command prompt, run the command below to create a new project directory and navigate to the folder:
mkdir newsletter-video-automation
cd newsletter-video-automation
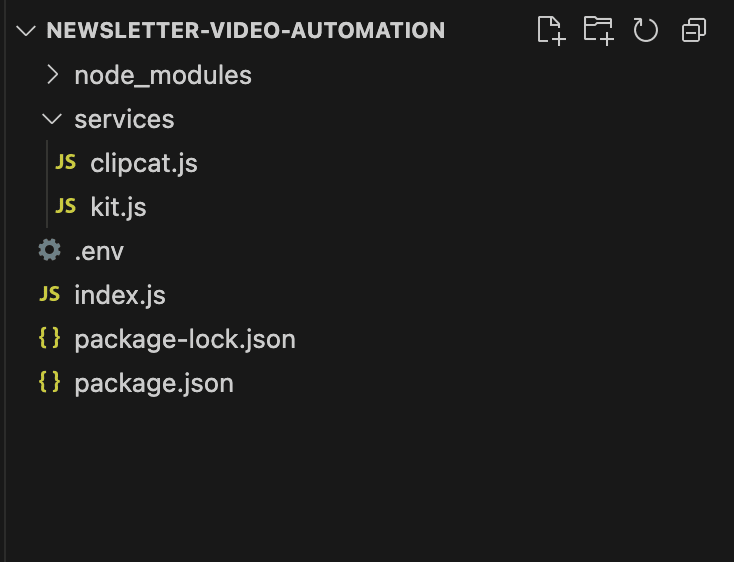
In the folder, create files following the file structure below:
├── index.js # Entry point of your server
├── services
│ ├── clipcat.js # Handles video generation with Clipcat API
│ └── kit.js # Handles Kit subscriber updates
├── .env # Stores your API keys and config
Step 2. Initialize the Project
In the same folder, run the command below to set up a new Node.js project and install all the dependencies you'll need:
npm init -y
npm install express body-parser dotenv
After running the commands above, your folder should look like this:
Step 3. Set Up Your ‘.env’ File
In your .env file, store all the sensitive keys and config settings:
PORT=3000

# Clipcat API
CLIPCAT_API_KEY=your_clipcat_api_key
CLIPCAT_TEMPLATE_ID=your_clipcat_template_id

# Kit API
KIT_API_KEY=your_Kit_api_key
KIT_TAG_ID=your_generate_video_tag_id
🐱 Meow Memo: By using environment variables, you avoid hardcoding sensitive credentials in your codebase. It’s safer and easier to manage.
Step 4. Complete ‘index.js’
This file sets up your main Express server, listens for webhook events from Kit, and handles the whole process: receive subscriber info → generate video → update subscriber with the video and thumbnail URLs → remove the trigger tag.
const express = require('express');
const bodyParser = require('body-parser');
require('dotenv').config();

const { generateVideo } = require('./services/clipcat');
const { updateSubscriber, removeTag } = require('./services/kit');

const app = express();
app.use(bodyParser.json());

app.post('/webhook/generate-video', async (req, res) => {
  res.status(200).json({ message: 'Accepted' }); // place here to avoid re-triggering the webhook
  const subscriber = req.body.subscriber;
  const subscriberName = subscriber.first_name;
  const subscriberId = subscriber.id;
  const subscriberEmail = subscriber.email_address;

  console.log(`Received webhook for subscriber: ${subscriberName}, ${subscriberId}, ${subscriberEmail}`);

  try {
    // Generate video via Clipcat
    const { videoUrl, thumbnailUrl } = await generateVideo(subscriberName);
    console.log('Video URL: ' + videoUrl);
    console.log('Thumbnail URL: ' + thumbnailUrl);

    // Update subscriber in Kit
    await updateSubscriber(subscriberId, subscriberEmail, videoUrl, thumbnailUrl);
    await removeTag(subscriberId, process.env.KIT_TAG_ID);
  } catch (err) {
    console.error(err.message);
    res.status(500).json({ error: 'Internal error' });
  }
});

app.listen(process.env.PORT, () => console.log(`Server running on port ${process.env.PORT}`));
🐱 Meow Memo: The
res.status(200)response is returned immediately to prevent Kit from retrying the webhook while video rendering is still in progress.
Step 5. Complete ‘clipcat.js’
The generateVideo() function in this file calls the Clipcat API to generate a video using the template we set up earlier, but changing the name object to the subscriber’s name. After that, we’ll keep polling Clipcat's /renders/${videoId} endpoint to check when the result. Once the video generation is done, the function will return both the video URL and the thumbnail (preview) URL:
require('dotenv').config();

async function generateVideo(name) {
  console.log('Generating video...');
  var data = {
    template: process.env.CLIPCAT_TEMPLATE_ID,
    modifications: [
      {
        scene: 'Greetings',
        object: 'name',
        text: name,
      },
    ],
  };
  const res = await fetch('https://api.clipcat.com/v1/renders', {
    method: 'POST',
    body: JSON.stringify(data),
    headers: {
      'Content-Type': 'application/json',
      Authorization: `Bearer ${process.env.CLIPCAT_API_KEY}`,
    },
  });
  const resData = await res.json();
  const videoId = resData.uid;

  let videoUrl, thumbnailUrl;

  while (!videoUrl && !thumbnailUrl) {
    console.log(`Polling the result for videoID: ${videoId}...`);
    const pollingRes = await fetch(`https://api.clipcat.com/v1/renders/${videoId}`, {
      method: 'GET',
      headers: {
        Authorization: `Bearer ${process.env.CLIPCAT_API_KEY}`,
      },
    });
    const pollingData = await pollingRes.json();
    if (pollingData.status == 'completed') {
      videoUrl = pollingData.url;
      thumbnailUrl = pollingData.preview;
    }

    await new Promise((resolve) => setTimeout(resolve, 5000));
  }

  return { videoUrl, thumbnailUrl };
}

module.exports = { generateVideo };
Step 6. Complete ‘kit.js’
This file contains two functions:
updateSubscriber()— updates the subscriber’s custom fields with the video and thumbnail URLs generated by Clipcat.-
removeTag()— removes the tag from the subscriber so you can reapply it again in the future.require('dotenv').config();
async function updateSubscriber(id, email, videoUrl, thumbnailUrl) { var data = { email_address: email, fields: { video_url: videoUrl, thumbnail_url: thumbnailUrl, }, };
await fetch(
https://api.kit.com/v4/subscribers/${id}, { method: 'PUT', headers: { 'X-Kit-Api-Key': process.env.KIT_API_KEY, 'Content-Type': 'application/json' }, body: JSON.stringify(data), }); }async function removeTag(subscriberId, tagId) { console.log(
Removing tag (${tagId}) from subscriber (${subscriberId}) ...);const options = { method: 'DELETE', headers: { 'X-Kit-Api-Key': process.env.KIT_API_KEY } };
const res = await fetch(
https://api.kit.com/v4/tags/${tagId}/subscribers/${subscriberId}, options); if (!res.ok) { const errorText = await res.text(); // fallback in case there's no JSON throw new Error(Failed to remove tag: ${res.status} - ${errorText}); } console.log("Tag removed successfully"); }module.exports = { updateSubscriber, removeTag };
Step 7. Run the Server
Start the server locally by running the command below in your terminal/command prompt:
node index.js
Once this is running, adding the generate_video tag to a subscriber in Kit will trigger the flow. It’ll generate a video using the subscriber’s name, then update their custom fields (video_url and thumbnail_url) with the result.
🐱 Meow Memo: Make sure that your locally-hosted server is exposed using ngrok and the public URL matches the one you set as the webhook’s target URL. Otherwise, the webhook won’t reach your server.
Part 4. Use the Video and Thumbnail in Your Emails
With video_url and custom_url saved to each subscriber’s profile, you can now reference them in email broadcasts using the Liquid template language in an HTML block:
<a href="{{ subscriber.video_url }}" style="position: relative; display: inline-block;">
  <img src="{{ subscriber.thumbnail_url }}" alt="Play" style="width:600px;">
</a>
<p>Click <a href="{{ subscriber.video_url }}">here</a> to watch the video.</p>
Here’s what the email will look like when the subscriber receives it:
🐱 Meow Memo: View the full code on GitHub.
Bonus Tip: Use a Play Button Thumbnail for Better Engagement
You might be wondering, “Can I embed the video directly in the email?” Unfortunately, most email clients don’t support embedded videos, and overlaying a play button using HTML/CSS inside the email body isn’t reliably supported either.
To work around this, you can use an image thumbnail with a play button already added to the image itself, then link it to the video URL. It looks like a playable video, even though it's technically just a clickable image.

To do this, you can use an image generation API like Bannerbear to automatically create an image with the subscriber’s name on it. Once the image is generated, just save the result and use it in your Kit email, just like how you did with the video.
🐱 Meow Memo: We’re not going into those steps in this tutorial since image manipulation isn’t the main focus. However, if you’re looking to enhance the outcome, it’s a great next step to explore!
Conclusion
Personalized content is one of the best ways to build stronger relationships with your subscribers, and with this setup, you can automate the process at scale. Once you’ve got everything running smoothly, you can reuse the same workflow for different use cases, such as:
- After someone checks out
- When a membership gets renewed
- As part of a re-engagement campaign for inactive users
Clipcat has a wide selection of templates in its library. Feel free to explore and pick one that matches your brand or campaign style. If you haven’t already, sign up for a Clipcat account and see how easy it is to bring personalised video content into your next campaign!