A Beginner’s Guide to FFmpeg-Python: How to Crop and Resize Videos
Contents
Working with video files usually requires some processing. It could be a full editing project with subtitles, effects, and transitions, or just simple tweaks like cropping unwanted edges or resizing videos to fit various screen sizes and platform requirements. No matter the scale, these tasks are important for video editing, content creation, and media automation.
FFmpeg is one of the most powerful tools for developers to create these video editing features. But if you’re working with it in Python and running FFmpeg commands directly using the subprocess module, the code can be hard to read and tricky to manage as the video editing task gets more complex.
The ffmpeg-python library offers a cleaner and more maintainable way to work with FFmpeg in Python. It wraps FFmpeg’s functions into Python objects and methods, so you can create video processing pipelines without dealing with complicated raw command lines. This makes the code simpler to read and easier to manage.
In this article, we’ll learn how to crop and resize videos using the ffmpeg-python library, including cropping specific areas, resizing while maintaining aspect ratio, combining operations in a filter chain, and more.
Setting Up the Environment
Before you can start cropping and resizing videos with ffmpeg-python, you need to make sure both FFmpeg and the Python wrapper (ffmpeg-python) are installed on your machine:
- FFmpeg is the actual engine that handles all the video and audio work, like reading files, trimming, encoding, and more.
- ‘ ffmpeg-python’ is the Python wrapper that lets you build FFmpeg commands using Python code, so you don’t have to write them out in the command line.
Step 1. Install FFmpeg
Follow this step-by-step guide to install FFmpeg on your Mac, Windows, or Ubuntu/Linux. Once it’s installed, you can run ffmpeg -version in your terminal/command prompt to verify the installation.
Step 2. Install ‘ffmpeg-python’
You can install the wrapper using pip:
pip install ffmpeg-python
This package gives you access to a Pythonic interface to FFmpeg's functionalities.
Step 3. Test Your Setup
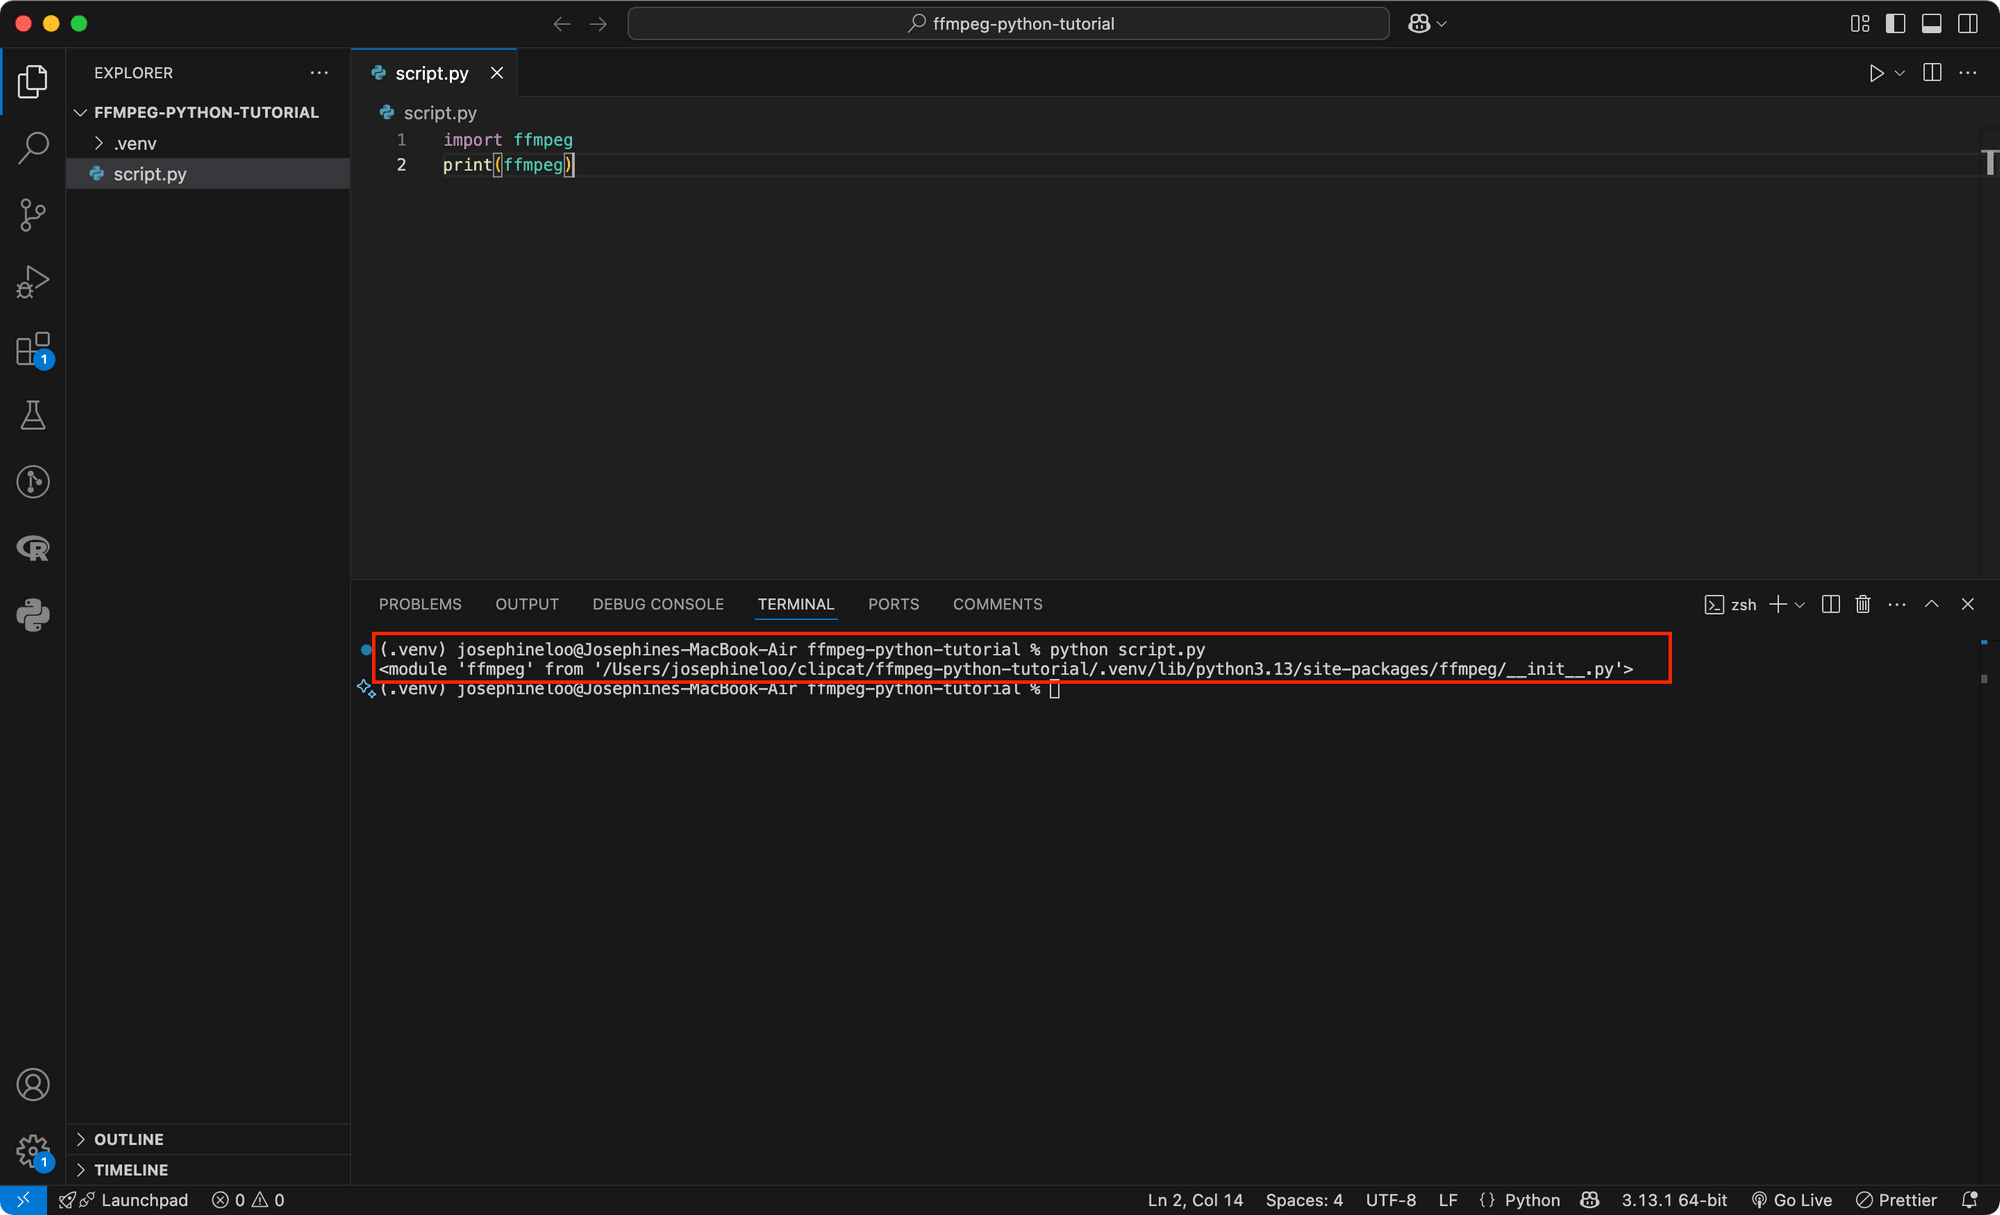
Open a Python shell or script and execute the code below:
import ffmpeg
print(ffmpeg)
If this runs without error, your setup is complete!
Understanding Cropping and Resizing with FFmpeg
Before jumping into code, let’s take a quick look at some of the FFmpeg flags you’ll often use when cropping and resizing videos:
i: Specifies the input video file.vf: Short for video filter, this flag is used to apply transformation filters likecrop,scale, orcropdetect.crop=w:h:x:y: Crops the video to a widthwand heighth, starting from coordinates(x, y)(top-left origin).scale=w:h: Resizes the video to widthwand heighth. Use1for automatic scaling to maintain aspect ratio.in_w/in_h: Dynamic variables that represent the input video’s width and height. Helpful when you don’t want to hardcode dimensions.ffprobe: A separate tool that comes with FFmpeg, used to inspect media files (like checking a video’s width and height).
Even though we won’t be using the flags exactly like how they’re written in CLI commands, it’s still helpful to understand them. Once you get the idea, it becomes much easier to write the equivalent in Python using the ffmpeg-python library.
Checking Original Video Dimensions with ‘ffprobe’
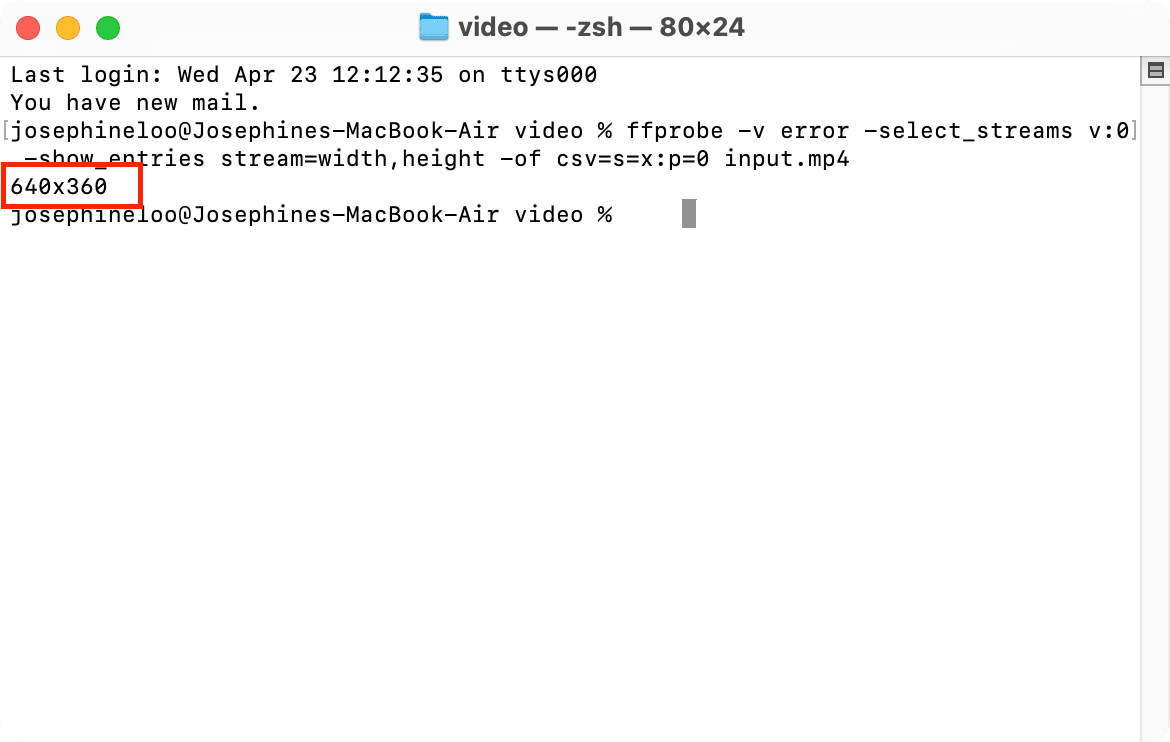
Before cropping or resizing, it’s useful to check the input video’s dimensions. You can do this with ffprobe:
ffprobe -v error -select_streams v:0 -show_entries stream=width,height -of csv=s=x:p=0 input.mp4
Running the CLI command above will return you the video’s dimensions:
If you want to do it in Python, use the code below:
import ffmpeg

def get_video_dimensions(path):
    probe = ffmpeg.probe(path)
    video_stream = next(s for s in probe['streams'] if s['codec_type'] == 'video')
    width = int(video_stream['width'])
    height = int(video_stream['height'])
    return width, height

print(get_video_dimensions('input.mp4')) # Output: (width, height)
🐱 Meow Memo: Knowing this information before cropping or resizing your videos can help avoid unintended distortions or black bars.
How to Crop Videos Using ‘ffmpeg-python’
Cropping lets you cut out a portion of the video. It is useful for zooming in on a subject, removing unwanted borders, or adjusting frame composition. To crop videos using FFmpeg, we will use the "crop" filter:
Basic CLI Command
ffmpeg -i input.mp4 -vf "crop=w:h:x:y" output.mp4
To do the same thing in Python using ffmpeg-python, here’s how:
import ffmpeg

(
    ffmpeg
    .input('input.mp4')
    .filter('crop', w, h, x, y)
    .output('output.mp4')
    .run()
)
Since ffmpeg-python provides shorthand notation for some commonly used filters like crop, you can also write:
import ffmpeg

(
    ffmpeg
    .input('input.mp4')
    .crop(x, y, w, h)
    .output('output.mp4')
    .run()
)
🐱 Meow Memo: When using the shorthand method, the order of the parameters (
x,y,w,h) is different compared to using the.filter()operator, so do take note!
Let’s look at some examples…
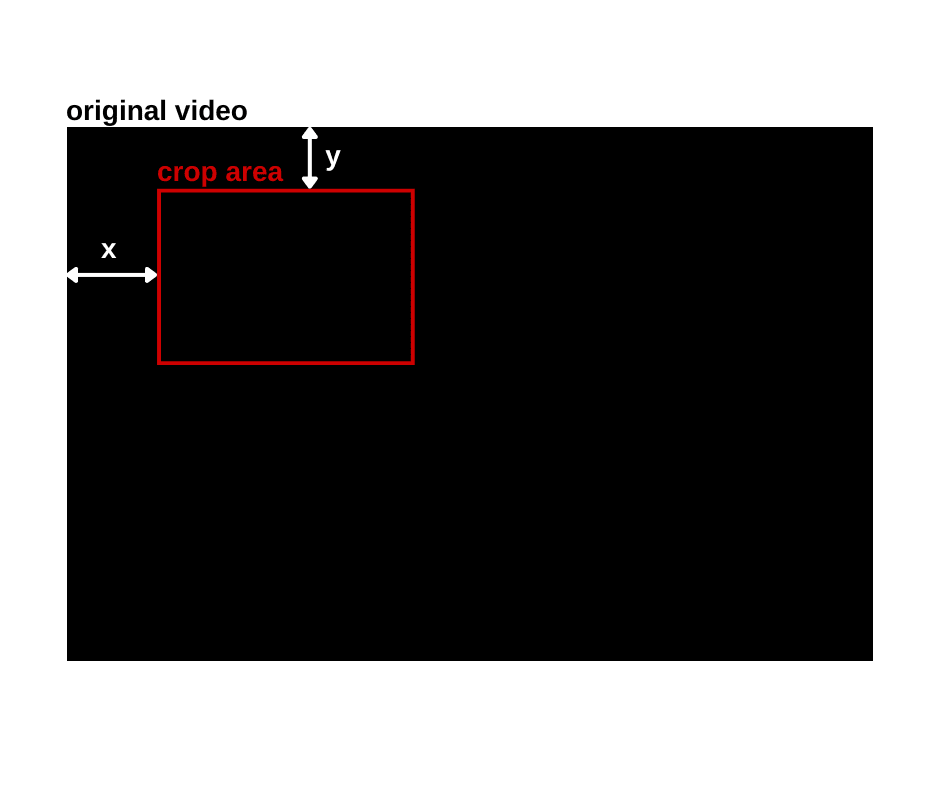
Example 1: Crop from Specific Coordinates
The code below does the same thing as the previous one, but this time with actual values for w, h, x, and y. It crops the video to 640x480 at 100 pixels from the left and 50 pixels from the top:
import ffmpeg

(
    ffmpeg
    .input('input.mp4')
    .filter('crop', 640, 480, 100, 50) # w, h, x, y
    .output('output.mp4')
    .run()
)
Example 2: Center Crop
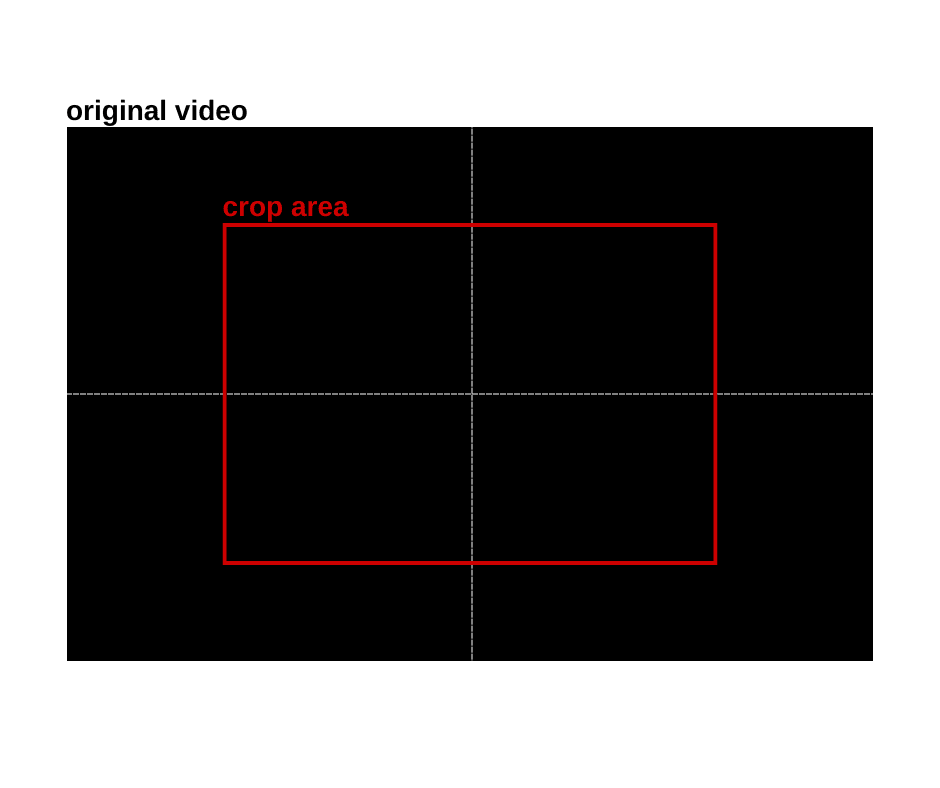
To crop the video from the center, we can use the dynamic variables in_w and in_h to get the input video’s width and height and work from there. Here’s how to crop the center portion of the input video to 1280x720:
import ffmpeg

(
    ffmpeg
    .input('input.mp4')
    .filter('crop', 1280, 720, 'in_w/2-640', 'in_h/2-360') # w, h, x, y
    .output('output.mp4')
    .run()
)
We need to start the crop in the middle of the video ( in_w/2, in_h/2) minus half the crop width (640) and height (360), so that the crop is centered:
🐱 Meow Memo: Make sure the new dimensions are smaller than the original ones!
Example 3: Dynamic Crop
Not only can we use the dynamic variables in_w and in_h to specify the coordinates, but we can also use them to set the dimensions dynamically. For example, the command below crops the video to half of its size, right from the center, no matter what the input video’s original dimensions are:
import ffmpeg

(
    ffmpeg
    .input('input.mp4')
    .filter('crop', 'in_w/2', 'in_h/2', 'in_w/2-(in_w/2)', 'in_h/2-(in_h/2)') # w, h, x, y
    .output('output.mp4')
    .run()
)
🐱 M eow Memo: If you have black borders around your video, try using the ‘cropdetect’ filter for finding the position (x, y) and crop size (w:h) dynamically.
How to Resize Videos Using ‘ffmpeg-python’
Resizing is often needed when preparing videos for different screen sizes or platforms (e.g., YouTube Shorts, Instagram Reels, web thumbnails). To do that, we will use the scale filter:
Basic CLI Command
ffmpeg -i input.mp4 -vf "scale=w:h" output.mp4
Here’s how to do the same thing in Python using ffmpeg-python:
import ffmpeg

(
    ffmpeg
    .input('input.mp4')
    .filter('scale', w, h)
    .output('output.mp4')
    .run()
)
Let’s look at some examples…
Example 1: Basic Resize
The code below sets the video to a new dimension—1200x720, regardless of its original aspect ratio:
import ffmpeg

(
    ffmpeg
    .input('input.mp4')
    .filter('scale', 1280, 720)
    .output('output.mp4')
    .run()
)
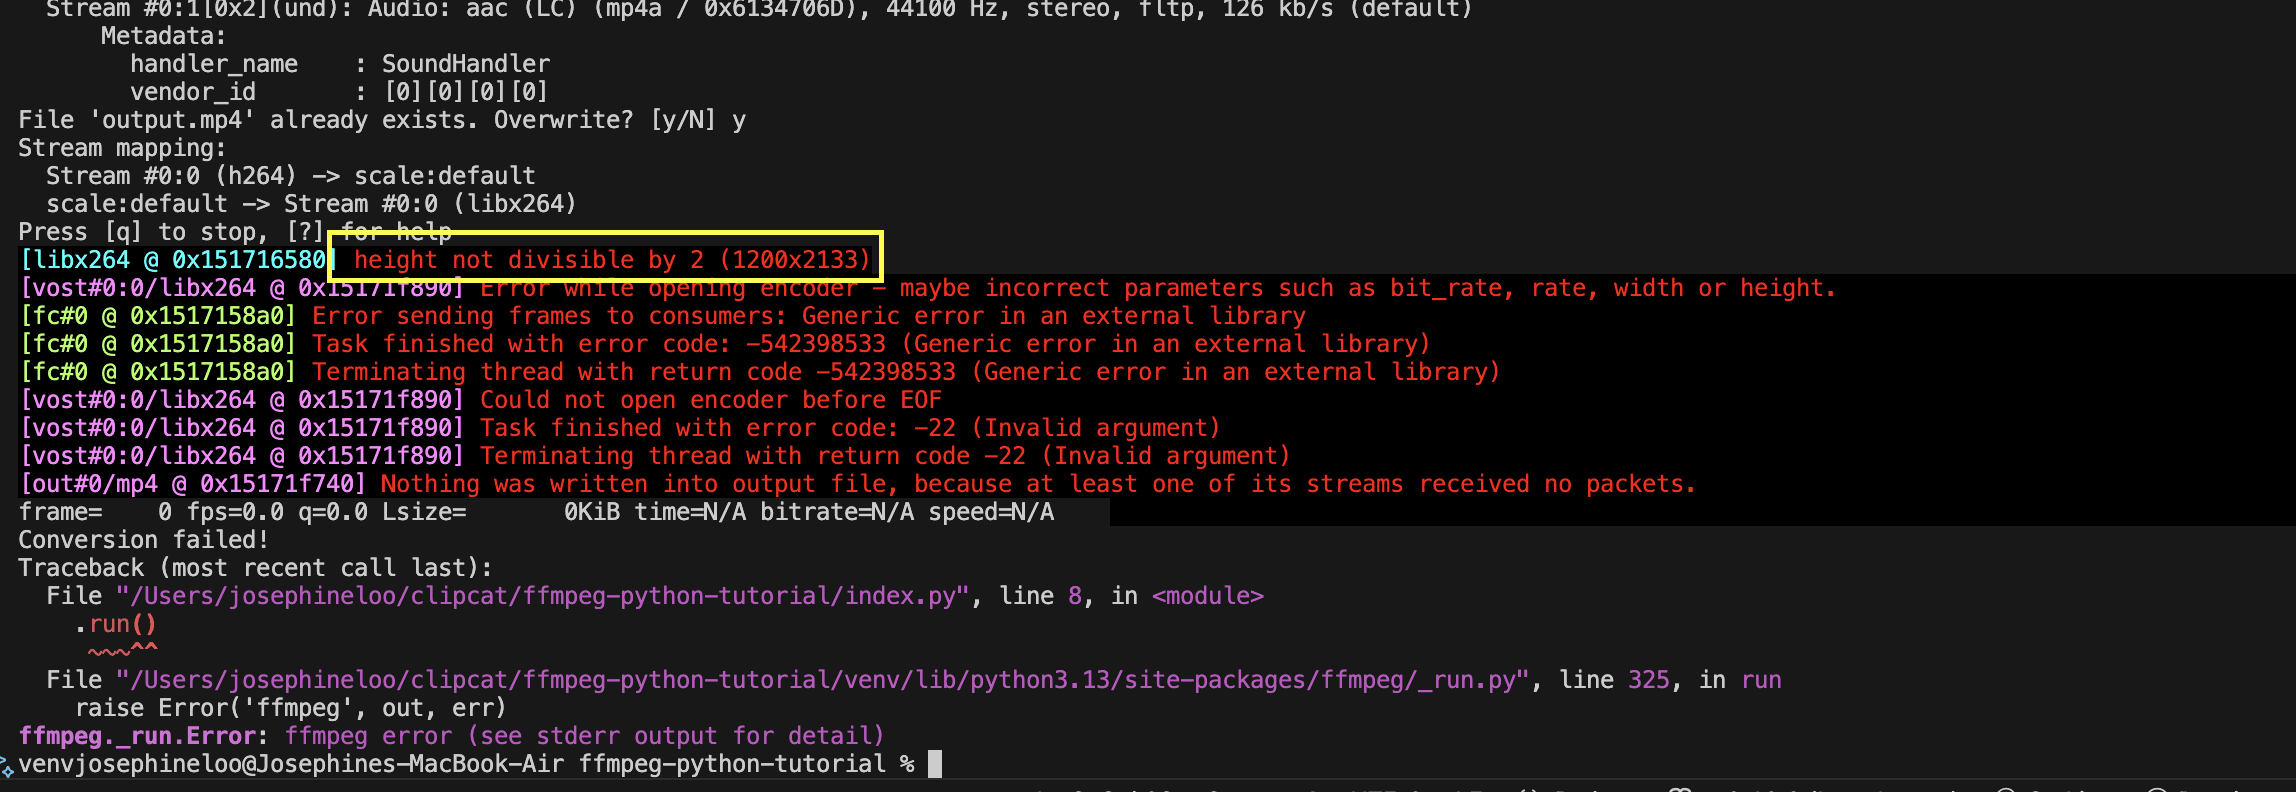
Example 2: Resize by Width (Maintain Aspect Ratio)
To adjust the width but keep the original aspect ratio, you can use the code below. FFmpeg will automatically calculate the height based on the original aspect ratio:
import ffmpeg

(
    ffmpeg
    .input('input.mp4')
    .filter('scale', 1200, -1)
    .output('output.mp4')
    .run()
)
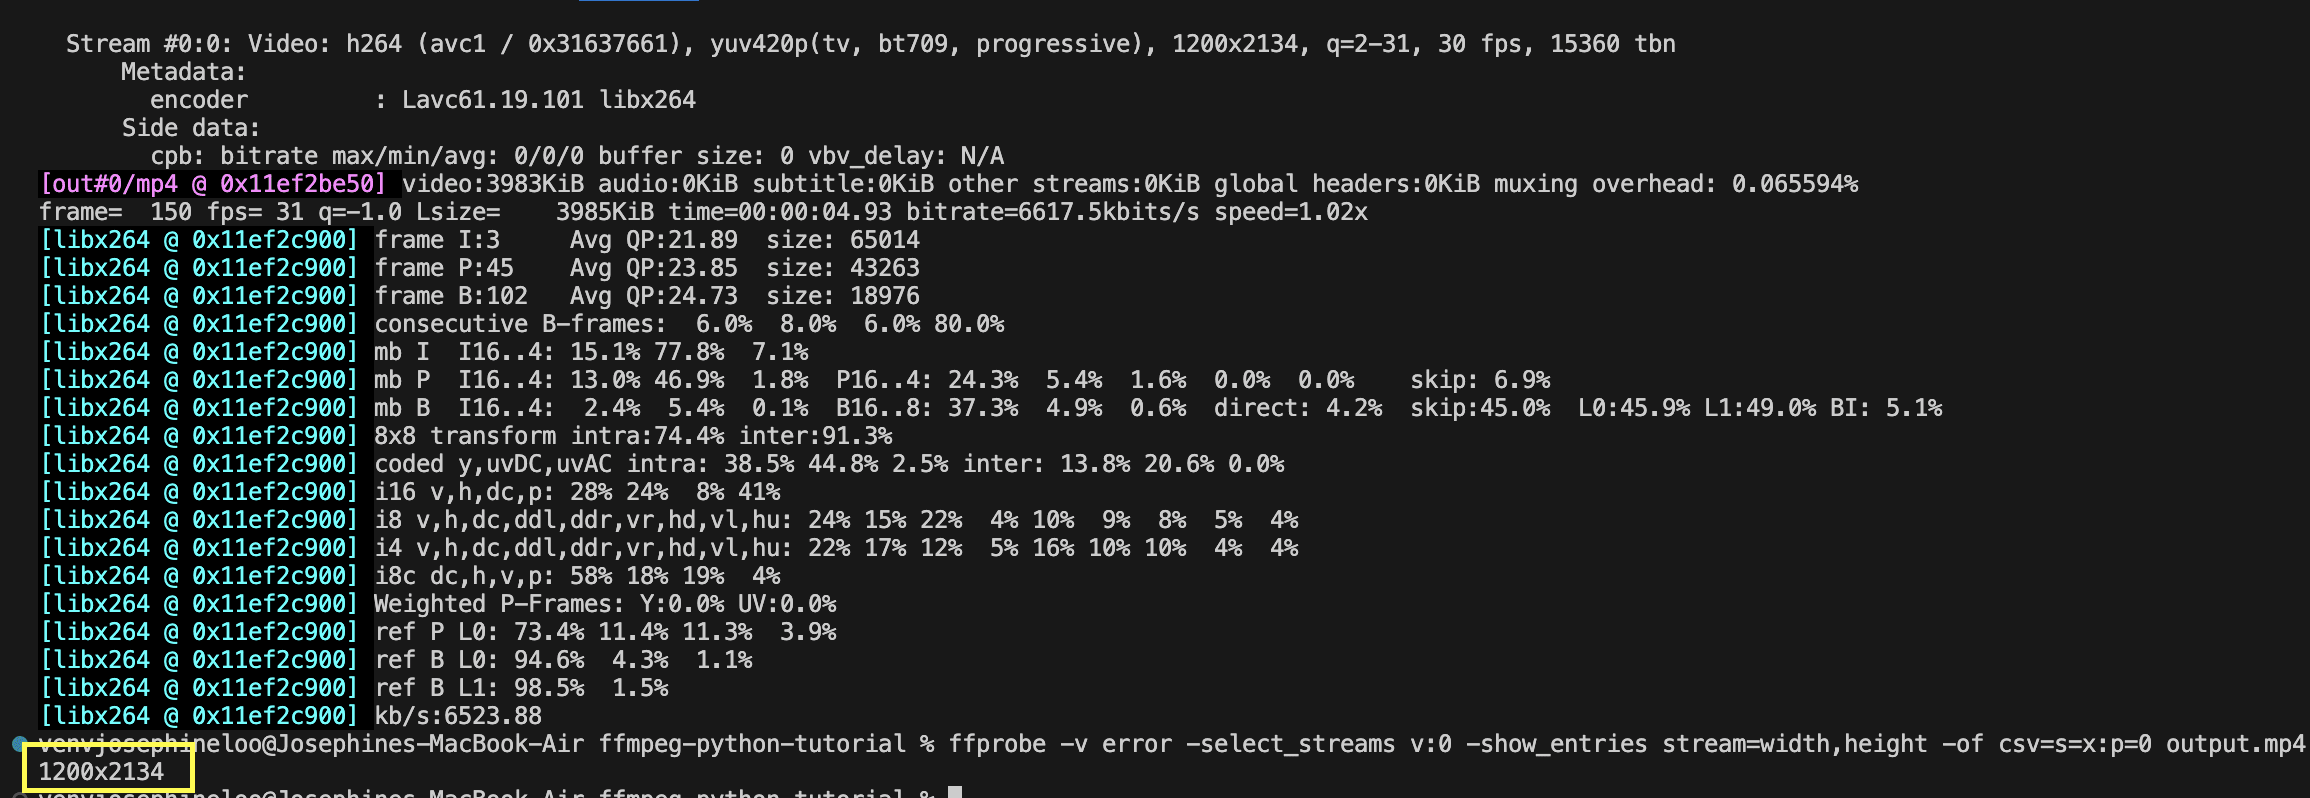
Depending on the size of your input video, you might get an error like “height not divisible by 2” when you try to resize it:
To fix this, set the height to -2. This will automatically adjust the height to the nearest even number after scaling:
import ffmpeg

(
    ffmpeg
    .input('input.mp4')
    .filter('scale', 1200, -2)
    .output('output.mp4')
    .run()
)
The screenshot below shows that the new height has been adjusted to an even number that is divisible by two:
Example 3: Resize by Height (Maintain Aspect Ratio)
To set the height and maintain the aspect ratio, do it the other way round:
import ffmpeg

(
    ffmpeg
    .input('input.mp4')
    .filter('scale', -1, 720)
    .output('output.mp4')
    .run()
)
🐱 Meow Memo: If you get the “
height not divisible by 2” error, the solution is the same. Just set the width to-2.
Combine Crop and Resize Using ‘ffmpeg-python’
You can also crop and resize a video in one step. For example, if you want to crop a specific area from the original video and then scale it to fit the right resolution for platforms like TikTok, YouTube, or Instagram, you can simply chain the filters together:
import ffmpeg

(
    ffmpeg
    .input('input.mp4')
    .filter('crop', 1280, 720, 'in_w/2-640', 'in_h/2-360') # center crop
    .filter('scale', 640, 360)
    .output('output.mp4')
    .run()
)
Bonus: Automating Batch Cropping and Resizing in Python
If you're handling multiple videos, like a folder full of user-submitted clips or product reels, you can use a simple loop to go through each file in the folder, apply your crop and resize filters, and then save the processed videos into another folder. Here’s how:
import os
import ffmpeg

input_folder = './input'
output_folder = './output'

os.makedirs(output_folder, exist_ok=True)

for file in os.listdir(input_folder):
    if file.endswith('.mp4'):
        input_path = os.path.join(input_folder, file)
        output_path = os.path.join(output_folder, file)

        (
            ffmpeg
            .input(input_path)
            .filter('crop', 1280, 720, 'in_w/2-640', 'in_h/2-360')
            .filter('scale', 640, 360)
            .output(output_path)
            .run()
        )
🐱 Meow Memo: This will be handy if you're building content pipelines or integrating FFmpeg into Python backend workflows.
Automating Video Editing with Templates and APIs
While FFmpeg gives you powerful control over cropping, resizing, and other media manipulation functions, it might not be the most practical choice if your goal is to let users generate dynamic videos with custom content like names, quotes, or uploaded images. Instead of building everything from scratch with FFmpeg, try using Clipcat.

Clipcat is a video generation tool that lets you create videos programmatically using templates. You only need to design the video template once, then use its API to dynamically update elements like text (e.g., titles, captions, quotes), images (e.g, profile pictures, logos, product photos), and videos (e.g., user-uploaded clips or animated backgrounds).
This makes it perfect for use cases like:
- Auto-generating promotional videos for new products
- Creating personalized thank-you or testimonial videos
- Generating UGC-style content at scale for social media
Here are some examples of the video templates:
Customer Review Template
Real Estate Listing Template
Breaking News Template
It’s a faster and more efficient way to create personalised videos without manually editing clips. The best part is, you can easily integrate it into your Python application or workflow using the API!
Conclusion
Cropping and resizing might sound like simple tasks, but they’re essential for any video workflow whether you’re prepping clips for social media, automating content for different screen sizes, or building your own editing tool.
The ffmpeg-python library lets you handle these operations cleanly in Python using a more readable and maintainable approach compared to raw CLI commands. I hope this guide helps you get started with ffmpeg-python to crop, resize, or build more advanced video editing application and workflow in Python.
🐱 Meow Memo: If you want to try Clipcat for your video projects, sign up here and get 100 free API credits to get started!